There are many reliable ways for an online multi-vendor marketplace to generate hefty profits. One of them is by using commissions. Another is through the strategic use of WooCommerce membership subscriptions.
Here’s the good news: Membership subscriptions offer a powerful avenue for sustainable growth and profitability. After all, they encourage your vendors to make repeat purchases to keep enjoying the benefits that your marketplace offers.
The even better news? Two of WC Vendors Pro’s tools – namely WC Vendors Membership and WC Vendors WooCommerce Subscriptions – make it easy for marketplace owners to create and sell membership plans to their vendors. And today, we’ll show you how to use these tools so that you can enjoy a generous income stream in no time!
So let’s dive in!
Charging Vendors In Your Marketplace Via Membership Subscriptions
Essentially, a membership subscription is a recurring fee that vendors pay to be part of and gain access to your platform.
In this strategic arrangement, vendors subscribe to your marketplace to leverage its tools, ecosystem, and customer base. In turn, this allows them to:
- Showcase and sell their products or services
- Tap into your platform’s marketing prowess
- Reach a wider audience
Best of all, they can do all this while contributing to your marketplace’s overall prosperity!
To retain their membership and keep enjoying the benefits of your platform, a vendor must pay you regularly. Thus, one of the best reasons to use the subscription model is the guarantee that you’ll be getting recurring revenue.
In addition, as vendors opt for various subscription tiers, they unlock specific features and opportunities that match their business needs. In other words, membership subscriptions are a great way for you to grant your vendors control over their selling abilities and commission rates.
Thankfully, WC Vendors Membership empowers you with a sophisticated membership subscription system that puts you in control of how vendors engage and participate in your platform’s success. And today, we’re going to show you how to use said system.
Our Guide On How To Use Membership Subscriptions To Charge Your Marketplace Vendors
Membership subscriptions can be extremely lucrative. But how do you implement them in your marketplace?
To benefit from the subscription system described in this guide, you’ll need the following tools:
- WordPress: This serves as the foundation of your website.
- WooCommerce: This powerful plugin transforms WordPress sites into online stores with robust e-commerce functionality.
- WC Vendors Pro: This popular WooCommerce plugin can turn a regular online store into a multi-vendor marketplace. With it, you can download the next two tools.
- WC Vendors Membership: This lets you create and sell diverse WooCommerce membership subscriptions to your vendors
- WC Vendors WooCommerce Subscriptions: This allows you to turn your marketplace into a subscription box service.
Make sure you download, install, and activate the latest version of each of the above plugins.
Lastly, for WC Vendors Membership to work, you should have at least one payment method that supports subscriptions. If you want to know how to set up a payment method, check out this WooCommerce guide.
With all that in mind, let’s start the tutorial!
Step 1: Set your marketplace up for memberships
Your first order of business is to ensure that your marketplace is capable of supporting WooCommerce membership subscriptions. This means you’re going to have to determine your marketplace’s Membership settings.
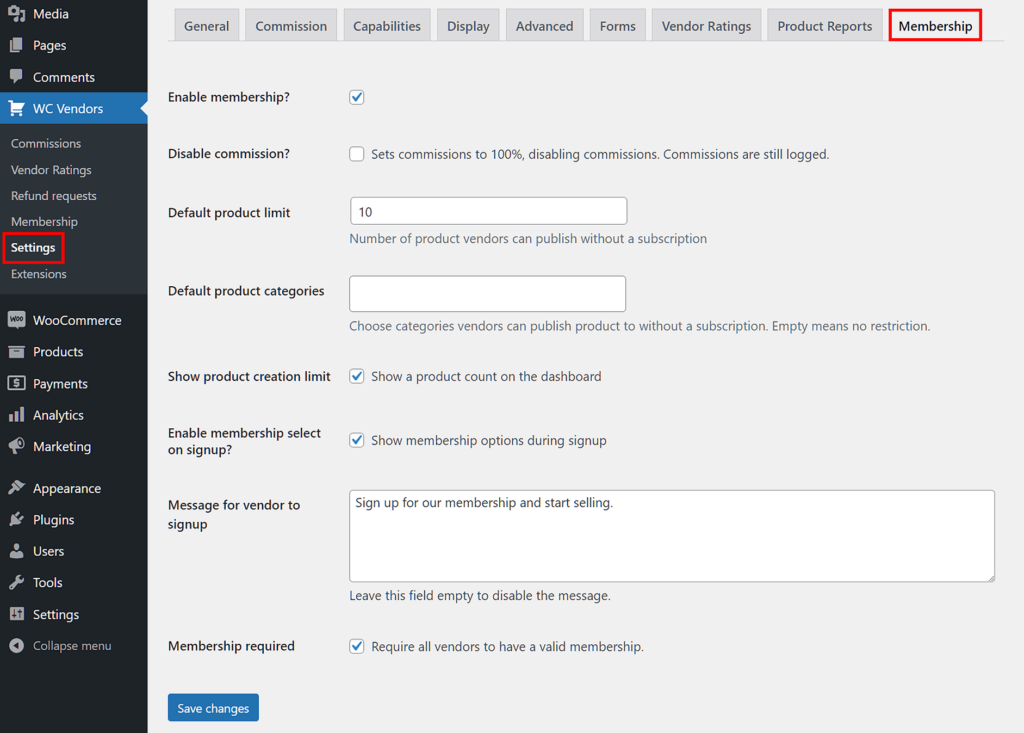
On your WordPress dashboard, click WC Vendors > Settings, then select the Membership tab.
As you can see, the Membership settings feature various options that you can use to give shape to your ideal marketplace. Let’s explore these options in further detail!
Enable membership?
Enabling this option by ticking its checkbox makes your marketplace membership-capable. If your goal is to create WooCommerce membership subscriptions, you must enable this.
Disable commission?
Ticking this option’s checkbox makes membership-based commissions override all other commission settings, such as those found in WC Vendors > Settings > Commission. This means only membership commissions will be in effect in your marketplace.
Tick this checkbox if you want your marketplace to be membership-only (or, in other words, if you want to require all vendors to become subscribed members before being able to sell on your platform).
Default product limit
You can limit the number of products an unsubscribed vendor can publish on your marketplace. For example, in the image above, a vendor without a membership subscription can sell only ten types of products.
Default product categories
Similarly, you can limit what product categories an unsubscribed vendor can sell. If you don’t want to give your vendors any restrictions, leave the entry field empty. Otherwise, input the product categories you want them to have the ability to sell.
Show product creation limit
This allows vendors to see how many product types they currently have (as well as their product limit) via the Pro Dashboard. For instance, if a vendor has published five products and has a product limit of 30, the Pro Dashboard will show 5/30.
Enable membership select on signup?
When you tick this option’s checkbox, vendors will be able to choose and pay for a membership plan during the vendor registration process.
Otherwise, they’ll have to use the Pro Dashboard to see the WooCommerce membership subscriptions that you’re offering.
Message for vendor to sign up
This allows you to create a notice that vendors will see on their Pro Dashboard. Typically, it’s a good idea to create a message that asks unsubscribed vendors to sign up for a membership plan.
If you don’t want to create a notice, simply leave the entry field blank.
Don’t forget to click the Save changes button once you’re happy with your Membership settings.
Membership required
What happens when this option’s checkbox is ticked? You require vendors to sign up for a membership plan before they can start selling products on your marketplace. Simply put, they won’t be able to sell products on your marketplace without a membership subscription.
If you wish to go this route, it would be best to also tick the Disable commission? checkbox.
Step 2: Create a vendor membership product
Your next step is to create your first vendor membership.
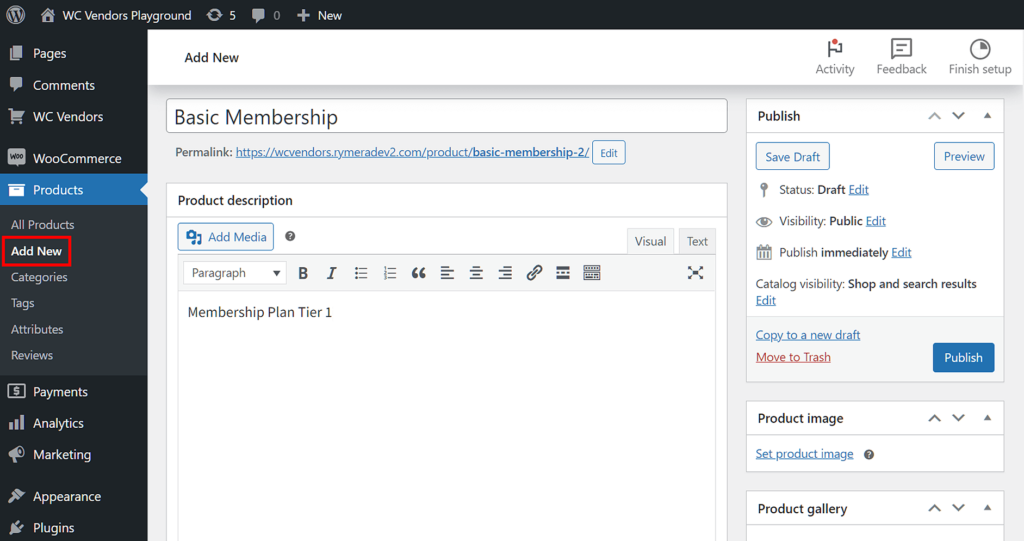
Take note that vendor memberships are essentially products. This means that the process of creating them is no different from adding other types of products to your WooCommerce store. Thus, on your WordPress dashboard, click Products > Add New. This will take you to your product’s Edit Product page.
If you’d like more detailed information on how to create products, head to this WooCommerce documentation.
For our example, we’ll create a “Basic Membership” product – the first level of our membership plan.
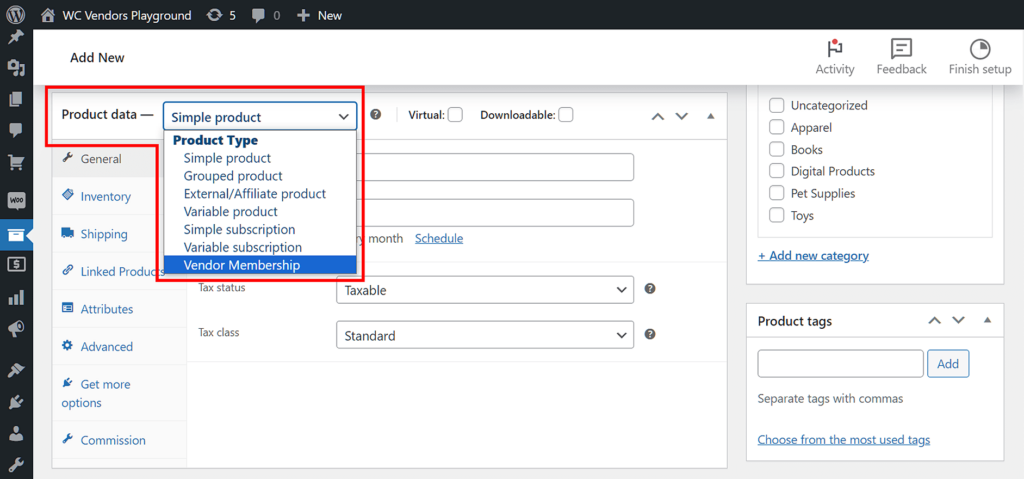
After naming and describing your product, scroll down to the Product Data box, then select “Vendor Membership” from the dropdown menu.
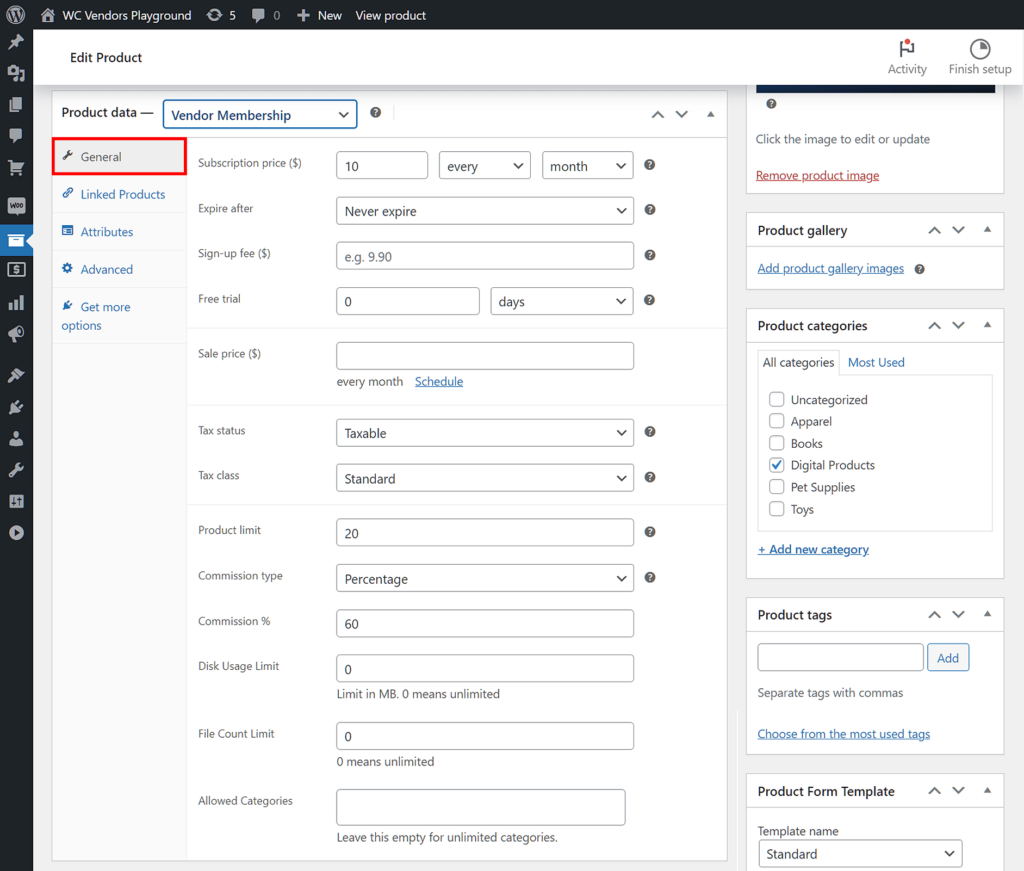
This will turn your product into a vendor membership, opening up a bunch of new options. You can access these options by clicking the General sub-tab.
Let’s discuss what each new option can do for you.
Subscription price ($)
This lets you determine the vendor membership product’s price as well as the billing interval and period.
For instance, in the image above, the vendor has to pay a subscription price of $10 every month to remain a member of our marketplace.
Expire after
If you wish, you can have the subscription automatically expire after a certain amount of time. In our example above, the subscription never expires.
Sign-up fee ($)
You can charge a fee at the start of the subscription. We chose not to charge such a fee in our example.
Free trial
You can give vendors a free trial of the subscription, which can last from days to years depending on your choice.
Product limit
This lets you determine how many products the subscription allows the vendor to publish. In our example, the subscription can sell 20 types of products.
Commission type
This option lets you choose which type of commission to apply to your marketplace. You have five choices:
- Default
- Fixed
- Fixed + Fee
- Percentage
- Percentage + Fee
If you wish to use your default commission, select “Default.” Otherwise, choose any of the other four, which will override the default commission.
In our example, we chose “Percentage” and a Commission % of 60%. This means this subscription awards vendors a 60% cut of every sale they make.
For detailed information on commissions, check out our article, “How To Charge Vendors In Your Marketplace (A Guide To Commissions).”
Disk Usage Limit
You can determine how much disk space a vendor is allowed to use. By setting such limits, you encourage vendors to avoid wasting disk space by uploading relevant files only.
File Count Limit
This lets you decide how many files a vendor can upload to the marketplace. This also encourages vendors to upload only the most important files.
Allowed Categories
A subscription can restrict what product categories a vendor is allowed to sell. If you don’t want to set such restrictions, leave the entry field blank. Otherwise, you’ll have to fill it up with the categories you want them to have access to.
Once you’re done with the settings, publish your vendor membership.
Step 3: Complete your membership plan
Now, it’s a simple matter of creating more vendor memberships so that you can have a complete membership plan. The idea is to create different subscription tiers, with each offering more benefits the more expensive it is. This way, you can encourage vendors to purchase or upgrade to higher membership subscriptions.
The sample subscription we created in Step 2, “Basic Membership,” is the first tier in our membership plan. Its main draws include its affordable price of $10, a product limit of 20 products, and a commission rate of 60%.
Therefore, if we’re going to create two other membership subscriptions, they’ll have to offer more to justify their higher price.
For example, we could price the second tier of our membership plan, “Standard Membership,” at $20. To make up for the higher price, the subscription could offer a higher product limit of 30 products and a higher commission rate of 70%.
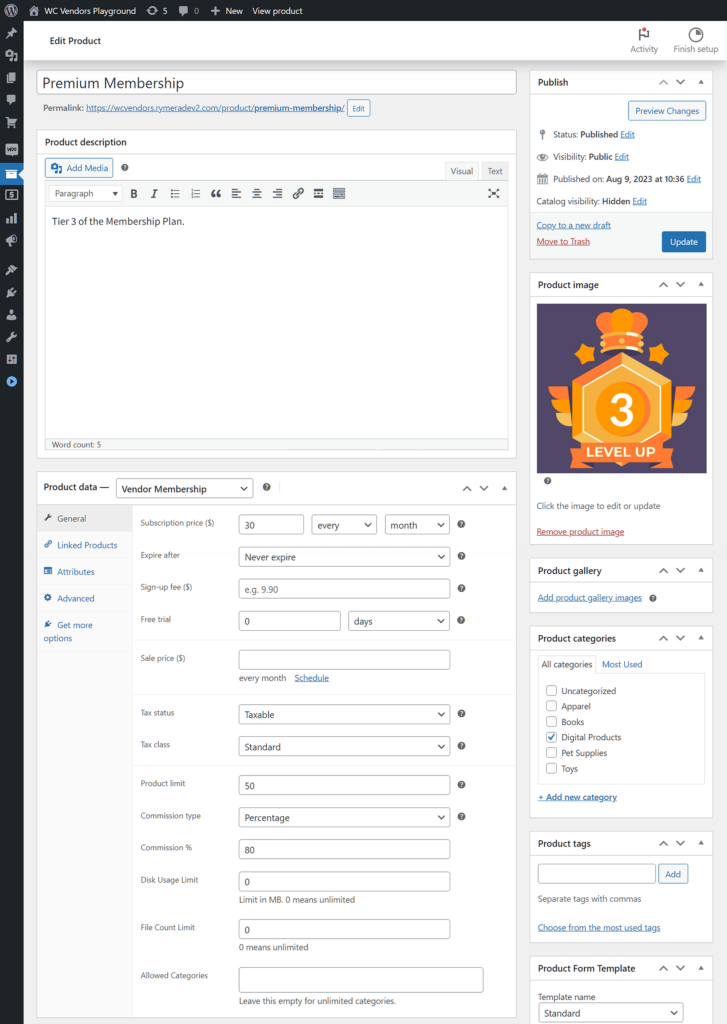
Then, we could price the third tier of the membership plan, “Premium Membership,” at $30. This could offer the best benefits, including a product limit of 50 products and a commission rate of 80%.
Remember to publish each vendor membership you create.
Here are our sample membership plan’s three tiers: “Basic,” “Standard,” and “Premium”:
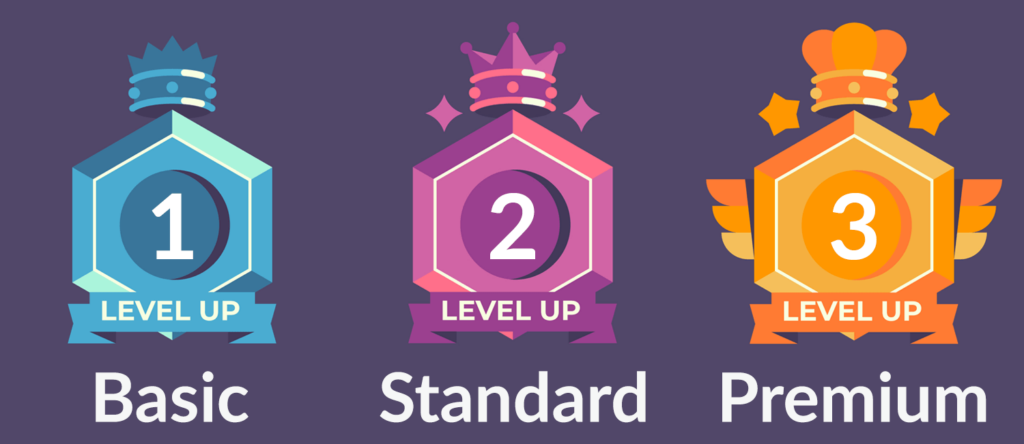
Technically, as long as you’ve already activated and configured a payment gateway such as WC Vendors Stripe Connect, you can start charging vendors via your newly created WooCommerce membership subscriptions. However, we suggest taking one additional step to ensure an effective membership plan.
Step 4: Group your vendor memberships into a single plan
It’s a good idea to give your vendors the ability to upgrade or downgrade their membership subscriptions. Continuing with our example, we can allow vendors to upgrade a “Standard Membership” to a “Premium Membership” or downgrade it to a “Basic Membership” at any time.
To do this, you have to do two things. Firstly, you have to put your vendor memberships together in one group. Secondly, you have to grant vendors the ability to switch from one membership to another in said group.
Grouping membership subscriptions
Your first step is to group together the three WooCommerce membership subscriptions you created in Step 3. Thankfully, this is as simple as creating another product. Thus, navigate to your WordPress dashboard and click Products > Add New.
As always, give your product a name and description. We’re naming ours “Elite Membership Tiers.”
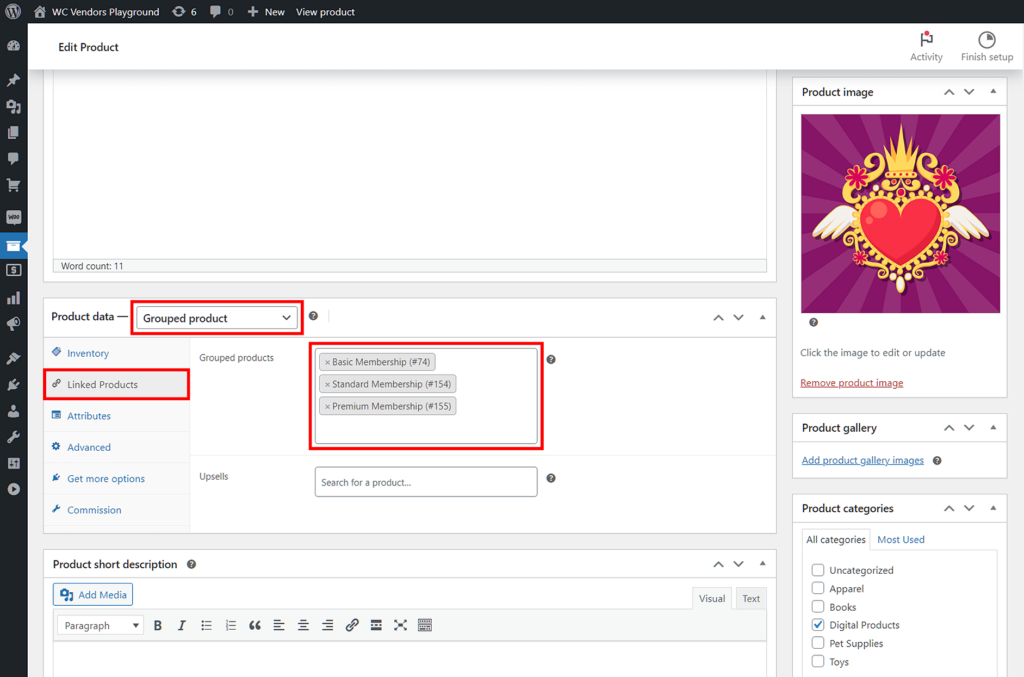
Then, in the Product Data box, select “Grouped product” from the dropdown menu.
Now, click the Linked Products sub-tab. In the Grouped products entry field, input the names of the membership subscriptions you wish to include in the group. Continuing with our example, we’ll add “Basic Membership,” “Standard Membership,” and “Premium Membership” to the “Elite Membership Tiers” group.
Once again, publish the product!
Enabling switching
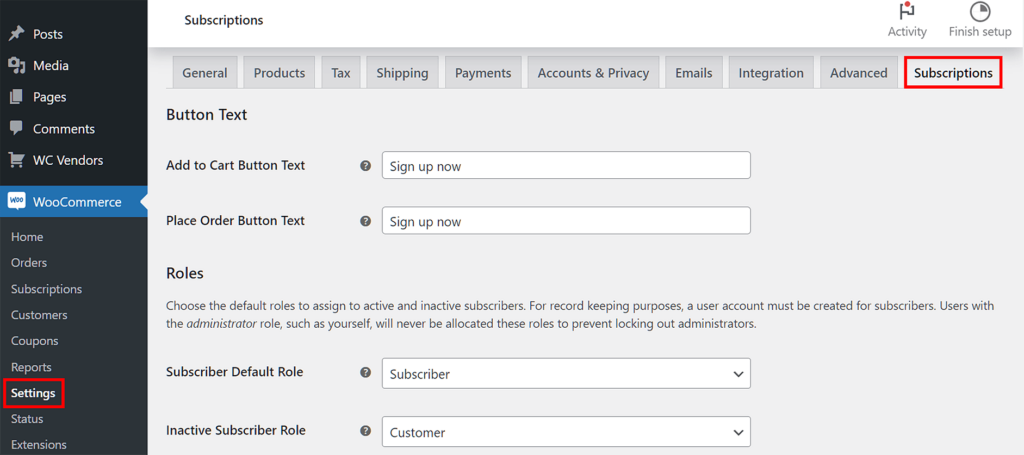
On your WordPress dashboard, click WooCommerce > Settings, then select the Subscriptions tab.
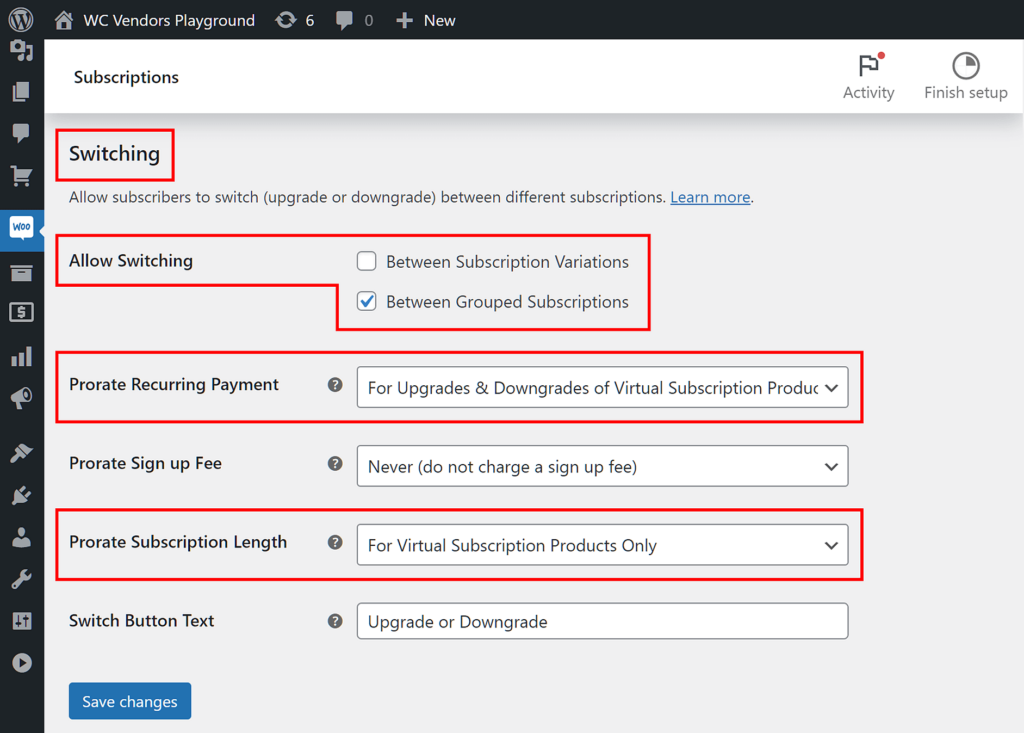
At this point, you don’t need to concern yourself with any of the Subscriptions options except for Switching and Allow Switching, which you should scroll down to.
Next, tick the Between Grouped Subscriptions checkbox to reveal more options.
From the Prorate Recurring Payment dropdown menu, select “For Upgrades & Downgrades of Virtual Subscription Products Only.” Then, from the Prorate Subscription Length dropdown, choose “For Virtual Subscription Products Only.”
Lastly, save your changes.
Putting things together
Now that your WooCommerce membership subscriptions belong to a single group and the relevant Switching options are active, vendors can switch from one subscription to another within said group.
Congratulations, you’ve just created your first membership plan! You can now charge vendors for subscribing to any membership in this plan, thus allowing you to enjoy recurring income on a regular basis!
Testing Your Membership Subscriptions
Do you want to find out whether or not the settings for your WooCommerce membership subscriptions are working? Or are you just curious about how vendors can purchase, upgrade, or downgrade subscriptions on the front end?
Whatever your concerns, we highly recommend testing your WooCommerce membership subscriptions. To do this, you must play the role of a vendor, then log in to your demo marketplace.
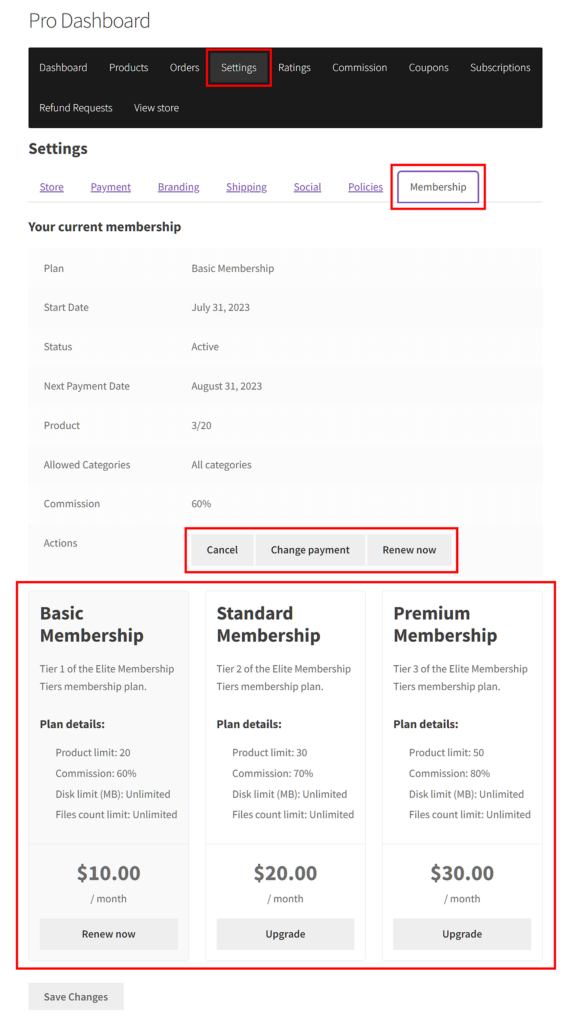
To purchase, upgrade, or downgrade a membership as a vendor, click Pro Dashboard > Settings > Membership. This will show you your current membership details, which will vary based on your settings. In addition, you’ll be granted the option to cancel, renew, upgrade, or downgrade your subscription.
Of course, where a vendor first encounters these WooCommerce membership subscriptions will depend on your marketplace settings. For example, if the marketplace requires those who wish to become vendors to purchase a membership on signup, they’ll be prompted to do so during the vendor registration process.
Managing Your Membership Subscriptions
Managing existing WooCommerce membership subscriptions is easy.
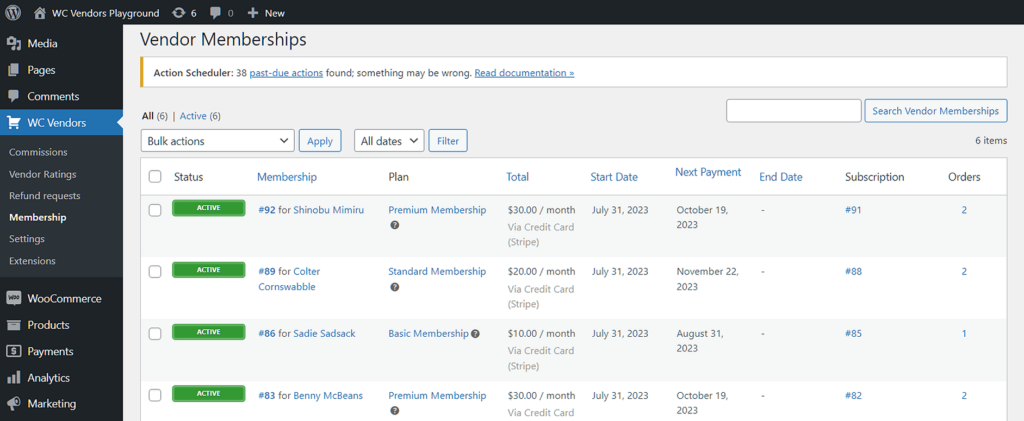
On the back end, you can view a list of your membership subscriptions by choosing either of the following two paths:
- WC Vendors > Membership
- WooCommerce > Subscriptions
On either page, you can suspend, reactivate, or cancel any subscription by hovering the mouse cursor over its status, then clicking the appropriate option.
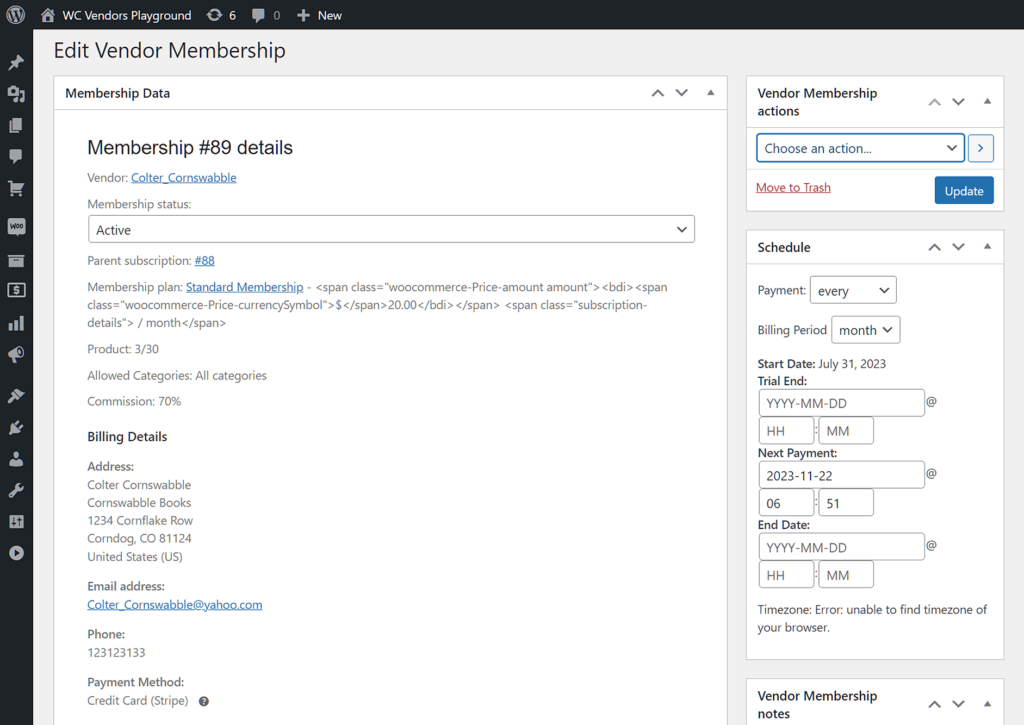
Furthermore, you can click the number next to the vendor’s name in the Membership or Subscription column. This will take you to a page where you can view membership details as well as make more modifications to said membership.
Commissions: Another Reliable Way Your Marketplace Can Earn Revenue
The primary method of generating revenue from your marketplace is through commissions.
A commission is the fee you collect from vendors for each sale they make on the platform. When a vendor sells a product, you take a cut of the sale amount before paying the vendor. For instance, if a product sells for $100, you might deduct $20, leaving the vendor with $80.
It’s an excellent idea to combine commissions with membership subscriptions. Thankfully, WC Vendors offers an advanced commission system that provides comprehensive control over vendor charges. To learn more about it, check out our article “How To Charge Vendors In Your Marketplace: A WooCommerce Commissions Guide.”
Conclusion
Do you want your marketplace to enjoy a continuous stream of revenue? Then membership subscriptions are the way to go. After all, by requiring subscriptions for the privilege of using your platform, you encourage vendors to make regular and repeat purchases of said subscriptions.
To enable WooCommerce membership subscriptions so that you can use them to charge your vendors, use WC Vendors to observe the following steps:
- Set your marketplace up for memberships
- Create a vendor membership product
- Complete your membership plan
- Group your vendor memberships into a single plan
Also, don’t forget to:
Do you have any questions about how to charge your vendors via WooCommerce membership subscriptions? Let us know in the comments below!
