Are you running a WooCommerce marketplace? Then having a WordPress site recovery strategy that includes using WordPress recovery mode is an absolute must.
Why? Simple: when things go wrong, a backup and restoration plan can save you time and money. WordPress sites are the biggest targets for malware attacks with over 90,000 attacks happening every minute. Besides hacks, WordPress websites aren’t immune from crashes, data losses, or malfunctioning. Even a single crash or error can seriously derail your marketplace for days or even weeks.
Thankfully, there’s a simple way to deal with these problems: backups. Think of this as a safety net for your website. Specifically, a comprehensive and reliable backup solution is your best protection against anything that could go wrong with your website.
Another valuable tool in your recovery arsenal is WordPress recovery mode. This built-in feature helps troubleshoot issues by temporarily disabling themes and plugins that may be causing problems.
So, are you ready to learn about the best WordPress site recovery strategy for your multi-vendor platform? Then read on!
Why Backups Are Important For Your Website
While backups are often looked at as a good-to-have, they are increasingly becoming a must-have in your WordPress site recovery strategy. Why? Well, here are real-life scenarios where backups can help restore your website’s normal operations:
- Your website is hacked or compromised by a malware attack
- A major WP update or a plugin/theme upgrade goes wrong and causes incompatibility issues
- You want a safe way to migrate your website to a different web host
- You’re unhappy with your website design changes and want to revert to the original version
- You accidentally delete an important file or folder
- You accidentally lose a day’s orders on your marketplace
Now think about this: what would happen if your backups go missing or worse, get hacked? And let’s not forget that backups are stored in independent servers or storage locations that could also crash or be compromised.
This is the reason why you should create multiple copies of backup and WordPress site recovery files for storage. Additionally, these backup files should be stored on multiple locations, including your dedicated server and independent cloud storage like Google Drive and Dropbox. This ensures that you always have access to your backup files and can download them to your computer at any time.

Understanding WordPress Recovery Mode For Site Recovery
In your journey to ensure the safety and restoration of your online marketplace, familiarity with WordPress recovery mode is essential.
WordPress recovery mode is a built-in feature designed to help website owners when a plugin or theme causes a fatal error on the site. Essentially, it serves as a protective measure, allowing you to access your WordPress admin area and fix the issue even if your site is experiencing significant errors.
How does WordPress recovery mode help in site recovery?
Firstly, accessing your site in WordPress recovery mode allows you to troubleshoot and resolve the underlying problem without needing to disable all plugins or switch themes manually.
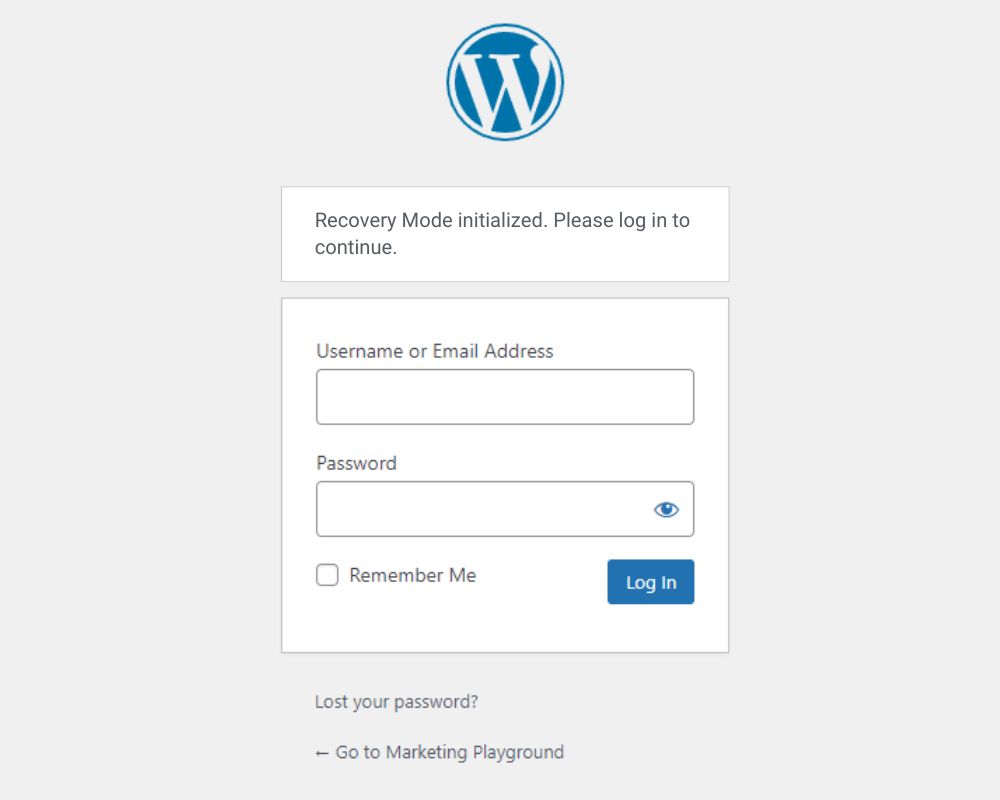
Here are a few ways WordPress recovery mode facilitates site recovery:
- Deactivate problematic plugins or themes – Directly from recovery mode, you can deactivate the plugin or theme causing the error. This action often restores site access and functionality, allowing for further investigation and correction of the issue.
- Access to site admin – Basically, recovery mode ensures that you retain access to your WordPress dashboard. This accessibility is crucial for performing necessary updates, backups, or restorations without having to go through FTP or database manipulations.
- Safe troubleshooting environment – By isolating the issue to specific plugins or themes, recovery mode provides a safe space to troubleshoot and resolve problems without impacting the rest of your site’s functionality.
How to use WordPress recovery mode
- When a critical error occurs, WordPress sends an email to the admin with a link to enter recovery mode.
- Click the link to access the recovery mode, where you can log in and see a list of potential issues.
- Temporarily deactivate the problematic theme or plugin directly from the recovery mode interface.
- Once the issue is resolved, you can reactivate your themes and plugins as needed.
Incorporating WordPress recovery mode into your site recovery strategy ensures that you have a quick and efficient way to address issues that arise from incompatible updates or faulty plugins. Additionally, combining this mode with regular backups provides a comprehensive approach to maintaining your online marketplace’s uptime and performance.
Now that you know all about backups and their importance in keeping your website running, let’s look at the three WordPress site recovery strategies you can employ.
1. Backups From Your Web Hosting Company
We’ll preface this by saying that we are happily using both Kinsta and Siteground for hosting, and some of the links in this article are affiliate links. We wouldn’t recommend these companies without thoroughly testing their services and support. In fact, we’ve been extremely happy with the support from both Kinsta and Siteground.
One of the easiest routes to take is to avail of backup and restore services from your web hosting company. Furthermore, most WordPress hosts like SiteGround and Kinsta include automated and easy-to-use backup services. They’re easy to manage and easy to restore.
We’ll use Kinsta as an example as we host this website with them. You get daily backups included in your plan. In addition, you can opt to select either hourly backups or 6-hour backups, each of which comes at an additional cost.
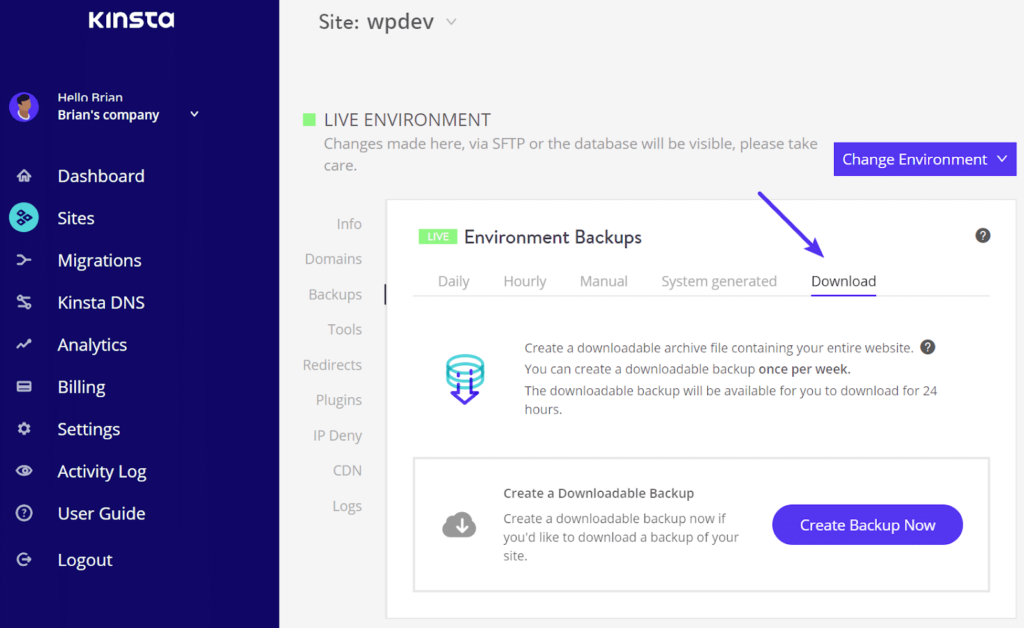
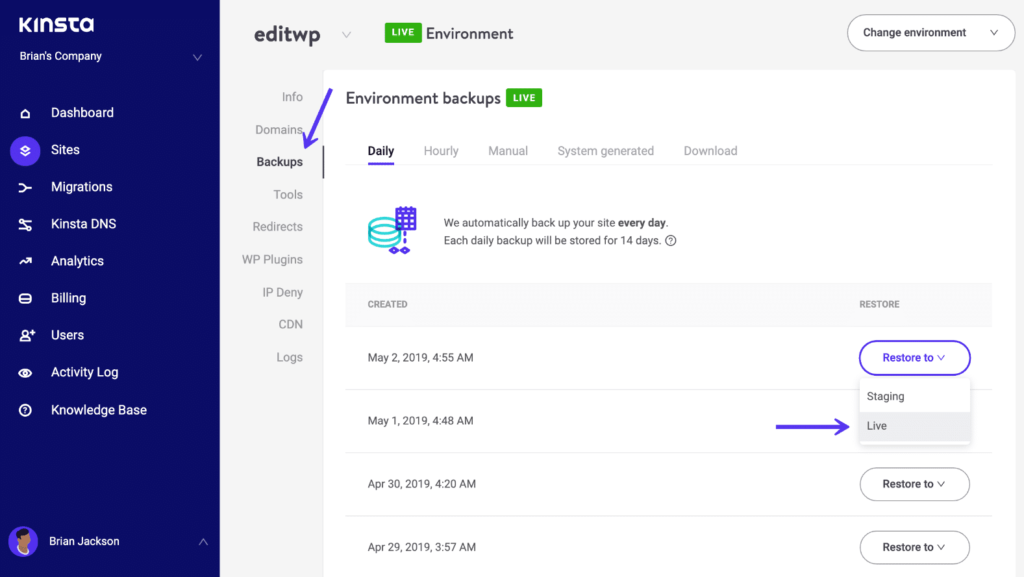
Apart from this, you can also access and download your backups from your Kinsta dashboard account. This is accomplished by following two simple steps:
1. First, create a downloadable backup of your website. To do this, head to your Kinsta dashboard, navigate to Environment Backups, and click the Download option.
2. Next, restore your stored backups to the live website or test them on a staging site before merging the backups on the live site. To do this, simply click the Backups tab, then select either “Live” or “Staging.”
Additional considerations
Although having backups from your hosting company is a great first step, there are some other things to consider when you take this approach:
- Can you rely entirely on your web host provider to make timely backups?
- Do these backup files include both website files and database tables?
- Is the web host provider charging a premium for providing backup services, or is it included in their standard hosting packages?
- Can you easily access these backups and restore them?
- What happens if your hosting company goes away?
These concerns are why it’s always a good idea to have multiple levels of backups, not only from your hosting company but also from other sources and through other methods.
2. Manual Backups
Aside from or in addition to backups from your web hosting company, you can also perform backups yourself. This is a fairly technical process that requires time and effort. You’ll need to possess a working knowledge of tools like FTP tools and the phpMyAdmin tool. It’s great to have some WordPress debugging skills, as well.
Primarily, manual WordPress backups involve making backups of your website files and database through the following steps:
- Backup and restore website files using cPanel or an FTP tool like FileZilla
- Backup and restore database tables using the phpMyAdmin tool
Before starting manual backups, ensure that you have installed or have access to these tools.
Now, let’s look at these steps in more detail:
Step 1: Backup and restore your website files using cPanel
You can use the cPanel tool if your current web host provides it. Unlike any FTP tool, you don’t need to install cPanel and it can be accessed from your web hosting account. Follow these steps to get started:
- Log in to your web hosting account and navigate to the cPanel.
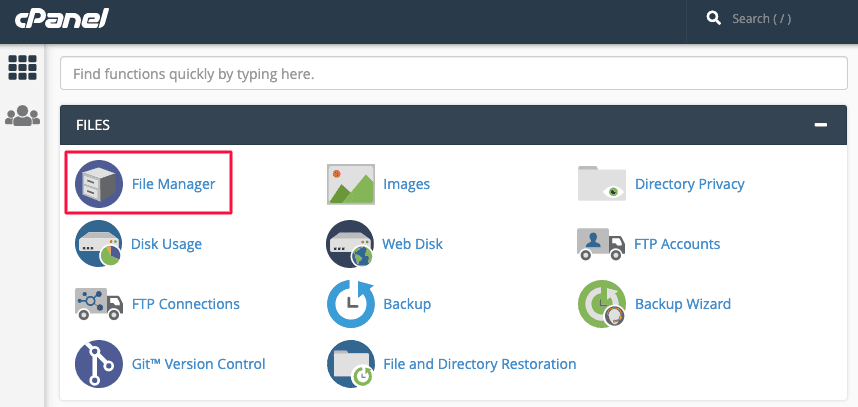
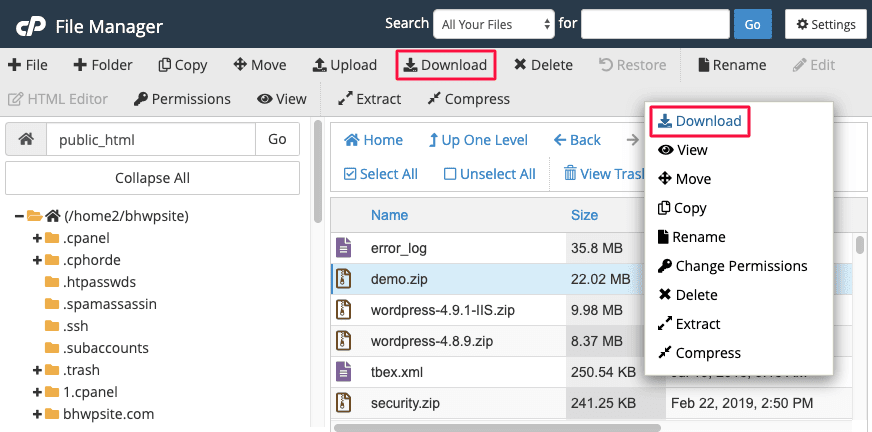
- From the cPanel, navigate to File Manager, where you can view several WP files and folders, including the “public_html” folder.
- Open the “public_html > <website name folder>” to view all the website files and folders on the right panel.
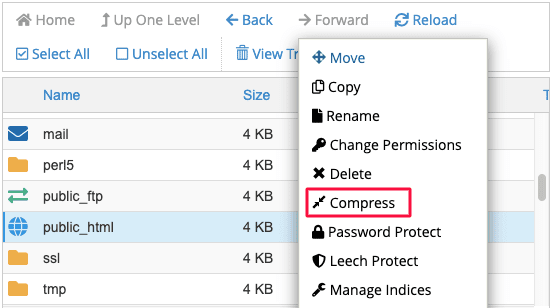
- Right-click the folder and compress its contents into a zip archive file. This helps decrease the file size and hence the download time.
- After compression, download your zip file to your local computer.
To restore your backup files using cPanel, here are the steps you need to execute:
- Log in to your web host account and navigate to the cPanel.
- Open the File Manager and delete all your existing website files and folders.
- Next, extract and upload your backup files from your computer to the “public_html > <website name folder>” using cPanel.
Step 2: Backup and restore your database tables using phpMyAdmin
You can use the phpMyAdmin tool to back up and restore your WP database. You can access this through your web host’s cPanel by logging in to your web hosting account and navigating to Databases > phpMyAdmin). Alternatively, you can download it directly.
- On phpMyAdmin, view all the current WP databases.
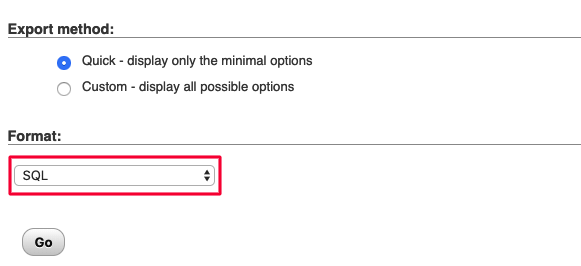
- Select the database to be backed up and then export all its tables in SQL format.
However, before you restore your database tables using phpMyAdmin, create a database first, and then import your backup. You can do this as shown below:
- Log in to your web host account and then create a new database using MySQL Databases.
- Next, using phpMyAdmin, import your backup file into the new database.
3. Automated Backups Using Plugins
Last but not least, you can use automated plugins for your WordPress site recovery. We highly recommend this method because it’s easier, more convenient, and more reliable than a manual backup. In case you encounter a critical error, the feature of WordPress recovery mode can be especially valuable, acting as your second line of defense if you have issues with your hosting backups. Thanks to the popularity of WordPress, you’re sure to have a wide range of plugins to choose from, many of which offer integrated recovery options.
However, with numerous choices comes much confusion. Hence, we’ve zeroed in on the top 3 popular backup plugins in the market:
i. UpdraftPlus
Available in both free and paid versions, Updraft Plus is a popular backup plugin for websites. Apart from complete website backups, it offers website cloning and migration functionalities. It’s also suitable for multisite networks and facilitates the safe storage of backup files on independent cloud platforms. This plugin is more suited for smaller websites that have low backup requirements.
ii. BlogVault
BlogVault is a complete backup and restore plugin that has a nearly 100% success rate in website restores. It’s easy to configure and use besides being competitively priced. Some of its standout features are the use of independent and dedicated servers for backups and incremental backups. Both features make sure your server isn’t loaded and hence there’s no impact on your website speed or its resources.
iii. BackupBuddy
Easy to install and configure, BackupBuddy is another popular WordPress site recovery plugin that offers complete automated backups. Additional features include support for a variety of cloud storage platforms and a user-friendly interface. It can also work on a shared web hosting platform.
Automated Backup Process
While all three of the above WordPress site recovery plugins are comprehensive and competitive offerings, we’ll focus on BlogVault for the rest of this section, mainly because we’ve used it internally on multiple occasions.
If you plan on backing up your website using BlogVault, follow the below steps to get started:
- First, sign up with BlogVault. Upon registration, an official link will be sent to your email address.
- Next, click the link to open the tool’s dashboard page. Use your user credentials to log into your dashboard account.
- Next, add the URL of your website.
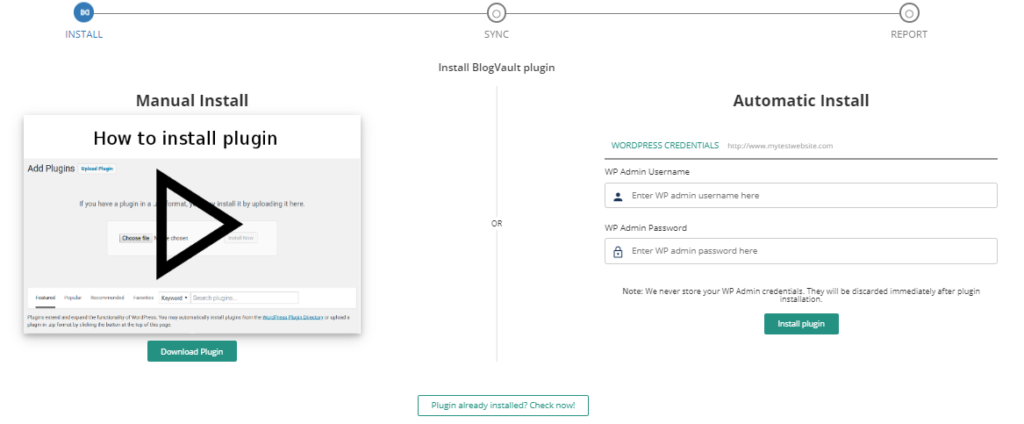
- Once you’ve specified the website, install the BlogVault plugin through the manual or automatic install.
We recommend using Automatic install as it’s easier and faster to complete. On installation, the tool automatically makes a backup of your website.
And that’s that – backup complete!
BlogVault makes an automatic backup every 24 hours. You can also perform a backup any time you want, any number of times. Moreover, the dashboard has some useful WordPress management features like the updating of plugins and themes, user management, staging, migration, and more.
Automated Restoration Process
Now that you’ve completed the backup process, let’s understand how you can use BlogVault to restore a backup to your site. Basically, this requires two easy steps:
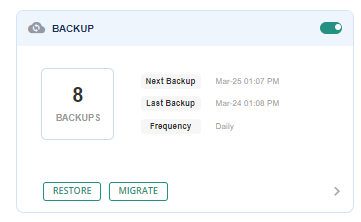
- Sign in to your dashboard and select the website that you want to restore.
- From the backups section, click Restore as shown below.
That’s all you need to do. With the Auto Restore feature, BlogVault restores the latest backup version of the website.
We have also used BlogVault to migrate sites from one host to another which is another bonus feature. That makes migrations easier. Although you can do this via lots of different plugins, BlogVault has worked the best for us when it comes to moving sites around.
Verdict
Now that you know how a backup can be your savior in times of an emergency, don’t delay creating one for your website. Our backups have saved us several times throughout the years, and we can’t recommend incorporating this WordPress site recovery strategy into your setup soon enough, including the use of WordPress recovery mode.
If your web host provider includes WordPress site recovery services and you’re someone who doesn’t make too many regular changes to your site, a backup from your web host would work for you. However, depending on your hosting provider, the backup process could be complicated and time-consuming.
Additionally, we suggest manually backing up your website only if you possess some prerequisite technical know-how besides both time and effort to invest in the process each time. Besides being technically intensive, it’s also not a smart choice if your website requires frequent or daily backups. It’s too much work, and there are plenty of automated solutions.
The best way to avoid the challenges offered by both the above options is to use an automated backup plugin. Whether you’re a newbie or an experienced professional, a dedicated WordPress site recovery plugin is worth the investment for the sheer peace of mind and free time it provides. Based on your website needs, you could evaluate any of the leading backup plugins we discussed today and pick one that works for you, ensuring that it supports the critical WordPress recovery mode feature.

Conclusion
Now that you know how a backup can be your savior in times of an emergency, don’t delay creating one for your website. Our backups have saved us several times throughout the years, and we can’t recommend incorporating this WordPress site recovery strategy into your setup soon enough.
In addition to backups, consider using WordPress recovery mode to enhance your site’s stability and quickly fix any critical errors that may occur. By combining these tools, you ensure that your WooCommerce marketplace remains resilient against disruptions.
A WordPress site recovery plan is crucial if you hope to protect your multi-vendor platform from numerous threats, such as hacking attempts, data losses, etc. Thankfully various options are available that can help you. These include:
- Backups from your web hosting provider
- WordPress Recovery Mode
- Manual backups
- Automated backups using plugins
We’d love to hear from you. Let us know which WordPress site recovery option you used, such as WordPress recovery mode, and your experience with it in the comments below!
