Sometimes, it can be tricky when it comes to reviewing new vendor applications. Every store owner wants to make sure that only trusted and complete vendors are approved. It is necessary to have a vendor approval process that helps admins review vendor details before giving them permission to sell products in the marketplace.
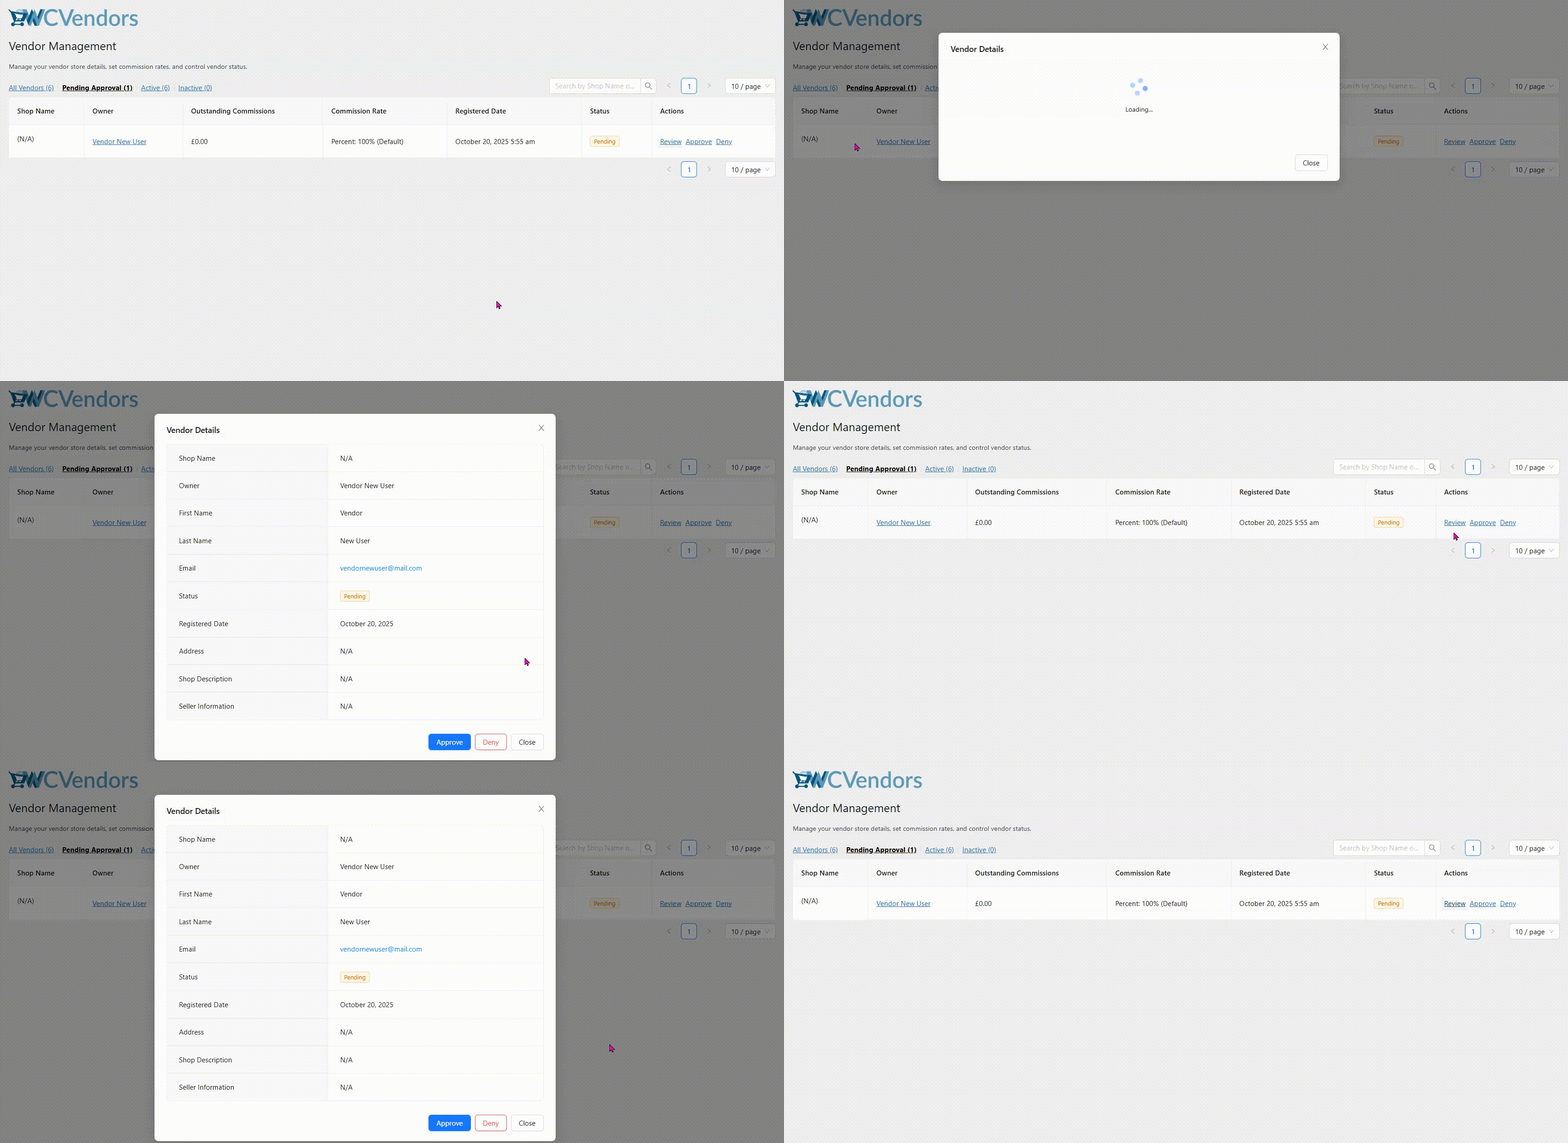
To make this easier, WC Vendors released a new feature called the Vendor Approval Process Modal View. This update adds a Review button and an eye icon next to each pending vendor. When the admin clicks on them, a small window appears that shows the vendor’s information. It includes their name, email, address, description, and seller details. This way, admins can check everything they need to know before deciding whether to approve or deny the vendor.
In this article, you will learn about the challenges admins face in the vendor approval process and how the new WC Vendors feature helps address them. You will also see how it works step by step and how it can help you manage your marketplace vendors with confidence.
Common Challenges In Vendor Approval Workflows
Running a marketplace means handling many vendor applications every week. Each one needs to be checked before approval. However, many admins find the vendor approval process time-consuming. Sometimes vendor details are scattered across different pages, and it takes several clicks to see everything. This can make the review stage longer than it should be.
1. Slow reviews and scattered information
When vendor details are spread across different screens, admins need more time to check each profile. This slows and disrupts the approval process. Some admins even forget where certain details are located, further delaying approvals.
2. Incomplete vendor profiles
Another common problem is missing information. Some vendors forget to fill out important fields like their address or store description. If these are not noticed early, admins might approve vendors who have incomplete profiles. Later, this can cause confusion with payments, shipping, or customer messages.
3. Risk of approving the wrong vendors
Without a proper vendor approval process, there is a risk of approving vendors who provide false or incomplete details. Once approved, these vendors can sell products that do not meet marketplace standards. This hurts customer trust and affects honest vendors who follow the rules.
4. Limited visibility during review
Admins had to open multiple pages just to see vendor details. Moving back and forth between screens wastes time and increases the chance of mistakes. It also makes vendor comparisons harder when several applications are awaiting review.
5. Difficulty checking vendor legitimacy
Sometimes, vendors look fine at first glance but turn out to be unreliable later. Without an easy way to view all vendor details in one place, admins spend extra time double-checking information. This slows down the vendor approval process and adds unnecessary stress.
Vendor Process Approval Workflow
The new WC Vendors update changes how admins handle vendor reviews. Before this feature, admins had to open many pages to check vendor information. Now, everything can be viewed in one place. This saves time and makes the vendor approval process much easier to follow.
When admins open the Pending Approval list, they will notice a small eye icon and a Review button beside each vendor name. By clicking either one, a small window appears. This window shows the vendor’s name, email, address, description, and seller information. Instead of jumping between tabs, admins can now view all these details at once.
Here are the steps on how you can activate it on your marketplace:
Step 1 – Access the pending approval list
First, log in to your WordPress admin dashboard. From there, go to WP Admin > WC Vendors > All Vendors. You will see different tabs, including one called “Pending Approval.” Click this tab to see all vendor applications that are waiting for review. This list shows vendors who signed up but have not been approved yet.
Step 2 – Click the eye icon or review button
Next, look for the small eye icon or the Review button beside a vendor’s name. Click either one, and a small window will open. This window is called the modal view. It displays the vendor’s main information, such as name, email, address, description, and seller details. This helps admins review vendor data all in one place.
Step 3 – Check key vendor details
Inside the modal view, review the vendor’s details carefully. Check if the name and email match the information given during registration. Read the store description to see if it aligns with your marketplace rules. Make sure the address is complete and correct. These small steps help keep your marketplace organized and safe. It also helps prevent approving vendors with missing or fake details.
Once you have reviewed all details, decide whether to approve or reject the vendor. If everything looks correct, click Approve. If not, click Deny and reach out to the vendor if needed.
You may also read: Custom Registration Form For Vendor Onboarding.

Takeaways
The new Vendor Approval Process Modal View gives marketplace admins an easier and smarter way to handle vendor applications. This helps admins check vendors faster and make better decisions during the vendor approval process.
Let’s review the steps on how you can do this in your admin dashboard:
From personal experience working with marketplace setups, having a clear approval system makes a big difference. The new modal view feature reflects how WC Vendors continues to make vendor management smoother and more organized. Keeping the vendor approval process clear and consistent helps create a marketplace that feels safe and reliable for both vendors and customers.
So if you manage a marketplace, this feature is a helpful way to save time and reduce errors. Try using the new modal view today and keep your marketplace accurate, secure, and easy to manage!

