Marketplaces thrive on clear communication. That makes the WooCommerce order confirmation email more than just a receipt. It’s the customer’s first real connection point after checkout, showing that their order is secure and clarifying which vendor is responsible for it.
If that email doesn’t highlight vendor details, the customer is left guessing. Who’s fulfilling their order? Who do they contact if something goes wrong? These small gaps can easily affect trust in your marketplace.
That’s why WC Vendors rolled out a new feature: the ability to add vendor details directly into the order confirmation email. This simple addition makes the buying experience more transparent, strengthens vendor visibility, and reassures customers they’re in good hands.
Let’s get you through this new feature, shall we?
WC Vendors Pro: WooCommerce Order Confirmation Email With Vendor Details (3 Easy Steps)
To make order emails more useful for marketplaces in WC Vendors Pro, we added a new feature that lets you include vendor information inside the WooCommerce order confirmation email. This update clarifies communication between vendors and customers, keeping everyone on the same page.
Here’s how you can try it out:
💡 Note: Before proceeding to these steps, make sure that you’ve already updated WC Vendors Pro to the latest version.
Step 1: Enable the setting
First, log in to your WordPress admin. Go to WC Vendors → Settings → Display → Emails. Here, you’ll find the option called Vendor Details in Order Emails. Toggle it on. This step ensures the system will start adding vendor information to every confirmation email sent to customers.
Step 2: Check and place a sample order
Now, test the feature in action. Switch to a customer account and place an order for a product from one of your vendors. This step simulates the real shopping experience, allowing you to see exactly how the confirmation email will appear to your customers.
Step 3: Review the confirmation email
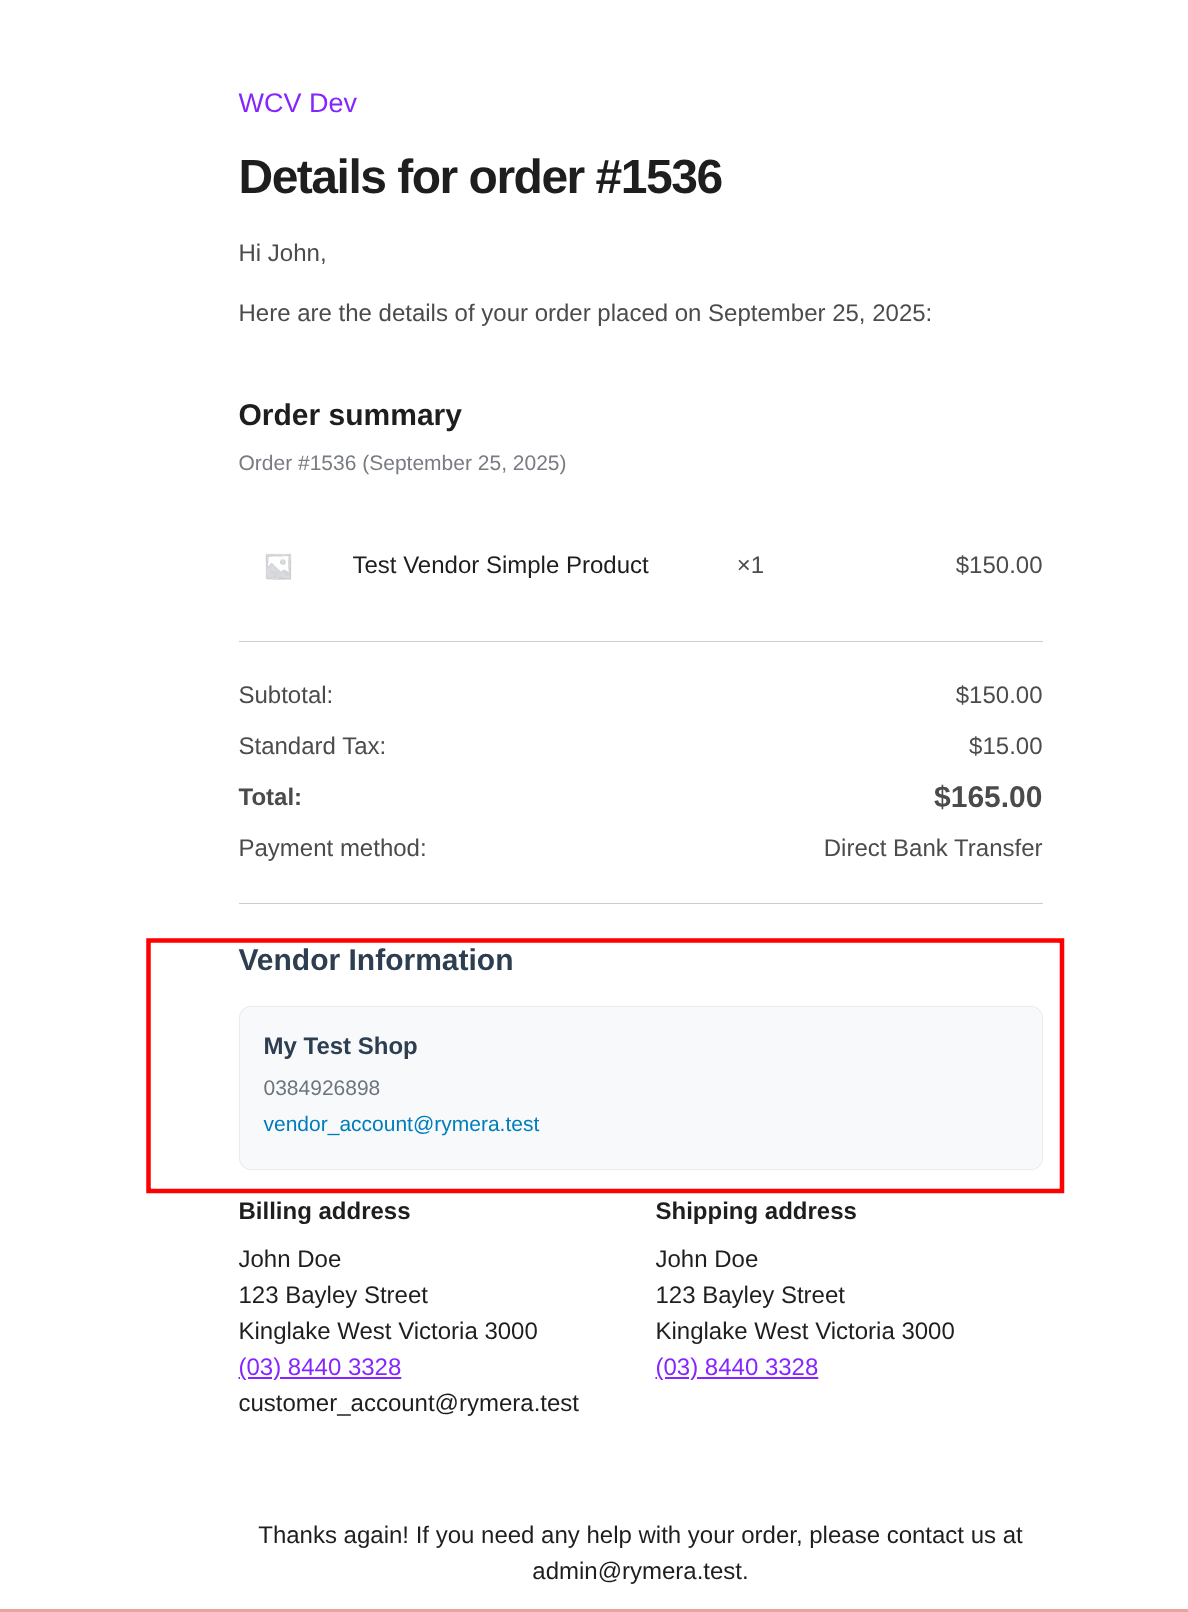
Finally, open the WooCommerce order confirmation email sent to the customer. Scroll down to the order details table, and you’ll notice a new Vendor Information section. This is where the vendor’s store details appear, providing customers with instant clarity on who they have purchased from and how to contact them if needed.
Best Practices For Marketplace Emails
Adding vendor details inside the WooCommerce order confirmation email is already a big step toward transparency. But if you want your emails to truly support your marketplace, there are a few best practices you can follow:
1. Keep the design clean
Avoid overloading the confirmation email with excessive text or graphics. Customers only need the essentials: order details, vendor information, and next steps. A clean layout makes everything easy to read.
2. Use consistent branding
Ensure your marketplace logo and tone of voice are consistent throughout the email. This consistency reassures customers that even though they’re buying from different vendors, they’re still inside a trusted platform.
3. Be clear with vendor details
Place vendor details right where customers expect them—under the order details table. This makes the process intuitive and prevents confusion.
4. Add helpful links
Consider including links, FAQs, or vendor policies to provide customers with additional resources. Customers appreciate having quick access to resources if they need extra guidance.
5. Test across scenarios
Don’t assume the email works perfectly all the time. Test with different vendors, products, and customer accounts to ensure optimal performance. This ensures that every WooCommerce order confirmation email looks polished, regardless of the situation.
Conclusion
The WooCommerce order confirmation email is the first touchpoint that shapes how customers see your marketplace after checkout. By adding vendor details, you provide customers with instant clarity about who they are purchasing from, while vendors gain the visibility they need to strengthen their brand.
Let’s recap on what we discussed in this new feature article:
With WC Vendors Pro, setting this up takes only a few steps, but the impact lasts far longer. It’s a simple change that creates a more transparent, trustworthy, and professional marketplace experience.
If you want your marketplace to stand out, don’t settle for generic emails. Customize your confirmation emails to highlight vendor details and turn every order into an opportunity to build stronger relationships!
Try out this new update and let me know what you think. 🫡

