If you run a WooCommerce marketplace and want to use PayPal as your payment method, setting up the WooCommerce PayPal integration is one of the most important steps you can take.
PayPal is one of the most widely recognized and trusted payment gateways available, offering customers a familiar checkout experience and giving store owners access to a full suite of tools for managing transactions.
In this guide, I’ll walk through the steps I followed to set up PayPal inside WooCommerce, highlight key options like PayPal Payments and PayPal Payouts, and explain how to avoid common setup issues.
Let’s get started.
What Is WooCommerce PayPal Integration?
WooCommerce PayPal integration connects your store to PayPal, allowing you to accept online payments and manage vendor commissions through PayPal Payouts Web. Everything runs inside your WooCommerce dashboard, so there’s no need to manage payments on separate platforms.
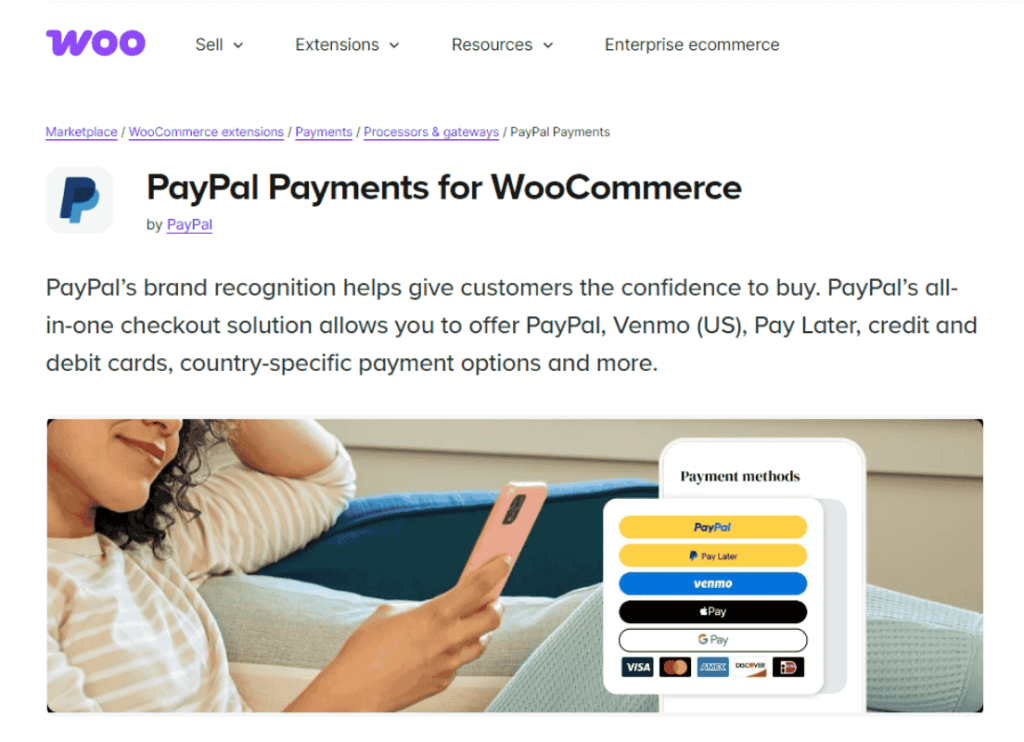
When I set it up for testing, I used the official WooCommerce PayPal Payments plugin. This plugin acts as an all-in-one solution, giving access to PayPal checkout, advanced card processing, Apple Pay, and pay later messaging. I noticed that it streamlined everything into a single integration, removing the need for multiple gateways.
If you’re running a WooCommerce marketplace, this integration becomes even more critical, as it offers features like PayPal Payouts Web, which can help simplify vendor commissions. Everything runs inside the WooCommerce dashboard, so there’s no need to manage multiple platforms for payment handling.
What Do You Need For The Initial PayPal Account Setup?
Before installing the PayPal Payments plugin, make sure you have a PayPal Business account. This ensures a smoother setup during the plugin’s onboarding flow.
This account type is required for accepting payments on behalf of a business, accessing advanced features like subscriptions, and using payout tools like PayPal Payouts.
During the setup process, I connected a verified PayPal Business account directly through the plugin’s onboarding screen. The plugin initiated a secure login window where I could authenticate, grant permissions, and link the account. Once connected, I checked that my account was verified and had the correct currency and country settings.
You’ll also need to enable reference transactions if you plan to use subscriptions or automated payments in the future. This part can take a day or two depending on your account type and region.
How To Install And Activate PayPal In WooCommerce?
To start using PayPal, you’ll first need to install the right plugin. WooCommerce recommends the WooCommerce PayPal Payments plugin, which combines all modern PayPal services into one solution.
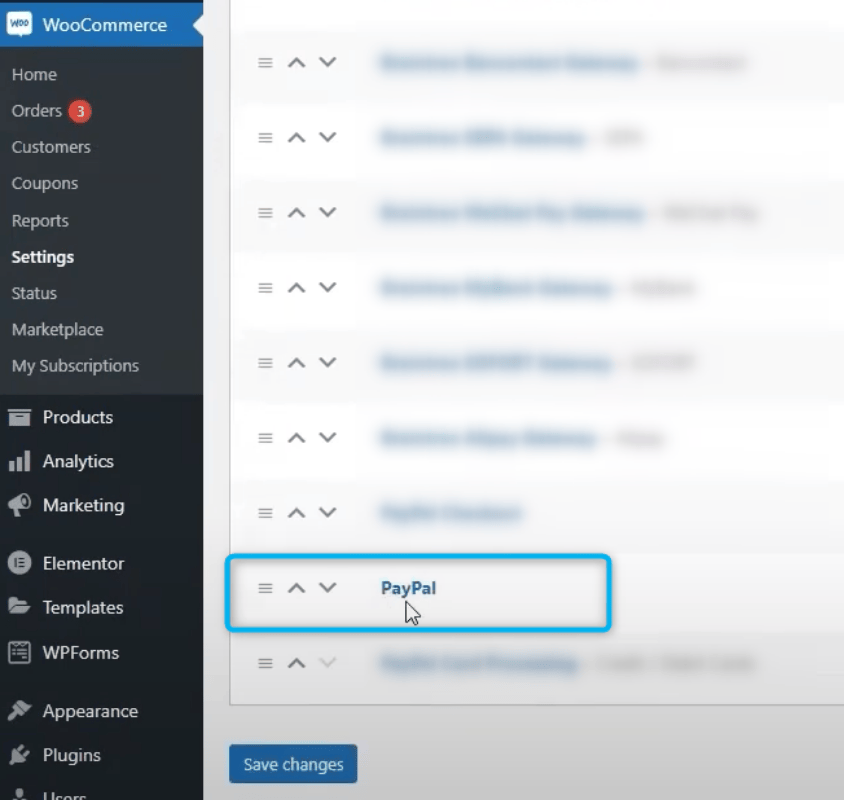
To install PayPal:
- Go to Plugins > Add New in WordPress.
- Search for WooCommerce PayPal Payments plugin.
- Click Install, then Activate.
- Open WooCommerce > Settings > Payments, and enable PayPal.
Once activated, you’ll see PayPal listed under WooCommerce > Settings > Payments. Click the Finish Setup button. This will launch a secure, embedded PayPal onboarding flow where you:
- Log in to your PayPal Business account
- Authorize the connection between PayPal and your WooCommerce store
- Allow access for payment processing and transaction reporting
This process automatically creates and links the required REST API credentials for your site. You don’t need to manually copy or paste any Client IDs or Secrets. Once connected, the plugin confirms your account setup and enables PayPal checkout immediately on the frontend—both on product pages and during the checkout process.
During setup, I also selected the type of products I plan to sell and confirmed the countries I accept payments from, which helped tailor the plugin’s default settings.
How To Configure PayPal Settings In WooCommerce
Once connected, you’ll have to adjust your PayPal settings to match your store preferences. These are available under WooCommerce > Settings > Payments > PayPal.
Some of the key configuration options I updated:
Pay Later messaging
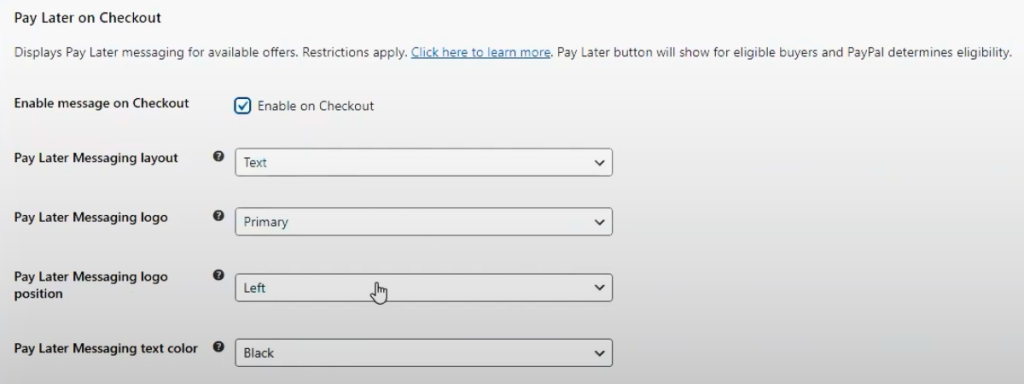
The Pay Later messaging feature shows financing options like Pay in 4 on your product and cart pages. I enabled it so buyers could see that they had flexible payment choices.
PayPal automatically displays the message based on product price and customer location, which helps encourage higher order values without extra setup.
Button label and description
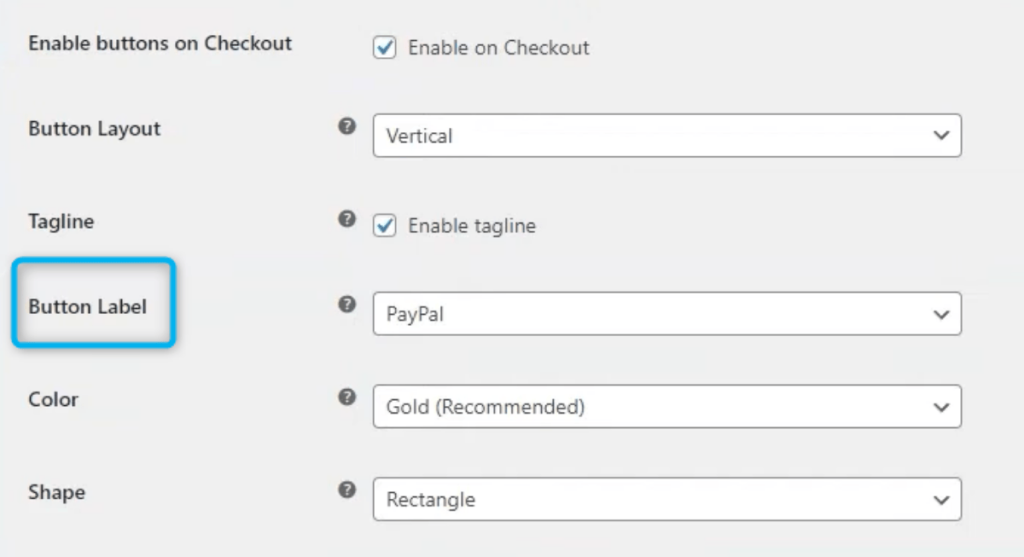
I changed the PayPal button text to make it clearer for users that they could pay with PayPal or a credit card.
Sandbox mode
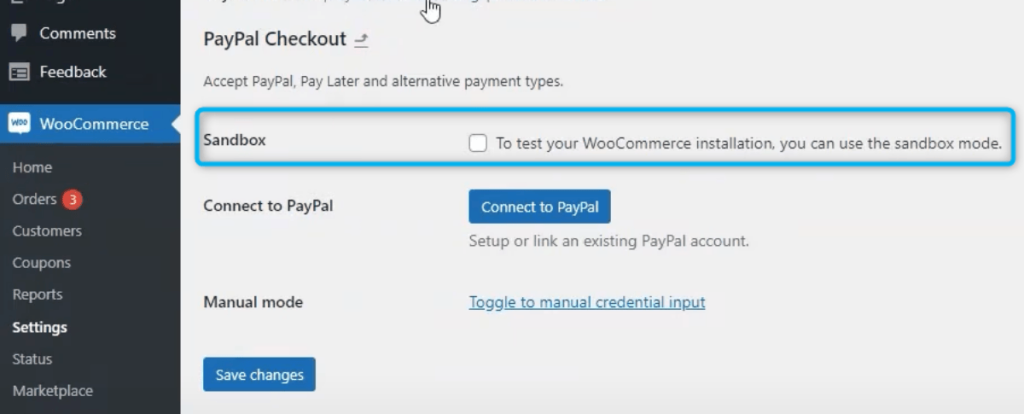
The PayPal Sandbox environment allows you to simulate transactions without using real money. It’s useful for making sure your checkout flow, order processing, and payment confirmations work correctly before going live.
To test the WooCommerce PayPal integration, I first created a PayPal sandbox account through developer.paypal.com. Then, I added buyer and seller test accounts and connected them in the plugin’s sandbox mode.
Switching to sandbox mode allowed me to complete a full order using test credentials, simulate payment, and confirm order status updates in WooCommerce.
Configuring PayPal Card Processing (Advanced Options)
Beyond the basic PayPal setup, there’s also a separate section in your WooCommerce dashboard for PayPal Card Processing. This allows you to accept debit and credit card payments directly on your checkout page, without requiring customers to log in to PayPal.
You can access this by navigating to:
WooCommerce > Settings > Payments > PayPal Card Processing
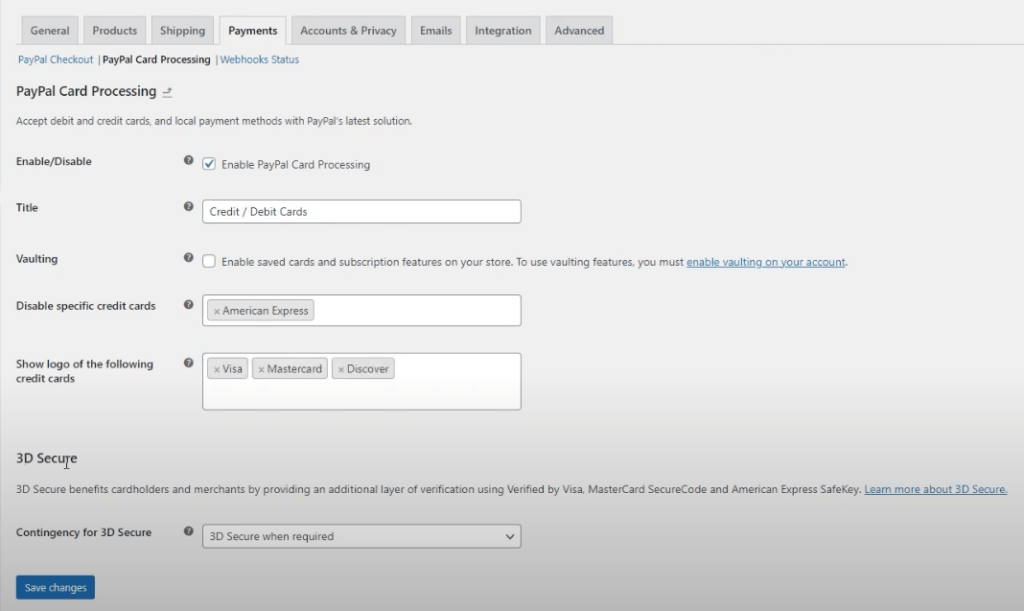
Here are the key settings available:
- Enable/Disable – Toggle PayPal card payments on or off.
- Title – Update how the method appears at checkout (e.g., “Credit / Debit Cards”).
- Vaulting – Enable this if you want to allow customers to save cards for future use. Vaulting is required for subscriptions and must first be enabled in your PayPal account.
- Disable Specific Credit Cards – You can exclude certain card types such as American Express.
- Show Credit Card Logos – Display card icons like Visa, Mastercard, and Discover at checkout.
- 3D Secure – Set your preferred behaviour for 3D Secure (like Verified by Visa). This adds another layer of verification and is helpful for fraud protection.
If you’re offering direct card payments through PayPal, it’s best to review this section carefully. Customers will see the updated options immediately after saving changes.
What’s The Difference Between PayPal Payments, Standard, And Express Checkout?
WooCommerce supports multiple PayPal payment options, and each has its own flow. Understanding the difference is important when choosing the right one for your store:
- PayPal Payments: The latest version, combining credit card processing, Apple Pay, and pay later features into one plugin.
- PayPal Standard: Redirects users to PayPal.com to complete the purchase. It’s simple but outdated.
- PayPal Express Checkout: A faster option than Standard, with fewer redirections but less flexibility.
When I installed the WooCommerce PayPal Payments plugin, I chose to enable PayPal Payments because it allows for advanced card processing and inline checkout. This means customers can complete transactions on the same page, which helps reduce cart abandonment.
What Are The Supported Payment Options?
The WooCommerce PayPal Payments plugin offers a wide range of payment options that you can enable based on what’s supported in your region and by your customers’ devices.
Supported options include:
- Debit and credit card processing
- Advanced card processing with fraud protection and 3D Secure
- Apple Pay for compatible devices
- PayPal checkout and pay later messaging on product and cart pages
Each of these methods can be turned on or off within the plugin settings, giving you full control over your checkout experience.
How To Set Up PayPal Payouts With WC Vendors
If you’re running a multi-vendor store, you’ll need a way to distribute commissions. PayPal Payouts Web is a manual tool that lets you send payments in bulk from your PayPal Business account.
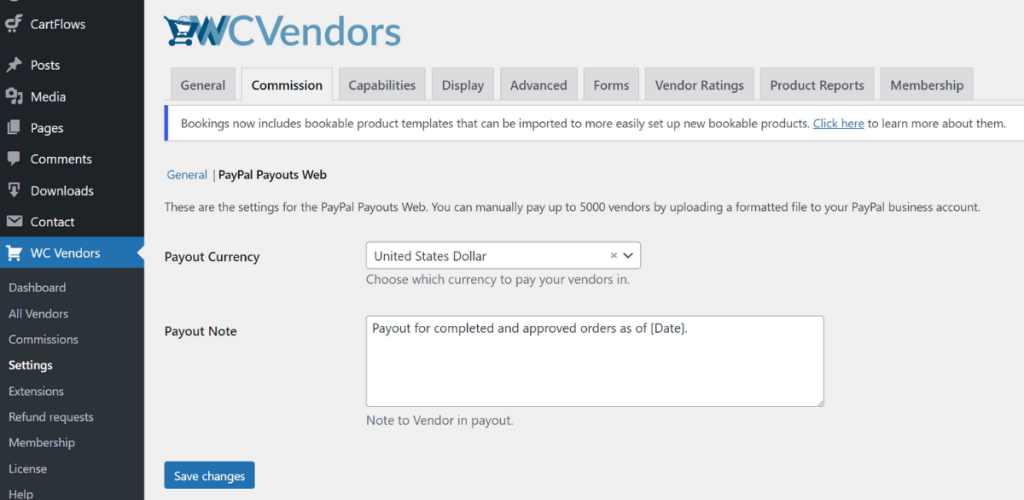
To set up PayPal Payouts Web in WC Vendors:
- Go to WC Vendors > Settings > Commissions > PayPal Payouts Web
- Select the currency you want to use for vendor payouts
- Enter a default payout note, which will appear in each vendor’s notification
- Click Export CSV to download a list of unpaid commissions formatted for PayPal
Once exported, I uploaded the file to the PayPal Business account using the Payouts feature.
The tool will send payments to all listed recipients in a single transaction. Vendors will also have the option to select PayPal or Venmo as their preferred payout method (Venmo is US-only).
📝 Bonus Tip: Need to route payments to different PayPal accounts or split orders between vendors? Try the WooCommerce Multiple PayPal Accounts plugin. It’s a free add-on that lets you create rules for sending payments to the right account—perfect for marketplaces using WC Vendors.
Final Thoughts on WooCommerce PayPal Integration
Setting up PayPal for your WooCommerce store or marketplace gives you more control over how you manage payments, subscriptions, and vendor commissions. Once your PayPal Business account is connected, the plugin handles most of the heavy lifting.
In this guide, we covered:
- What WooCommerce PayPal integration is
- What you need for the initial PayPal account setup
- How to install and activate PayPal in WooCommerce
- How to configure plugin settings and card processing
- Key differences between PayPal Payments, Standard, and Express Checkout
- Supported payment methods through the plugin
- How to setup PayPal Payouts Web with WC Vendors
If you’re looking to build a marketplace that supports vendor commissions with PayPal, WC Vendors works seamlessly with PayPal Payouts Web for manual bulk payments.
Visit our pricing page to find a plan that suits your marketplace goals, or explore our live demo site to see how WC Vendors handles commissions, storefronts, and more.
Frequently Asked Questions
Does WooCommerce PayPal integration support guest checkout?
Yes, WooCommerce PayPal integration supports guest checkout if the buyer’s country allows card payments without logging into PayPal. This depends on the buyer’s region and PayPal’s local policies.
In most cases, customers can pay with a debit or credit card through PayPal without creating an account. However, this option may be restricted in countries where PayPal requires registration for compliance or fraud prevention reasons. You can increase the likelihood of guest checkout appearing by enabling advanced card processing in your PayPal Payments plugin settings.
Can I refund PayPal orders directly in WooCommerce?
Yes, you can issue refunds directly from WooCommerce when using PayPal Payments. The refund will automatically be processed in the customer’s PayPal account.
After enabling the WooCommerce PayPal Payments plugin, each transaction is linked to your PayPal account. When you click “Refund” inside the WooCommerce order details, the plugin communicates with PayPal’s API to process the refund. This works for both full and partial refunds, but your PayPal Business account must have the necessary permissions.
What currencies are supported by WooCommerce PayPal integration?
WooCommerce PayPal integration supports over 20 global currencies, but your WooCommerce store currency must match one of PayPal’s accepted options to avoid payment issues.
You can find the supported currency list in your PayPal Business dashboard or in the PayPal developer documentation. If your store is set to an unsupported currency, the PayPal option will not appear at checkout. To fix this, go to WooCommerce > Settings > General > Currency Options and select a compatible currency.
Can I customize the PayPal checkout experience in WooCommerce?
Yes, you can customize the PayPal checkout layout, button style, and messaging directly in the WooCommerce PayPal Payments plugin settings.
Within WooCommerce > Settings > Payments > PayPal, you’ll find options to modify the checkout plugin interface. You can choose button color, shape, and size, enable pay later messaging, or display smart buttons based on customer context. This flexibility helps align the PayPal experience with your store design and conversion goals.
