Today, multi-vendor marketplaces continue to flourish as hubs for diverse vendors and customers. However, it’s crucial to recognize that the success of such platforms hinges not only on the products and services offered but also on the seamless payment solutions they employ. This is where the Stripe Connect integration with a powerful marketplace solution comes in.
If you’re running or hope to launch an online marketplace powered by WC Vendors, the Stripe Connect integration can be a game-changer. After all, it offers a robust framework for managing transactions between buyers and sellers within the WooCommerce ecosystem… among many other things.
Today, we’ll teach you how to implement the Stripe Connect integration with WC Vendors. In addition, we’ll delve into the features and benefits that make it a boon for modern marketplace operations.
So, let’s get started!
What Is Stripe Connect?
Stripe Connect is a payment processing platform provided by Stripe. Basically, it lets businesses process diverse forms of payments, including credit cards, debit cards, and alternative payment methods such as bank transfers. Furthermore, it enables businesses to send payouts and manage their finances.
Stripe Connect is particularly designed for marketplaces and platforms where there’s a need to handle transactions between multiple parties, like buyers, sellers, and service providers.
This platform offers features such as multi-party payments, automated payouts, and customizable financial flows. For these reasons, it’s preferred for businesses aiming to create scalable and secure payment solutions.
What is the Stripe Connect integration with WC Vendors?
The WC Vendors Stripe Connect integration allows marketplace owners using WC Vendors to implement Stripe Connect for processing payments between buyers and sellers.
With this integration, sellers can directly receive payments from buyers through Stripe. Meanwhile, the marketplace owner can easily manage these transactions and payouts.
Furthermore, the Stripe Connect integration enables other powerful features. For example, it can split payments between sellers and the marketplace, automate payouts, and ensure robust payment security. Such features enhance the marketplace’s overall functionality and efficiency.
The 5 Most Awesome Features Of The WC Vendors Stripe Connect Integration
The Stripe Connect Integration boasts many wonderful features designed to make the jobs of vendors and marketplace operators more convenient and efficient. Here are five of the best features:
1. Automation of customer payments to vendors
With the Stripe Connect integration, you have the option to automate payments. This means that when a customer pays for their order at checkout, the vendor and the marketplace instantly receive the split payment.
2. Scheduled automation of payouts
Do you want to withhold payouts to vendors until a specific period has passed? Then you can opt to schedule automated payments.
The Stripe Connect integration allows you to send vendors their earnings on a daily, weekly, or monthly basis. This can be useful if you want ample time to perform certain tasks before payment, such as reviewing transactions, granting customers the opportunity to refund items, or waiting for shipping to be completed.
3. Automation of split payments between vendors and the marketplace
The Stripe Connect integration automatically divides the total payment received from a customer between the vendor and the marketplace owner. The vendor commissions or fees set by the marketplace owner determine this division.
Here’s how it works. When a customer pays for a product or service, Stripe Connect automatically sends the vendor their portion, with the remainder going to the marketplace owner. This allows for the seamless handling of transactions. Moreover, it ensures that vendors are paid their commissions in a timely and transparent manner.
4. Safe payment gateway practice through the Test Mode
The Stripe Connect Integration with WC Vendors gives you access to two modes:
Test Mode: This lets you experiment with transactions without processing real payments. In other words, it offers a safe environment to try out the payment gateway’s functionality without affecting actual financial transactions. Thus, we recommend using Test Mode before launching your multi-vendor marketplace. Only disable the option once you’re ready for your platform to go live.
Live Mode: Basically, this lets you receive customer payments and send commission payouts to vendors. Switch to this mode when you’re ready to launch your marketplace and process actual payments.
Take note: Make sure to toggle Test Mode on and off in your Stripe account, as well.
5. Enhanced security through official Stripe API integration
The WC Vendors Stripe Connect integration leverages the official Stripe API. By doing so, you benefit from enhanced security measures throughout the payment process.
The integration follows best practices for data encryption, fraud detection, and compliance with industry standards. Thus, it ensures that sensitive information, such as payment details and personal data, is handled securely.
Furthermore, using the Stripe API means that WC Vendors Stripe Connect stays up-to-date with the latest security patches and features Stripe provides. This reduces the risk of vulnerabilities, thus ensuring that your multi-vendor marketplace remains protected against potential threats.
Lastly, using the official Stripe API reassures both vendors and customers. After all, it signifies a trusted and reliable payment gateway thanks to Stripe’s reputation for robust security measures. With every transaction processed through the Stripe Connect integration, you can be confident in the integrity and security of your marketplace platform.
Enabling WC Vendors Stripe Connect (In 5 Simple Steps)
To enjoy the full benefits of the WC Vendors and Stripe Connect integration, you must have WC Vendors Pro. Therefore, if you own the free WC Vendors Marketplace, we recommend upgrading it to WC Vendors Pro.
In addition, you must:
- Have a Stripe account
- Download and activate Stripe Connect for WC Vendors.
Lastly, we’re going to assume you already know your way around WC Vendors and Stripe.
With that out of the way, let’s begin!
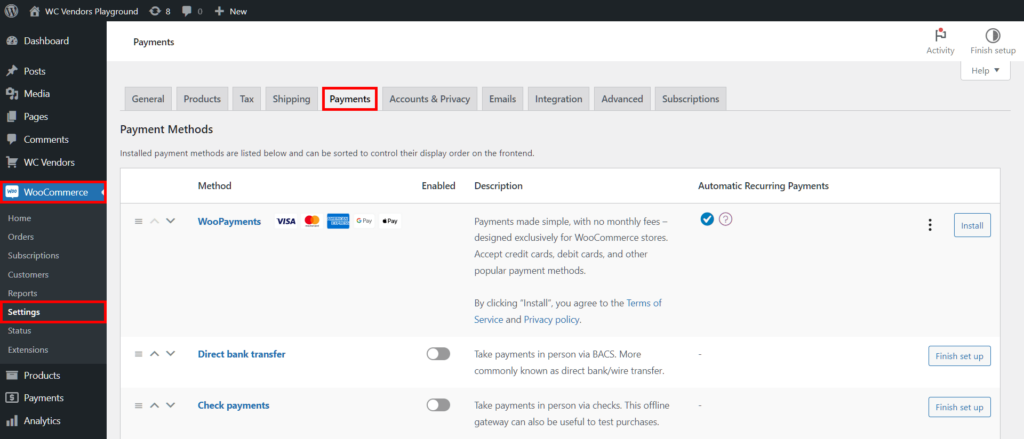
First, access the Stripe Connect settings by heading to your WordPress dashboard and clicking WooCommerce > Settings > Payment.
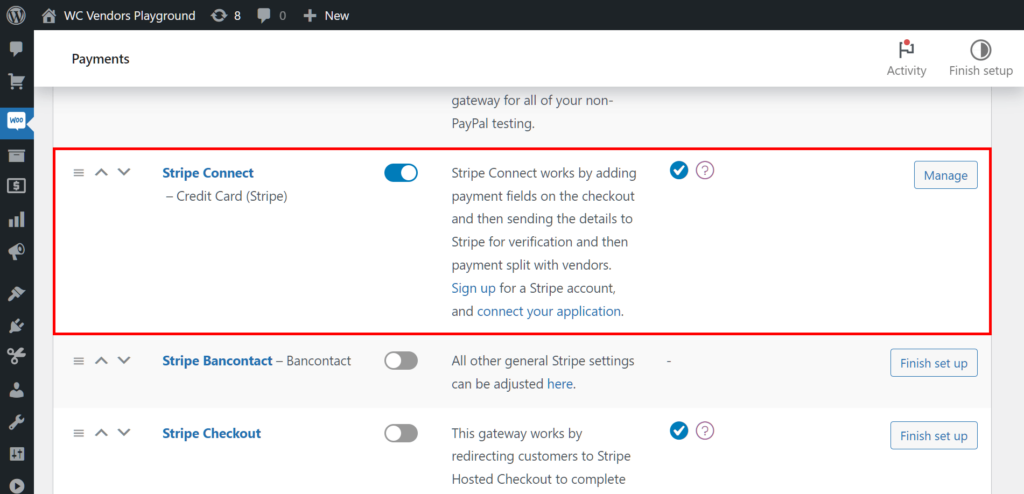
Next, scroll down to and enable Stripe Connect. Finally, click the Manage button to go to the Stripe Connect configuration page.
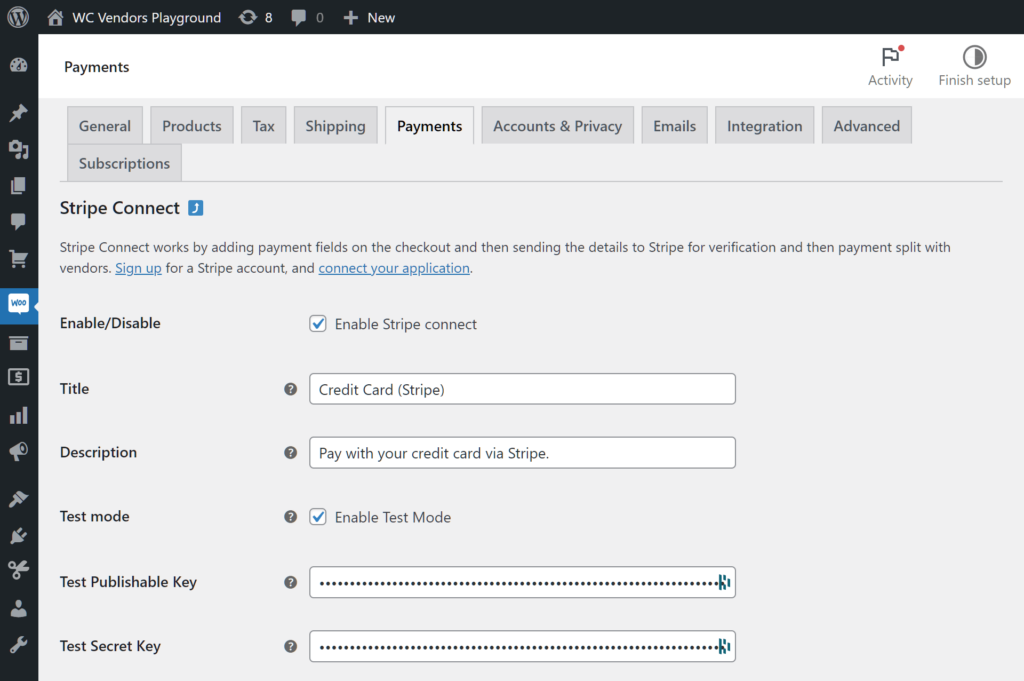
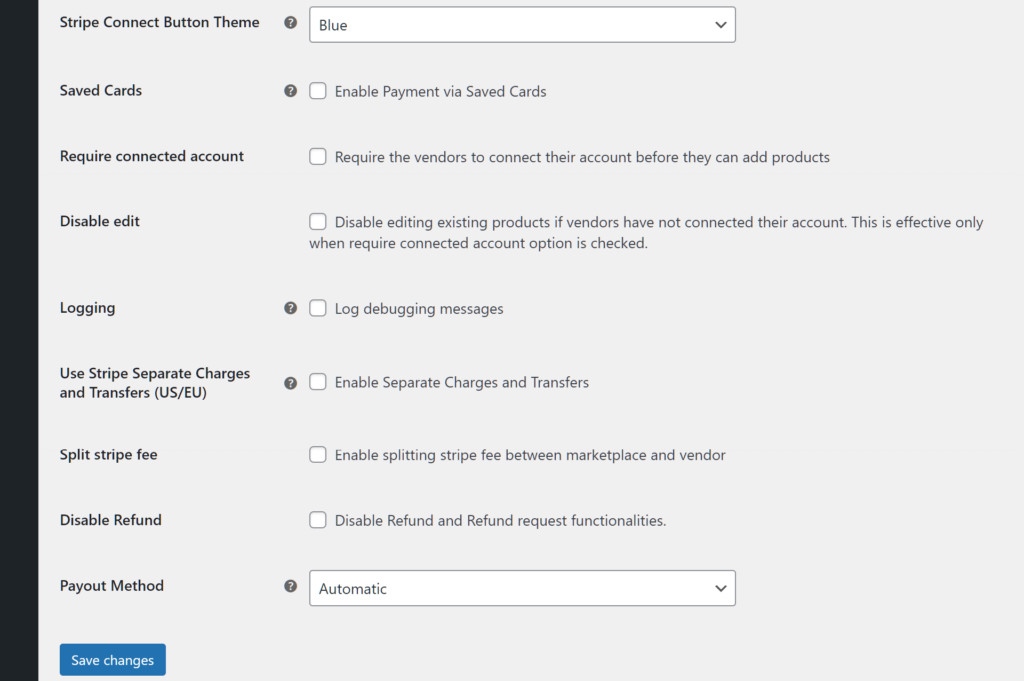
As illustrated below, the configuration page comes with various options. Basically, for the WC Vendors and Stripe Connect integration to work, you must enable or disable these options or fill their entry fields with the required information.
To enable an option, tick its checkbox or fill its entry field. To disable the same option, do the opposite. Some options must be activated for the Stripe Connect integration with WC Vendors to work.
This takes us to the next step:
Step 2: Allow the payment gateway to process customer payments
The following options allow your marketplace to process customers’ payments.
Enable/Disable: Tick this option’s checkbox to enable the Stripe Connect payment gateway.
Title: This is the title of the payment option that customers will see on the checkout page.
Description: This describes the payment option that appears to customers on the checkout page.
Test Mode: Enable this mode by ticking its checkbox. We recommend using Test Mode to try out test payments. This will prepare you for real payments once your platform goes live.
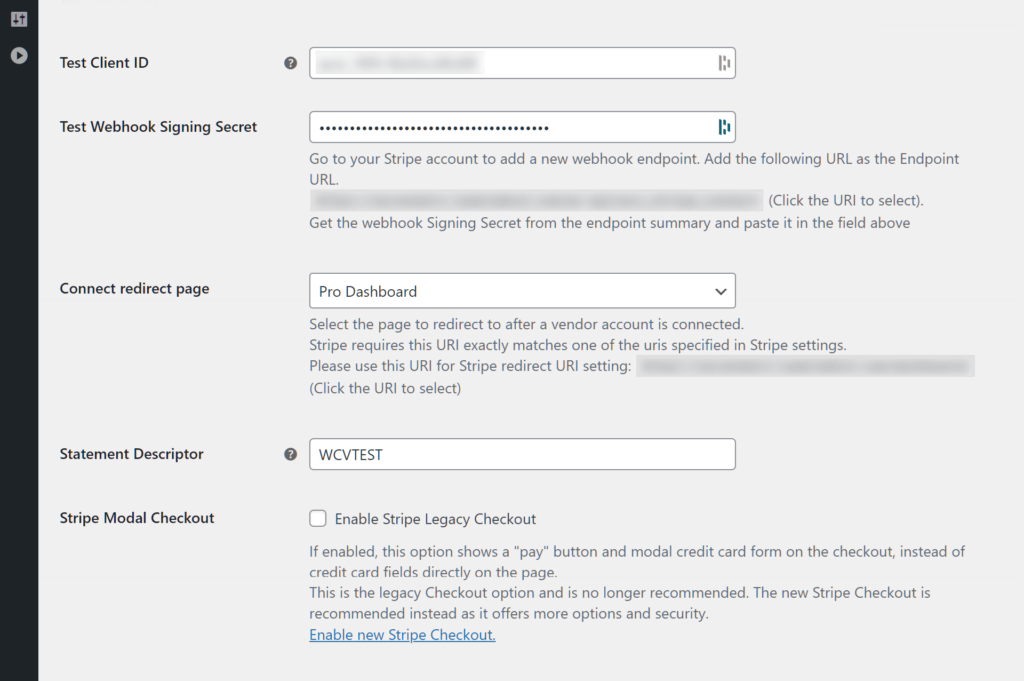
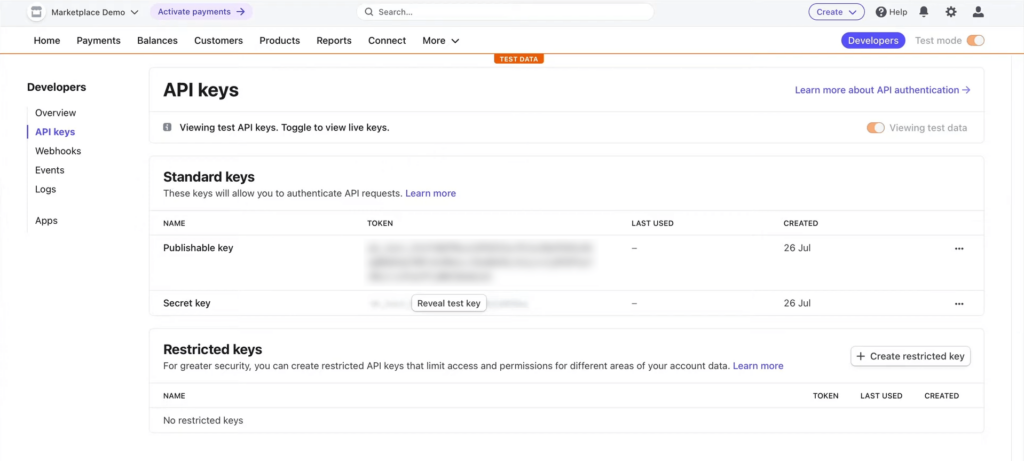
Publishable Key and Secret Key: These API keys are required for both Live and Test Modes. You can retrieve them from your Stripe Account by going to Developers > API Keys, then looking for Publishable Key and Secret Key under Standard Keys.
Take note that the API keys for Live Mode aren’t the same as those for Test Mode. Thus, you have to use different keys depending on the mode you’re using.
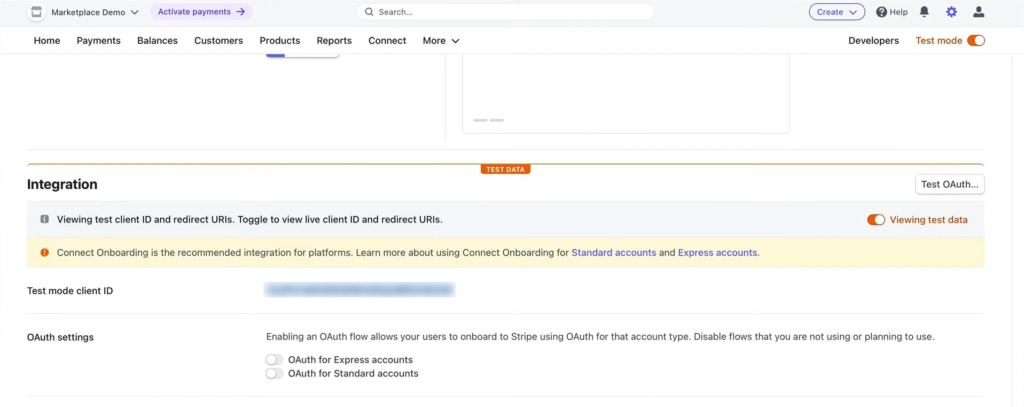
Client ID: The client ID is required for both Live and Test Modes. You can acquire it from your Stripe Account by going to Settings > Connect Settings, then scrolling down to Client ID. This also changes depending on if you’re using Live Mode or Test Mode.
These options prepare your marketplace for processing customer payments.
However, to allow your vendors to connect with Stripe via their marketplace dashboard, you need to tweak a few more settings in your Stripe account…
Additional Stripe account settings
First, go to your Stripe account and click Settings > Connect Settings. Next, scroll down to the Integration area. Then, find OAuth Settings and enable OAuth for Standard accounts.
Next, if you’re ready for Live Mode, you make sure the Redirect URI is consistent between your WooCommerce and Stripe account settings.
Thus, go back to WooCommerce > Settings > Payment and look for the Connect Redirect Page option. Now, search its description and copy the URI.
Lastly, return to Settings > Connect Settings in your Stripe account settings, look for Integration again, and paste the URI into the Redirects URI entry field.
Step 3: Determine who pays the Stripe fees
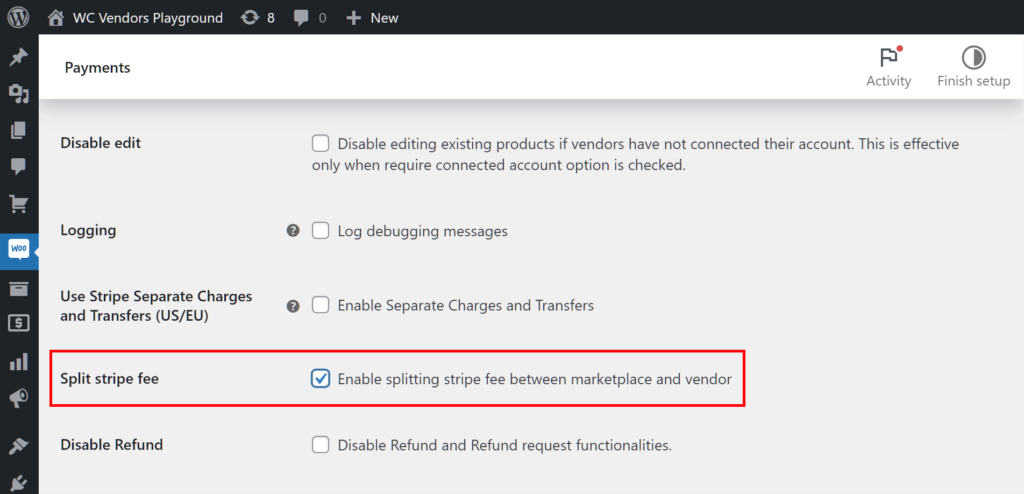
By default, vendors must pay all the fees associated with using the Stripe Connect integration. However, you can make things more appealing to vendors by splitting these payments between your marketplace and vendors.
To do this, scroll down to the Split Stripe Fee option and enable it by ticking its checkbox.
Step 4: Determine payout style
Do you want customer payments to vendors and the marketplace to be done manually, automatically, or automatically on a weekly or monthly basis?
Scroll down the page to the Payout Method option. This comes with a dropdown menu that offers you three choices.
All you have to do is choose your preferred payout method.
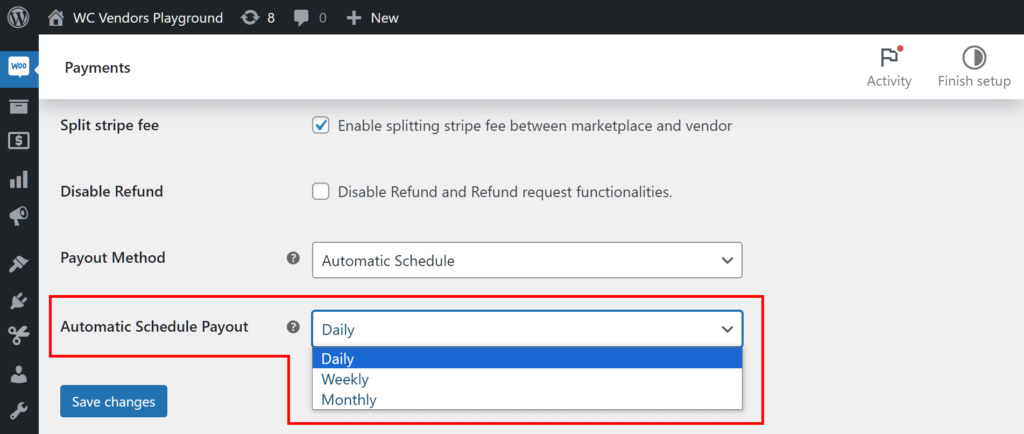
If you choose “Automatic Scheduled,” you gain access to a new option called Automatic Schedule Payout. This also has a dropdown menu that lets you select if you’ll send out automated payouts daily, weekly, or monthly.
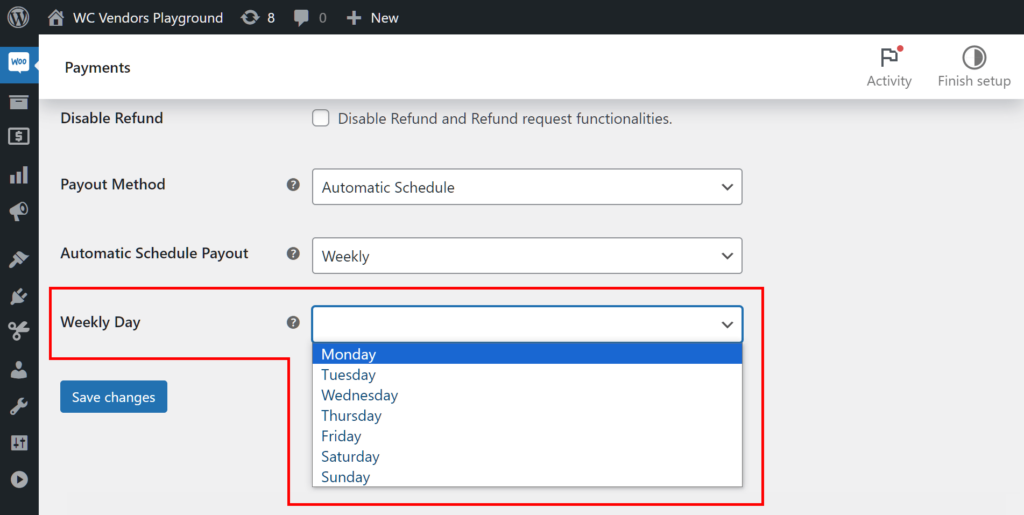
If you pick “Weekly,” you gain access to the Weekly Day option. Basically, this lets you choose which day of the week to send automated payouts.
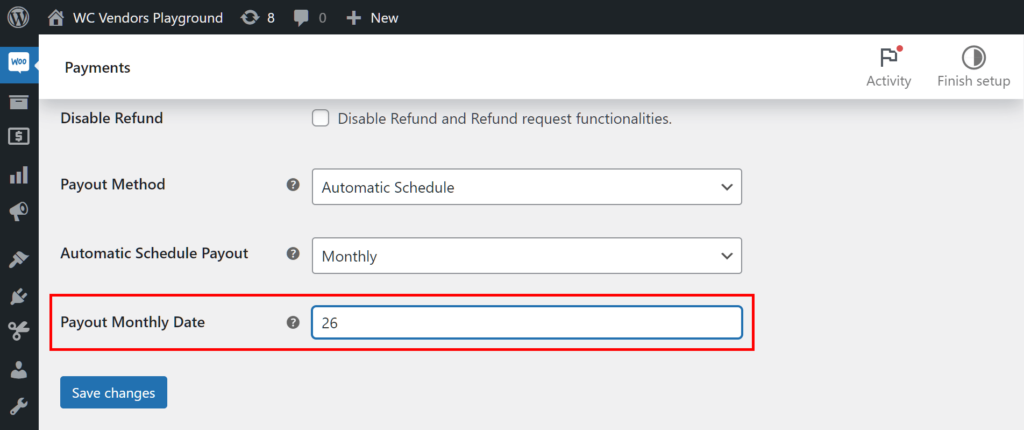
Choosing “Monthly” also grants you the Payout Monthly Date option, which has you entering data into an entry field. Simply pick a number from 1 to 31 to specify the monthly date to send vendors automated payouts.
Step 5: Save your work!
Scroll down to the bottom of the page and click the Save Changes button. This implements all the settings you’ve made on the page.
And that’s it! Now, your marketplace and vendors can use the WC Vendors and Stripe Connect integration.
Take note: To check if a vendor is connected with Stripe, go to your WordPress dashboard and click Users > All Users. Then, examine the rightmost Connect Status column to see which of your vendors are connected.
Take note, part 2: The options described above are the most crucial ones you need to manage. However, the WC Vendors Stripe Connect integration boasts many other options. To learn more about them, check out this documentation.
Conclusion
The Stripe Connect integration with WC Vendors revolutionizes the way multi-vendor marketplaces operate within the WooCommerce framework. Its array of features empowers marketplace operators to streamline transactions while ensuring the satisfaction of vendors and customers alike.
To recap, the Stripe Connect integration comes with many awesome features ensuring efficiency, convenience, and security in online commerce. Five of the best features include:
- Automation of customer payments to vendors
- Scheduled automation of payouts
- Automation of split payments between vendors and the marketplace
- Allows safe payment gateway practice through the Test Mode
- Enhanced security through official Stripe API integration
To unlock the full potential of their platforms, marketplace owners can implement the following simple steps:
- Navigate to the Stripe Connect settings
- Allow the payment gateway to process customer payments
- Determine who pays the Stripe fees
- Determine payout style
- Save your work!
Do you have any questions about the WC Vendors Stripe Connect integration? Let us know in the comments!


