Worrying about whether or not your e-commerce platform can process financial transactions accurately is understandable. However, if you’ve built your multi-vendor platform using WC Vendors, you’re in luck. After all, this WooCommerce marketplace solution boasts Stripe Connect integration, allowing you to make efficient, convenient, and secure Stripe marketplace payments.
But before you dive in headfirst, it’s essential to understand how to test your setup to ensure everything runs smoothly. Enter Stripe Connect Test Mode—a feature that allows you to simulate transactions without processing real payments.
In this guide, we’ll walk you through the simple steps to activate Test Mode to ensure your Stripe marketplace payments are error-free.
So let’s get started!
What Is WC Vendors Stripe Connect?
WC Vendors Stripe Connect is an integration that enables marketplaces powered by the WC Vendors plugin to handle payments through the renowned payment processing platform Stripe.
This integration processes credit card payments from customers and payouts to your vendors.
In addition, it automates, streamlines, and secures these transactions, allowing marketplace owners to easily manage Stripe marketplace payments. For instance, it accurately splits earnings between sellers and the marketplace, then automatically distributes said earnings.
In short, using Stripe Connect lets you enhance your multi-vendor platform’s functionality and create a smoother payment experience for all users.
What Is Stripe Connect Test Mode?
Stripe Connect Test Mode is a feature provided by Stripe that lets you simulate transactions within your WC Vendors-powered online marketplace. As such, it allows you to test the functionality and reliability of WC Vendors’ integration with Stripe Connect without processing real payments.
By testing, you can verify that Stripe marketplace payments are processed accurately, securely, and seamlessly. In addition, it helps you identify and resolve any potential issues before they can impact real transactions. Thus, Test Mode prevents financial loss and maintains user trust. Furthermore, it helps optimize the payment flow to guarantee a smooth and reliable experience for all parties involved in marketplace transactions.
Considering these factors, we strongly advise using Test Mode before deploying WC Vendors Stripe Connect to process actual payments.
How To Enable WC Vendors Stripe Connect’s Test Mode (In 3 Simple Steps)
Enabling Stripe Connect Test Mode is extremely easy. However, to access this feature, you must first convert a WordPress website into an online store using WooCommerce. Then, you must use WC Vendors to transform this store into a multi-vendor marketplace.
Have you yet to use WC Vendors to build a marketplace? Then check out our comprehensive guide, “How To Build Your First Multi-Vendor Ecommerce Website (Full Guide).”
Of course, you must have a Stripe account and set up Stripe Connect for WC Vendors. To learn how to enable this integration, read our complete guide, “How To Implement WC Vendors Stripe Connect Integration (Full Guide).”
If you’ve already accomplished all of the above, then read on to learn how to activate Stripe Connect Test Mode!
Step 1: Navigate to the Stripe Connect settings
Your first order of business is to go to the Stripe Connect settings page.
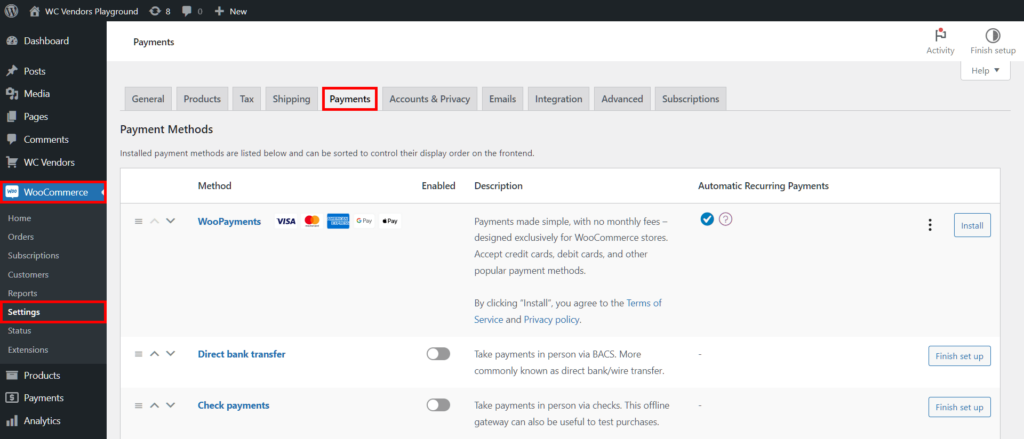
Thus, navigate to your WordPress dashboard and click WooCommerce > Settings > Payment.
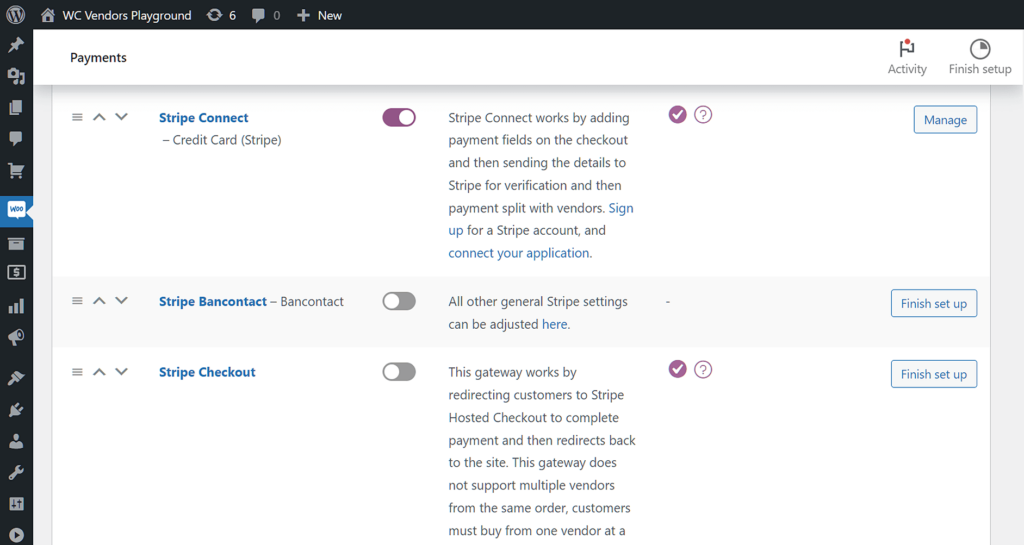
Then, look for Stripe Connect and enable it. Finally, click the Manage button to access the Stripe Connect settings.
As shown above, this page boasts many options. Now, all you have to do is enable the correct settings to activate Test Mode.
Step 2: Enable Test Mode
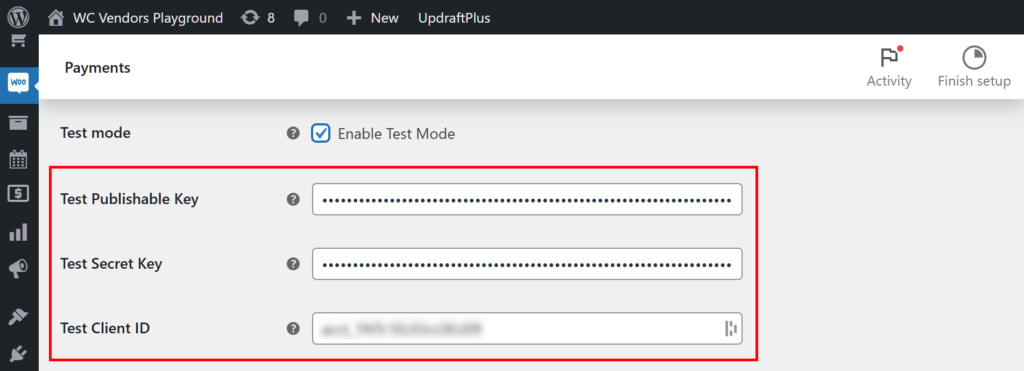
Now, look for the Test Mode option and enable it by ticking its checkbox.
However, we’re not quite done yet.
For Test Mode to let you test Stripe marketplace payments, you need API keys and a client ID.
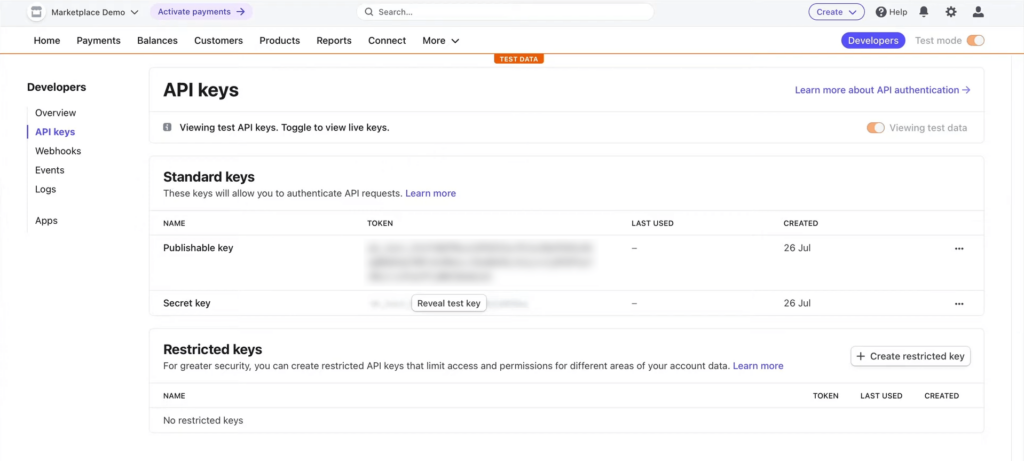
To acquire the API keys, visit your Stripe Account. Then go to Developers > API Keys and look for the Standard Keys area. In addition, make sure the Test mode option is enabled.
Now, copy Publishable Key and Secret Key and paste them into their respective entry fields on the WC Vendors Stripe Connect settings page.
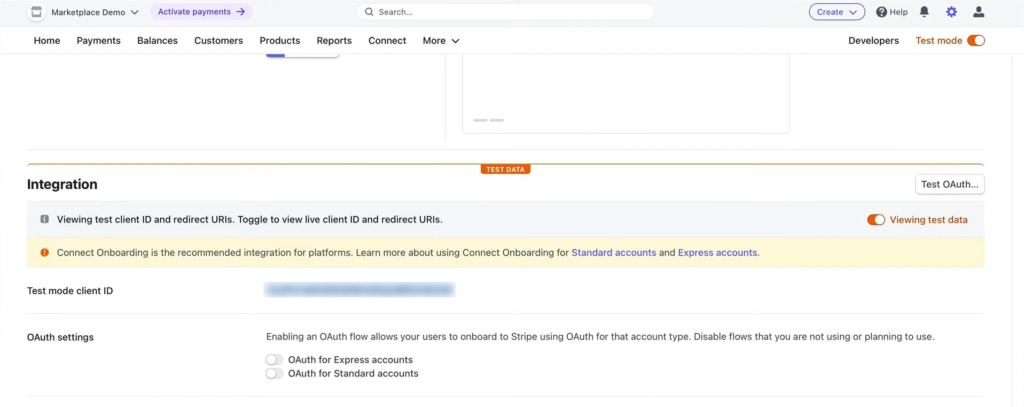
As for the client ID, return to your Stripe Account and click Settings > Connect Settings. While ensuring Test mode is enabled, search for Client ID and copy and paste the detail into its appropriate entry field on the WC Vendors Stripe Connect settings page.
Step 3: Save your work!
Scroll down to the WC Vendors Stripe Connect settings page and click the Save Changes button. This deploys the Test Mode, giving you a safe environment to test Stripe marketplace payments without affecting genuine financial transactions.
And that’s all there is to it!
How To Test Your Stripe Marketplace Payments
Now that Test Mode is working, it’s time to test your Stripe Marketplace payments.
Log into your online marketplace as the marketplace administrator. Alternatively, you can also log in as a dummy customer or even a dummy vendor.
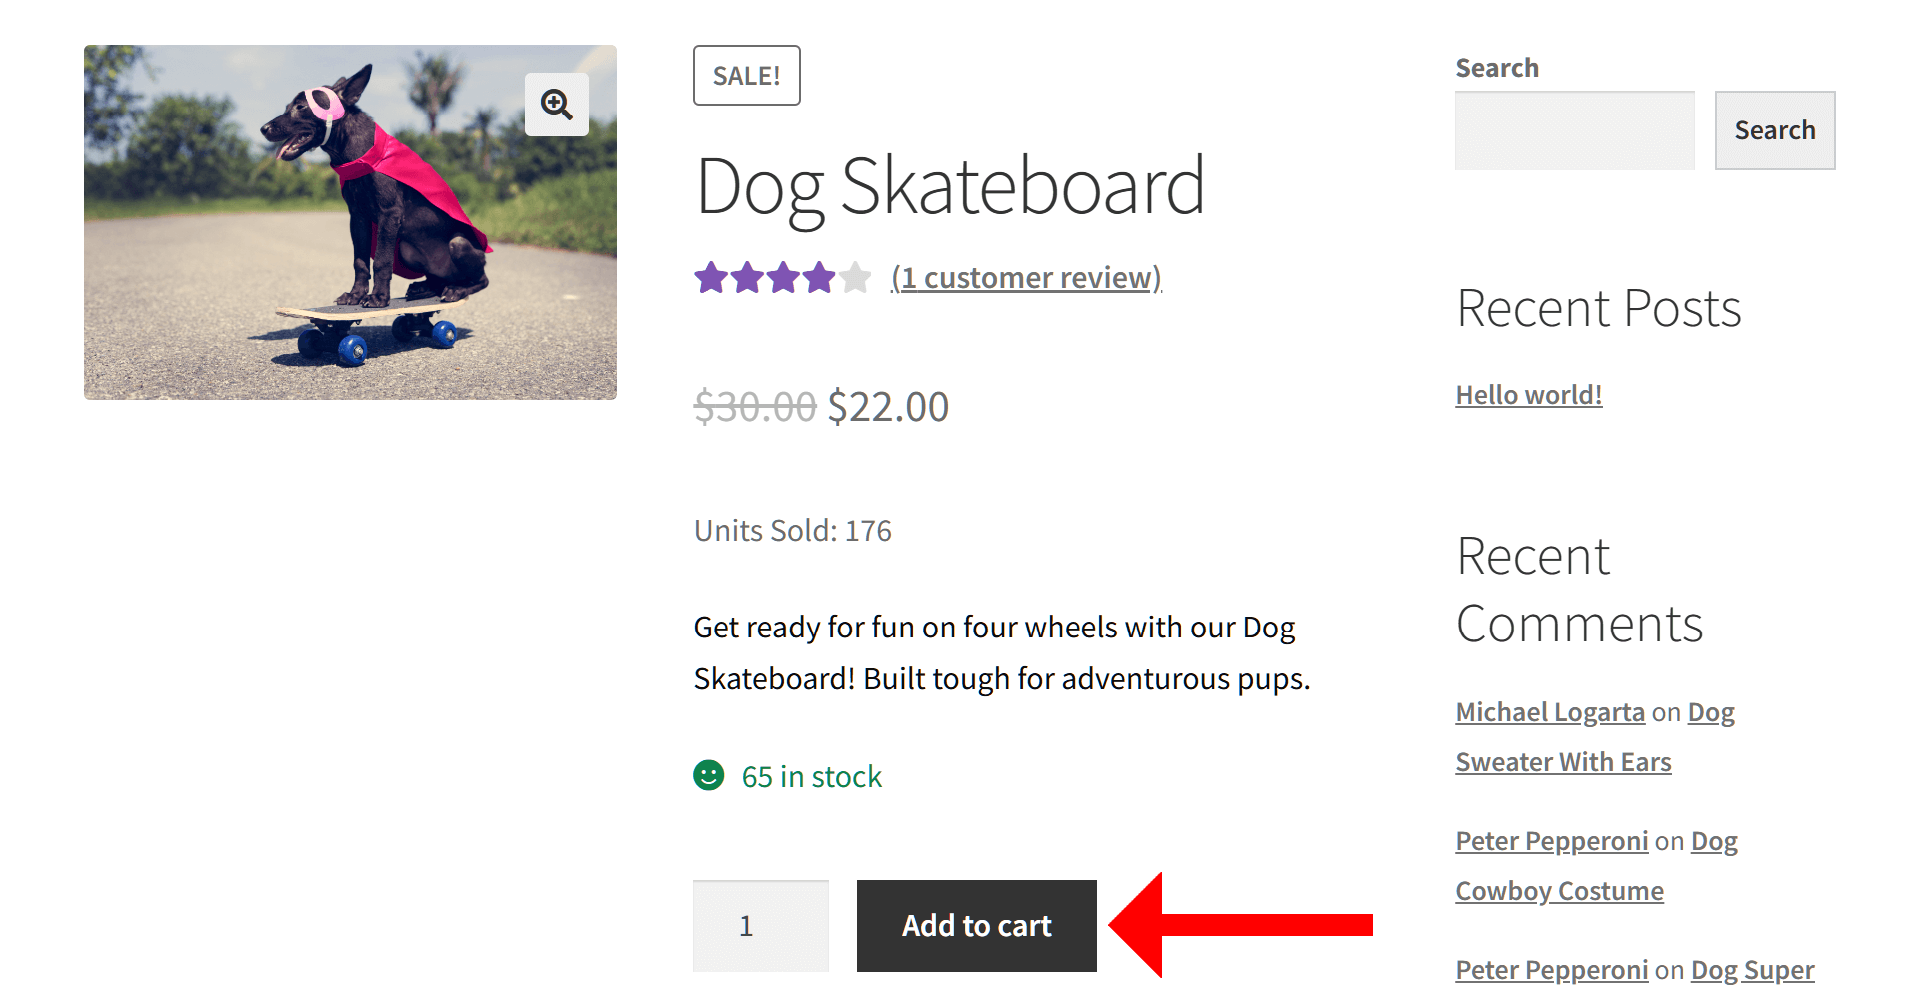
Next, visit one of the marketplace’s online stores and add one of their products to your cart.
Once that’s done, proceed to checkout.
First, provide your billing details. Then, on the lower right side of the checkout page,
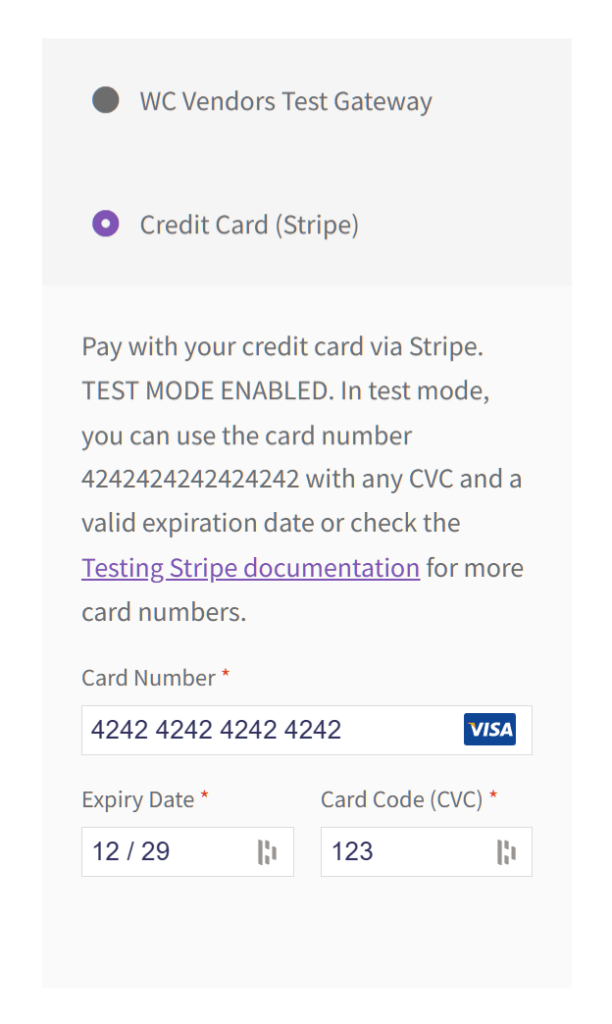
look for and select the Credit Card (Stripe) option.
As the option’s instruction states, you must enter “4242424242424242” in the Card Number entry field to make a test transaction. Then, enter any fake details into the Expiry Date and Card Code (CVC) entry fields.
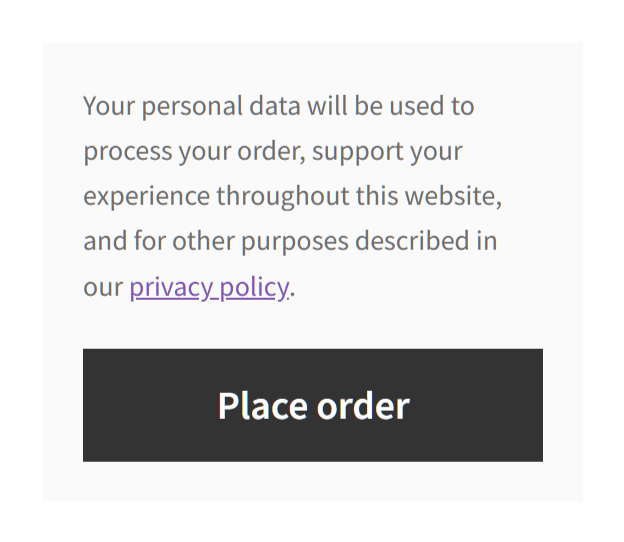
Lastly, scroll down and click the Place Order button to complete the test purchase.
If all your Stripe Connect settings are correct, the test purchase should go through without any issues.
For more information on testing Stripe marketplace payments, read this Stripe documentation.
Conclusion
Ensuring smooth and secure transactions is paramount if you’re running an online marketplace. Thankfully, through its valuable Test Mode feature, WC Vendors Stripe Connect allows you to test Stripe marketplace payments before engaging in real financial exchanges. This way, you can test your setup thoroughly, identify any potential issues, and optimize your payment flow—all without risking costly errors.
In summary, enabling Test Mode to test Stripe marketplace payments requires you to observe the following steps:
Do you have any questions about how to test WC Vendors Stripe marketplace payments in your multi-vendor platform? Let us know in the comments!


