Every aspiring or current marketplace owner dreams of running a thriving online multi-vendor marketplace. However, for such a platform to be successful, you have to take steps to ensure that it attracts customers and profits. And one of the most impactful things you can do is avoid publishing products that you have yet to scrutinize.
Publishing products makes them visible on vendor stores, thus allowing customers to see and purchase them. Unfortunately, if these products are of inferior quality, they can turn customers away, therefore robbing you of sales. Worse, unhappy customers can tell others about their negative experiences with your platform, tarnishing your brand’s reputation.
For this reason, it’s to your best benefit to examine all the products your vendors wish to sell before making them available to customers.
Today, we’ll discuss the benefits of preventing vendors from publishing products without the approval of the marketplace owner or administrator. In addition, we’ll show you how to use WC Vendors to implement the vendor approval prerequisite.
So let’s get right into it!
Why Publishing Products Only After Vendor Approval Is Ideal
As the owner of a marketplace, you’re the manager of a team of vendors whose goal is to sell their products through your platform.
To sell their products, every vendor first has to publish their products via their online store. Basically, this is the process of adding products to their store and making them visible and purchasable to customers.
However, to ensure the quality and relevance of the products on your marketplace, it’s a good idea to not let vendors publish them anytime they wish. This grants you the opportunity to study every vendor-submitted product so that you can determine whether or not it’s an ideal fit for your marketplace. This way, you can publish products that meet the marketplace standards while discarding those that don’t.

To further illustrate the importance of publishing approved products only, here are the 5 key benefits of preventing vendors from publishing products without your approval:
1. Maintain quality standards
Approving products before publishing ensures that only high-quality items aligning with your marketplace standards make it to the virtual shelves. This not only boosts customer satisfaction but also enhances your marketplace’s reputation.
2. Curate a unique marketplace
Crafting a distinctive marketplace requires careful curation of products. With strategic approvals, you have the control to shape a unique and cohesive selection that sets your platform apart.
3. Build trust with customers
A curated marketplace instills confidence in customers. They are more likely to trust and make repeat purchases when they know your platform is dedicated to offering vetted and reliable products.
4. Empower vendors
By setting clear approval guidelines, you empower vendors to align with your marketplace’s vision. This collaborative approach fosters a positive relationship between you and your vendors, ensuring a shared commitment to quality.
5. Enhance user experience
A clutter-free marketplace with thoughtfully approved products enhances the overall user experience. After all, it lets customers easily find what they’re looking for, leading to increased engagement and conversion rates.

How To Prevent Vendors From Publishing Products Without Your Approval (In 3 Easy Steps)
It’s time to learn how WC Vendors lets you prevent vendors from publishing products without the marketplace owner/administrator’s approval.
However, before we get to that, you should know that using WC Vendors requires an online store that’s powered by:
Furthermore, you’ll have to use WC Vendors to convert your WooCommerce store into a multi-vendor marketplace. Check out the following articles if you’d like instructions on how to accomplish this:
- How To Create An Online Marketplace: A Beginner’s Guide
- How To Build Your First Multi-Vendor E-commerce Website (Full Guide)
Now that we’re done with that, let’s start the guide!
Step 1: Navigate to the Permissions page
WC Vendors allows you to choose the abilities your vendors can access via the Permissions page.
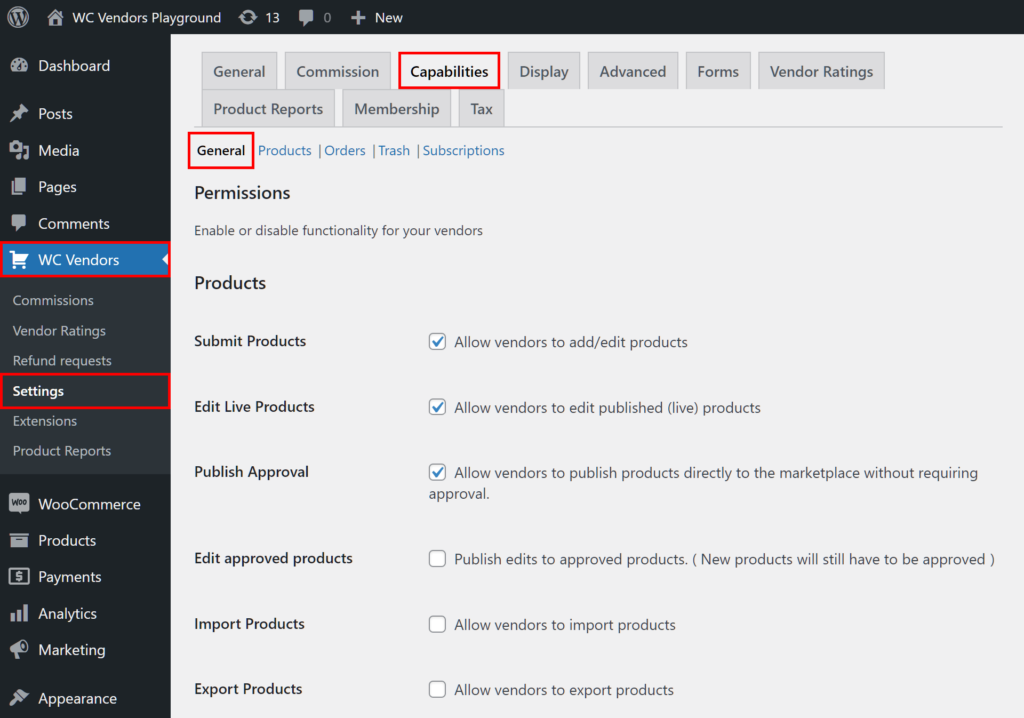
So, how do you get there? First, go to your WordPress dashboard. Next, click WC Vendors > Settings followed by the Capabilities tab. Lastly, select the General subtab.
As you can see, the Permissions page is where you’ll find plenty of options granting you control over the powers vendors can wield. To activate an option, all you have to do is tick its checkbox. Thus, to deactivate it, you must untick said checkbox.
Step 2: Disable the Publish Approval option
Now, it’s time to prevent vendors from publishing products without your approval.
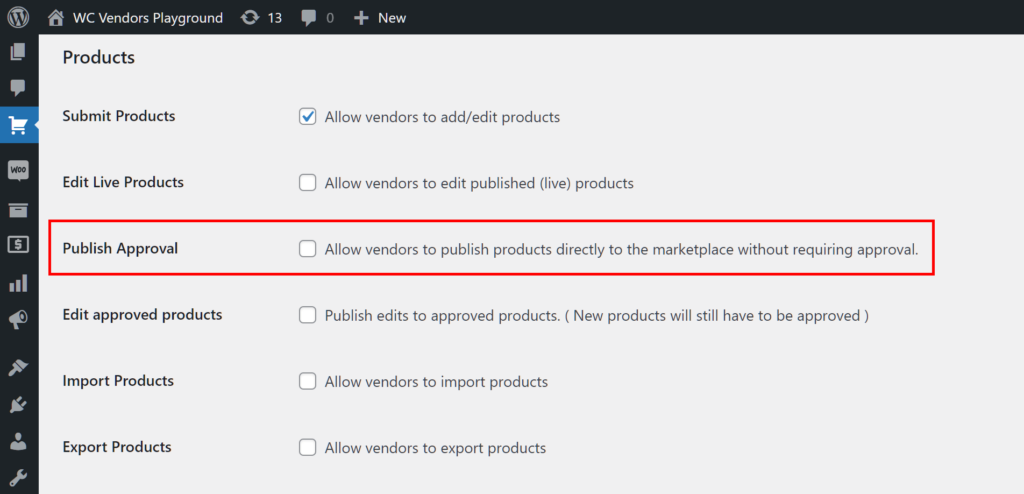
Under the Products area, look for the Publish Approval option. As the option’s description says, enabling the option allows vendors to publish their products directly to their stores without your approval.
Thus, to require vendors to obtain your approval before they can publish products, you have to disable the option. And to do this, simply untick the option’s checkbox as shown below.
And that’s it! With the option disabled, vendors can no longer publish products without your approval.
Take note: Make sure the Submit Products option is enabled. Otherwise, your vendors won’t be able to submit products to their stores at all!
Step 3: Save your work!
Once you’re finished modifying your Permissions settings, scroll down the page and click the Save Changes button. This activates all the relevant options so that vendors can only publish products to their stores once you’ve approved them.
Publishing Products – The Approval Process
Let’s say a vendor has submitted an item to their online store. How do you approve the publishing of this product so that the vendor can start selling it on said store?
The vendor’s perspective
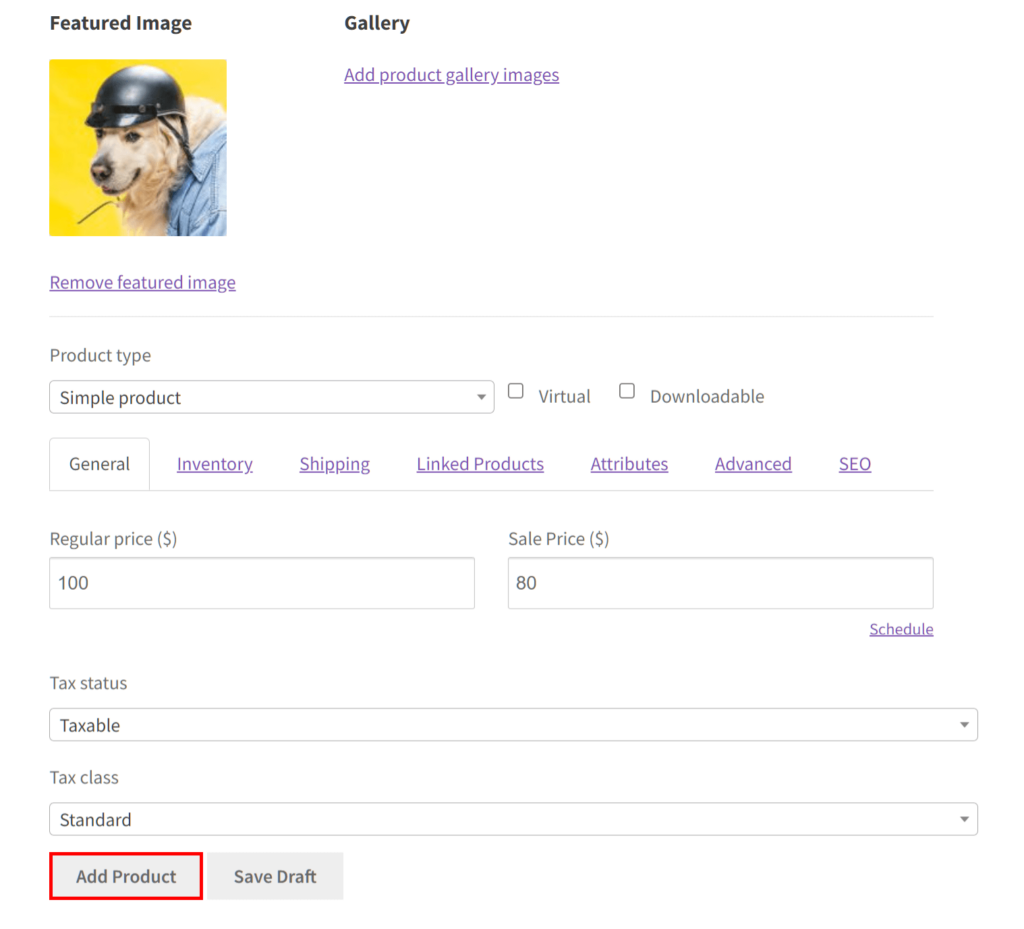
First, let’s take a look at the vendor’s perspective. To submit a product for approval, they must first go to their Add Product page and fill in various fields with the product’s details. Once this task is complete, they must then click the Add Product button.
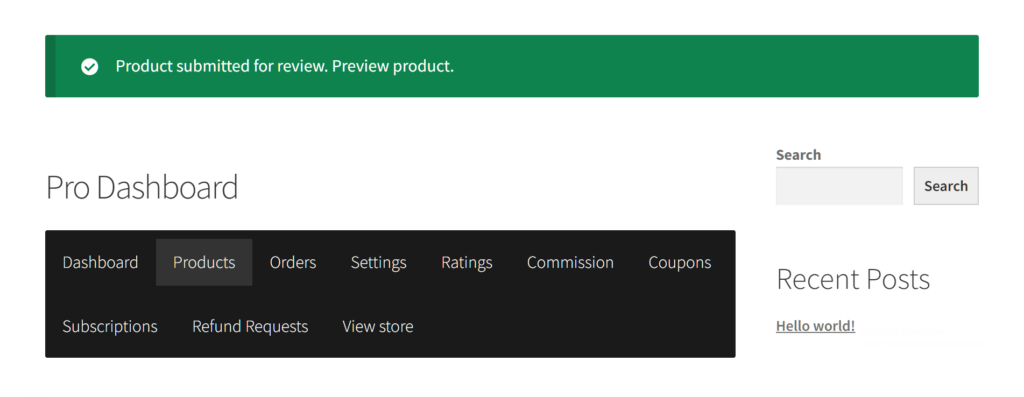
Upon clicking this button, the vendor will be returned to their dashboard. Here, they’ll receive a notification informing them that their product hasn’t been published yet as it first requires your approval.
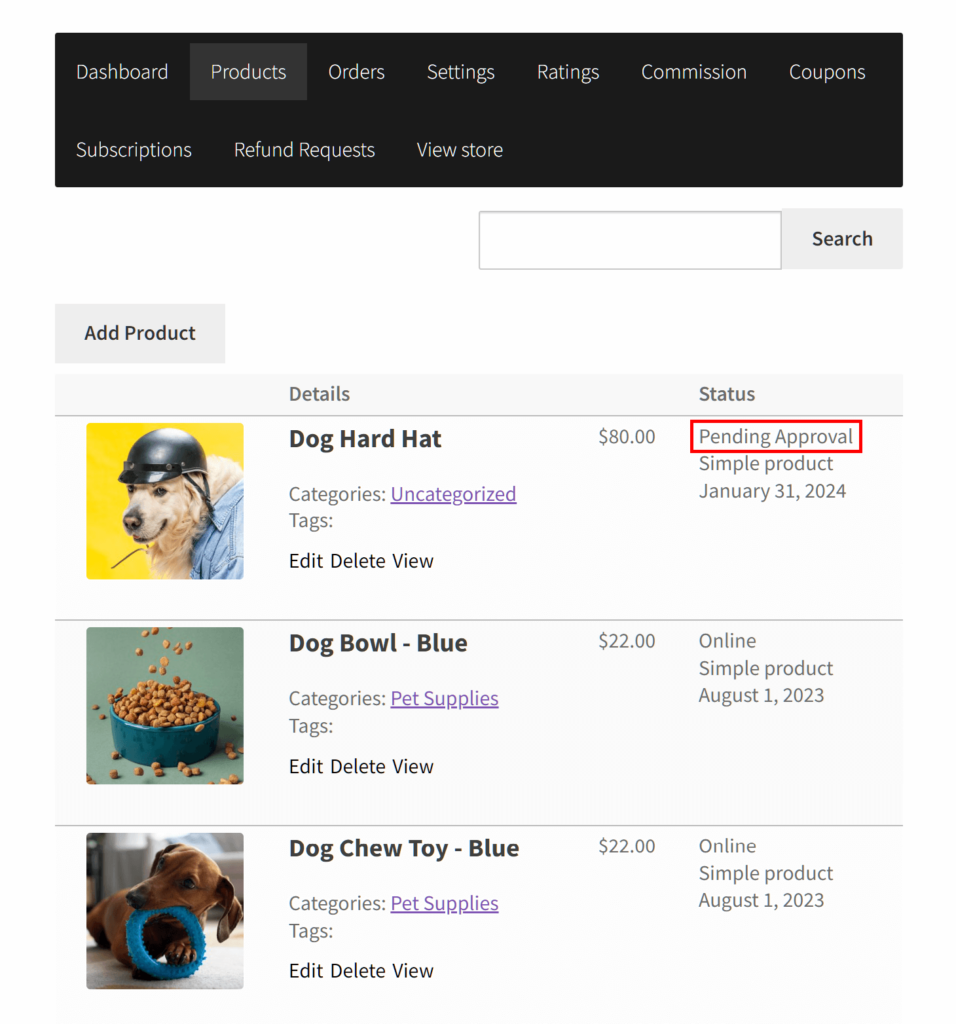
If the vendor examines their list of products, they’ll see that the newly submitted product has the “Pending Approval” status. In our example below, the pending product is “Dog Hard Hat.”
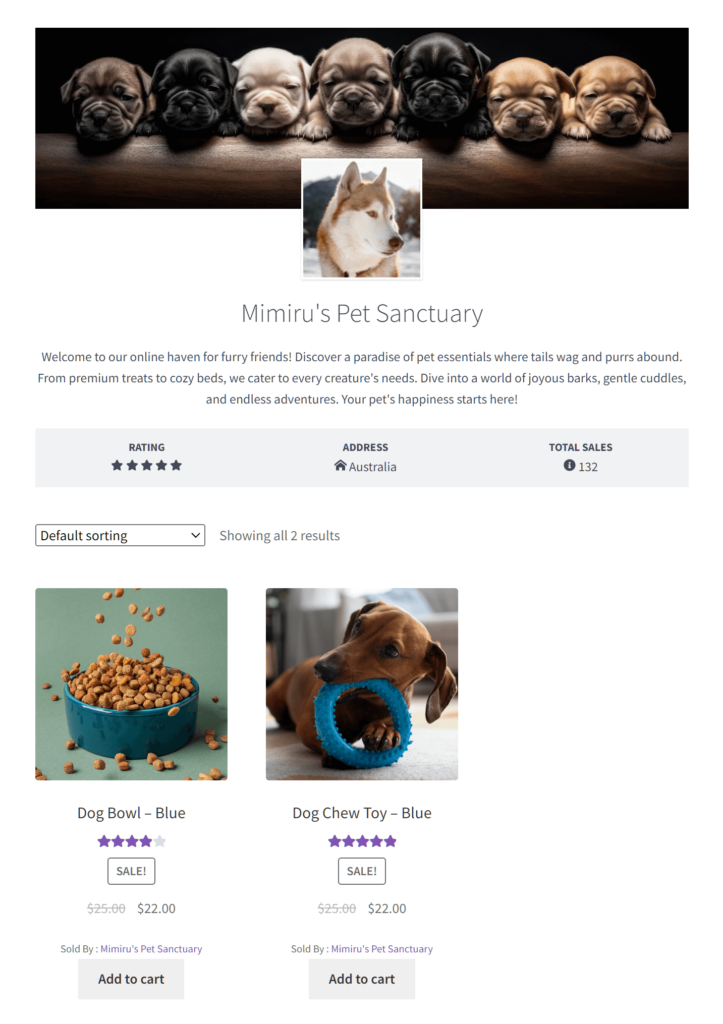
Any product with the “Pending Approval” status won’t be visible to customers, as illustrated below.
The marketplace owner/admin’s perspective
Now, let’s see how you or the marketplace administrator can approve the submitted product.
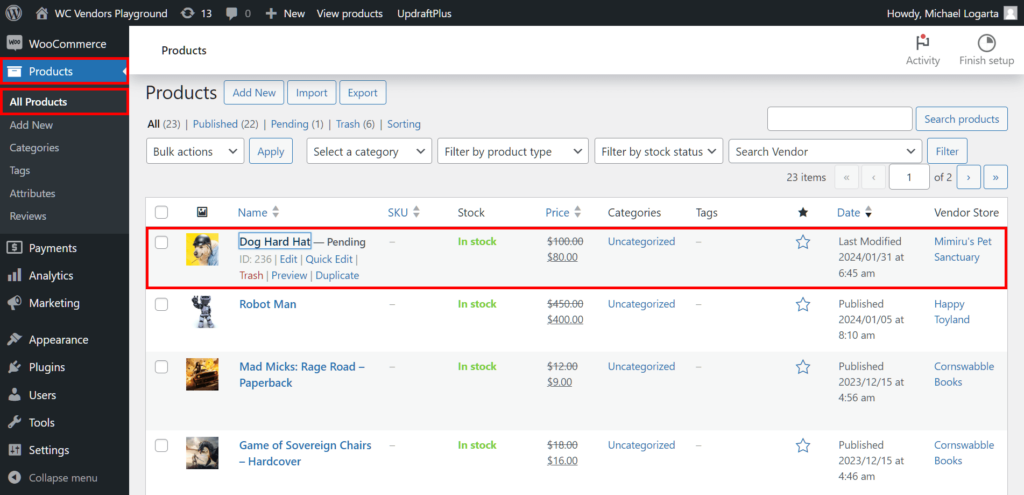
First, navigate to your WordPress dashboard. Then, click Products > All Products. This takes you to the Products page, which lists all the products on your marketplace.
Search for the pending product. Continuing with our example, it’s “Dog Hard Hat,” which as you can see has been assigned the “Pending” status.
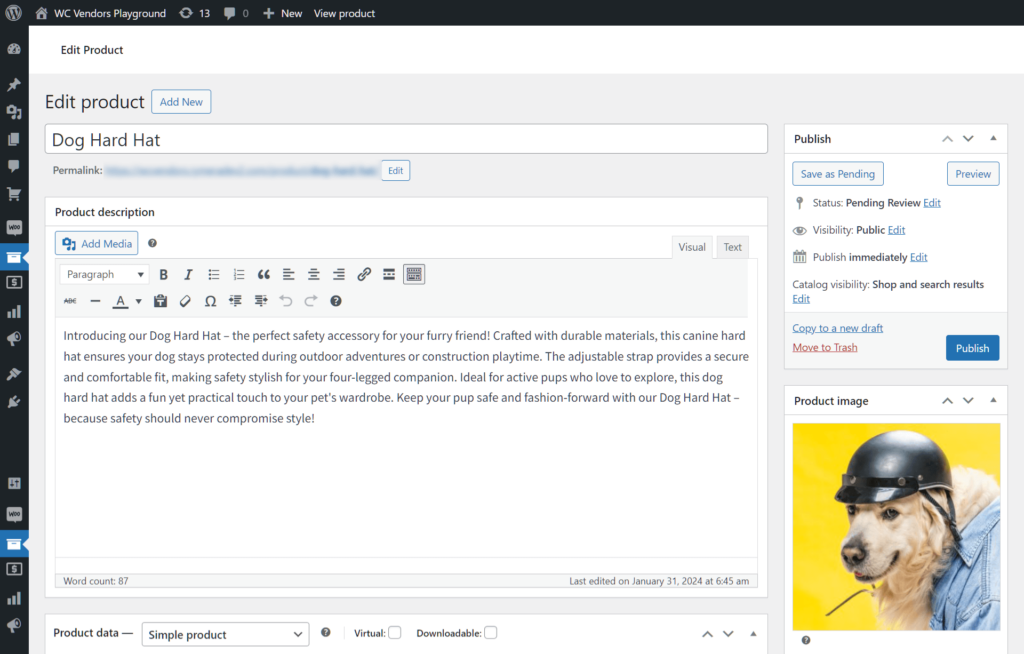
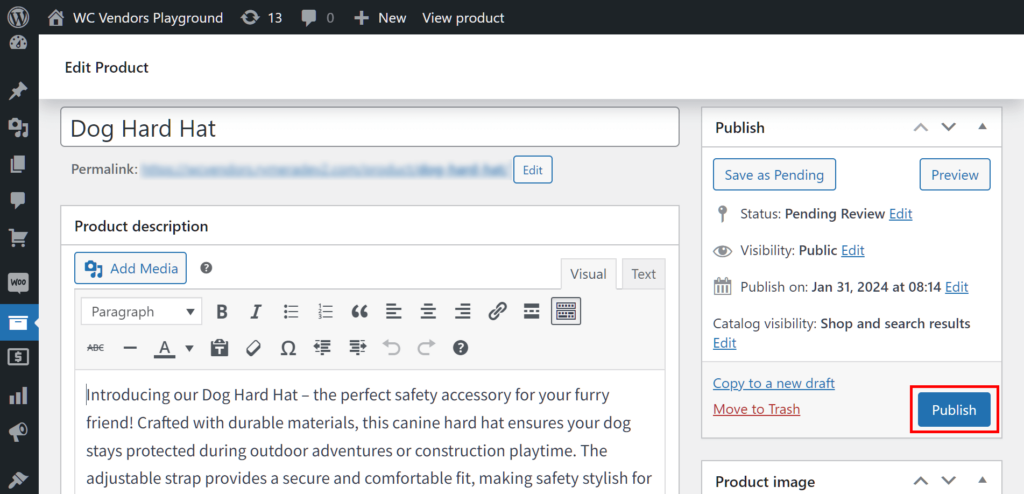
Clicking the product takes you to its Edit Product page. Here, you can modify the item’s various elements, such as its Product Description, Regular Price, etc.
Our goal for this tutorial, however, is to publish the product. Therefore, go to the Publish box on the upper right side of the page, then click the Publish button. Doing so publishes the product so that it appears on the vendor’s store and becomes visible to customers, allowing them to purchase it if they wish to.
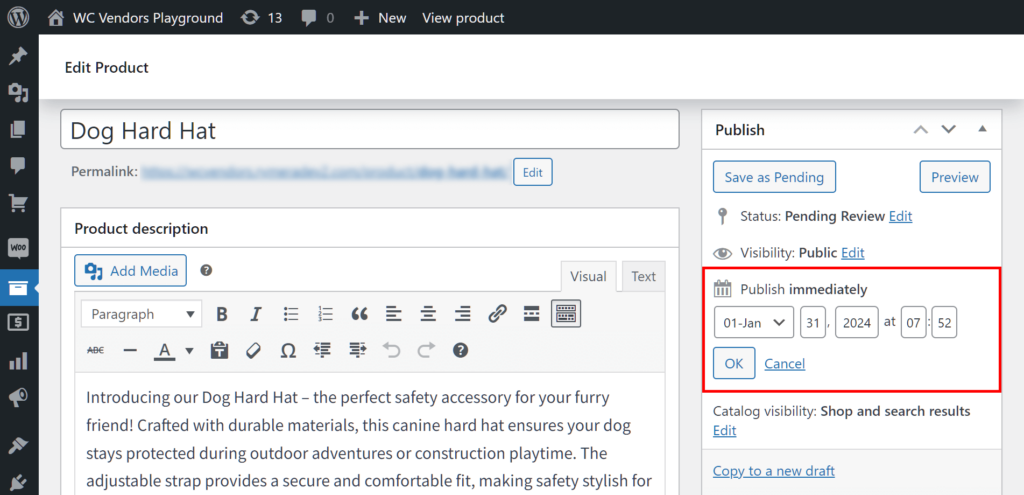
Take note: If you don’t want to publish the product immediately, you can instead click the Publish Immediately/Publish On option’s Edit button, enter a future date, click OK, and then click the Schedule button. Basically, this publishes the item on the date provided.
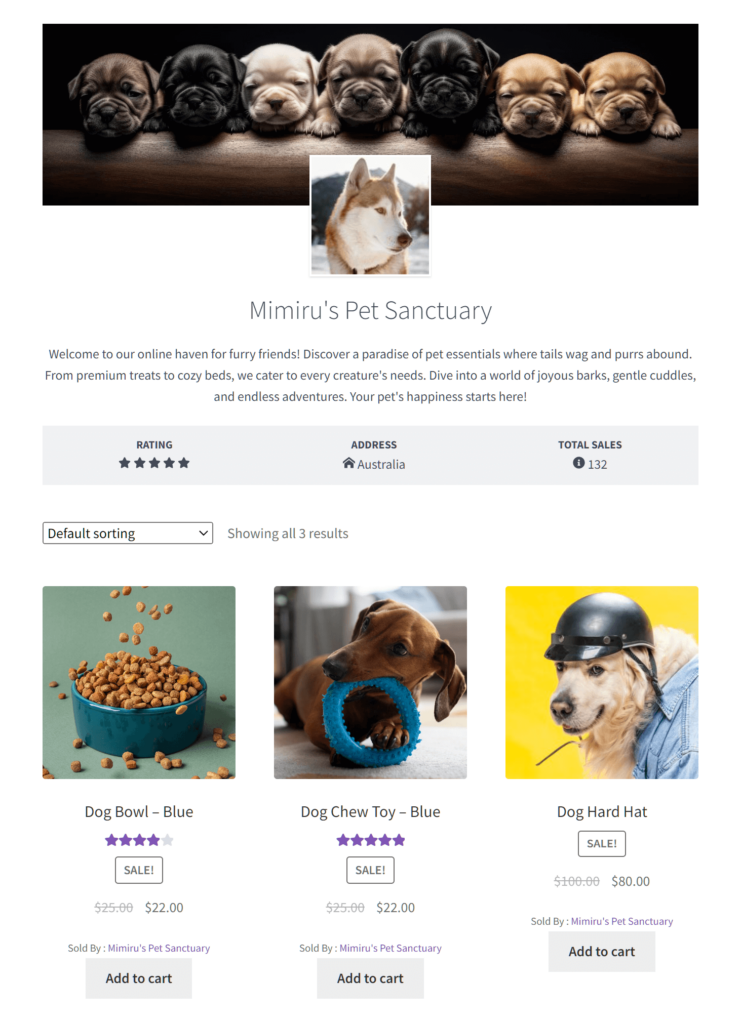
Once the product has been published, it will appear to customers on the vendor’s store:
Conclusion
To guarantee that your marketplace is home to only relevant, high-quality products, it helps to prevent vendors from publishing products without your approval.
Thankfully, you can use WC Vendors to publish products only once you’ve approved of them. To do so, simply observe the following steps:
Do you have any questions about publishing products? Reach out to us and let us know; we’d be happy to hear from you!
