Are you considering implementing product permission options in your marketplace? Then know that few are as pivotal as granting vendors control over their products.
Remember: a multi-vendor marketplace is an online platform where multiple sellers gather to sell their products. If your vendors can’t carry out essential tasks – such as expanding their inventories and updating their listings – you could end up slowing down or even crippling your business.
Today, we’ll explore the value of this product permission option in the context of online marketplaces. Furthermore, we’ll teach you how to use the powerful marketplace solution, WC Vendors, to give your vendors control over their products.
So let’s get started!
What Does It Mean To Grant Vendors Product Control?
Granting vendors product control means giving them the authority and ability to manage their products within a marketplace platform.
In its most basic sense, this control includes functionalities such as:
- Adding new products: Every vendor can add items to their store to be sold to customers.
- Editing existing products: Every vendor can make changes to the items in their store. For example, they can update descriptions, images, pricing, and more.
But why should you implement such product permission options for your vendors in the first place?
Importance Of Granting Vendors Product Control
Granting vendors product control contributes to the successful management of a multi-vendor marketplace. After all, it leads to the following benefits:
1. Empowerment and autonomy
By providing vendors with control over their products, you give them the power to manage their stores independently. This autonomy fosters a sense of ownership and responsibility, motivating vendors to actively engage with their businesses and strive for success.
2. Enhanced product quality
Allowing vendors to control their products lets them maintain and update their listings. This ensures the accuracy of product information, including descriptions, images, and pricing. In turn, accurate information can lead to higher-quality listings that attract and retain customers.
3. Flexibility and adaptability
Each vendor has unique preferences and requirements. Thankfully, offering them control over product-related functionalities – such as submitting, editing, importing, and exporting products – lets them accommodate diverse business models and strategies. This flexibility helps vendors meet their needs.
4. Streamlined operations
Efficiently managing product-related tasks is vital for the smooth operation of your marketplace. By giving vendors control over their products, you simplify administrative processes, thus reducing the burden on your team. Vendors can handle regular tasks such as adding new products and updating inventory, allowing you to focus on other important business-related projects.
5. Competitive advantage
The marketplace industry is extremely competitive. Thus, vendors need tools that can help them stand out and make their offerings unique. Providing comprehensive product control features gives vendors a competitive edge. After all, this allows them to customize and optimize their product listings according to market trends, customer preferences, and business objectives.
How To Grant Vendors Control Over Their Products In Your Marketplace (In 3 Steps)
So, we’ve established that for your marketplace to function, you need to offer your vendors certain freedoms where their products are concerned. But how do you do that?
Is your marketplace powered by WC Vendors? Then implementing this product permission option is super easy! After all, this robust WooCommerce marketplace solution facilitates the creation of multi-vendor marketplaces.
Assuming you already know how to build a multi-vendor platform using WC Vendors, all you have to do is execute the following steps:
Step 1: Navigate to the Permissions page
The Permissions page is where you’ll find all the options for enabling or disabling functionalities for vendors. Thus, it’s on this page you can give vendors various product controls.
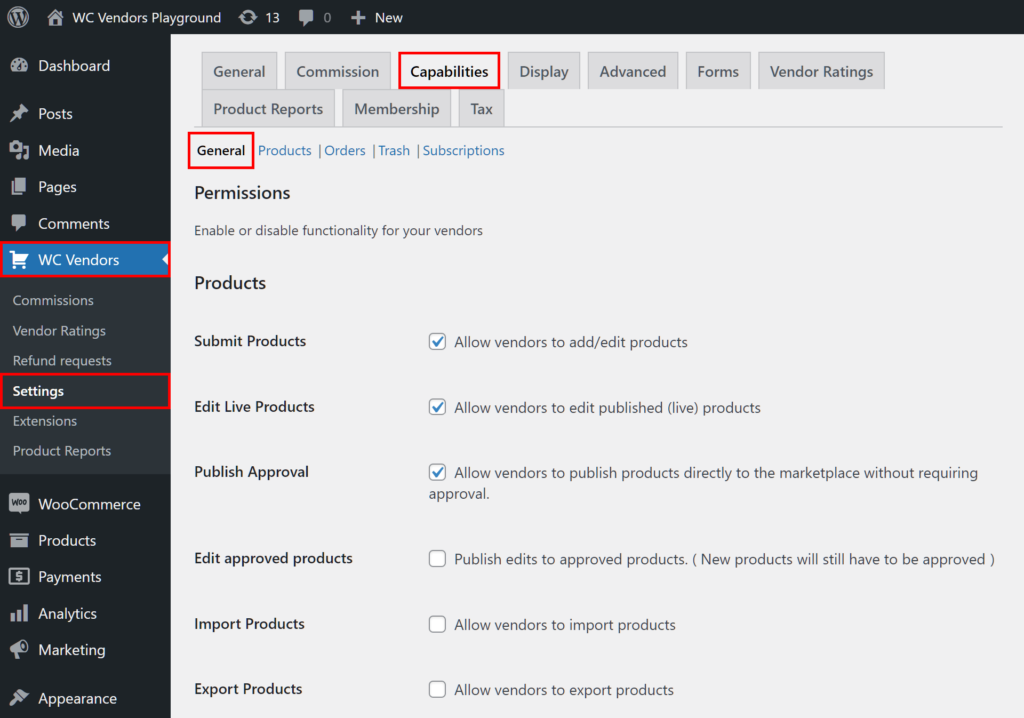
To locate this page, head to your WordPress dashboard and click WC Vendors > Settings. Then, click the Capabilities tab followed by the General subtab.
Now that you’re on the Permissions page, you’ll immediately see the Products area.
As Products contains all the product permission options for your vendors, we’ll focus on it in the next step.
Step 2: Configure your product permission options
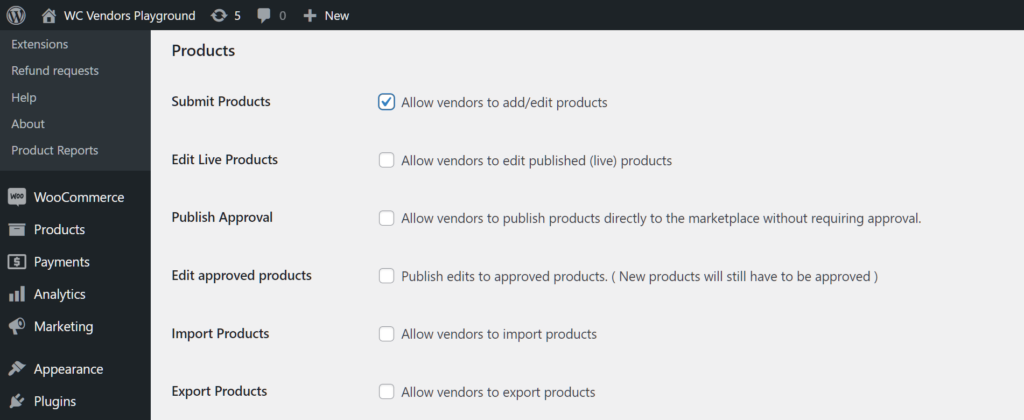
It’s time to explore each product permission option to discover what you should enable or disable for your marketplace.
To enable an option, simply tick its checkbox. To disable it, untick its checkbox.
Submit Products
Among the most crucial product permission options, Submit Products allows the vendor to submit products to their store in your marketplace.
So, what happens to submitted products? It depends on the status of the Publish Approval option (more on this below). Basically, if Publish Approval is enabled, submitted products are immediately published. In other words, they’re added to the store, allowing the vendor to sell them.
If you want your vendors to be able to populate their stores with their products, make sure to enable Submit Products.
For a more detailed discussion on the Submit Products product permission option, check out our article, “Product Submissions: How To Let Vendors Add Items To Their Stores.”
Publish Approval
For your marketplace to succeed, it’s vital to ensure that your vendors sell high-quality products only. Thus, you should scrutinize every item your vendors submit before allowing them to be published.
This is where Publish Approval comes in. When disabled, a submitted product isn’t automatically added to the store. Instead, its data is stored in the marketplace backend, where you can examine it to determine if it’s right for your platform. Only once you approve the submission will it be added to the vendor’s store. On the other hand, a rejected product doesn’t get published in their store.
For a more detailed discussion on the Publish Approval product permission option, check out our article, “Publishing Products With Your Approval: How To Manage Vendors Effectively.”
Edit Live Products
When enabled, Edit Live Products allows the vendors to edit products that have already been published on their store.
Import/Export Products
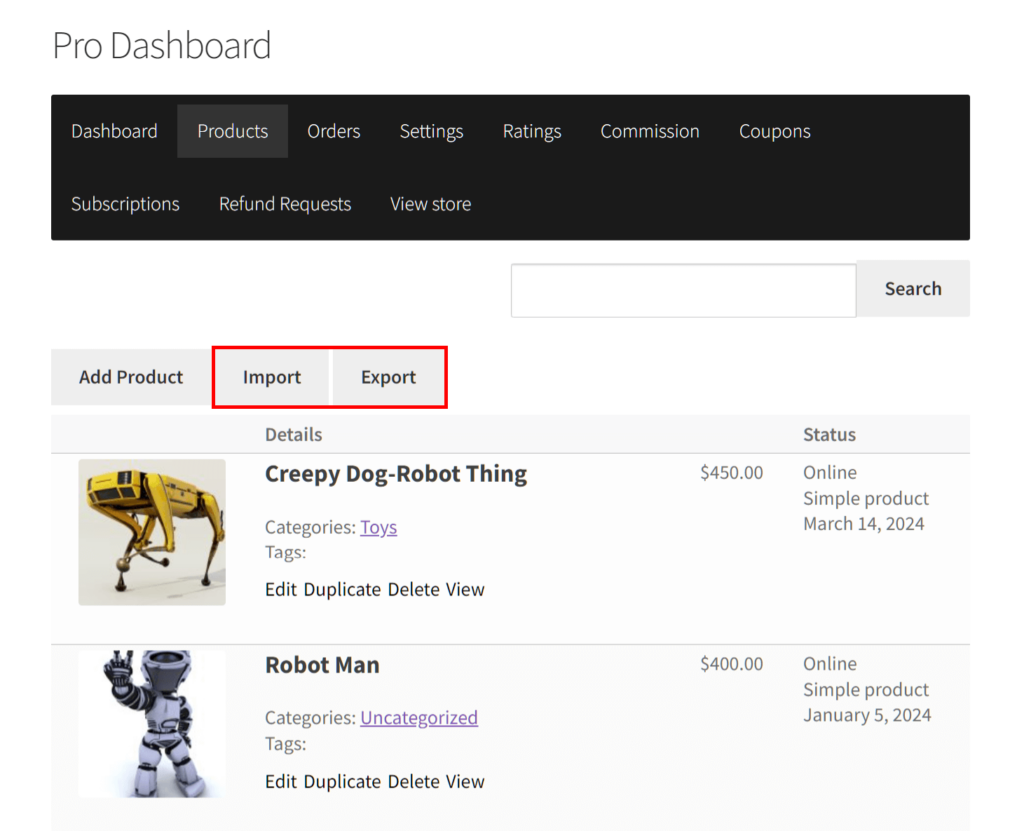
When enabled, Import Products allows the vendor to bring products from external sources into their store. To start the product import process, the vendor must go to their vendor dashboard, click the Products panel, and then click the Import button.
When enabled, Export Products allows the vendor to transfer products from their store to an external location. To start the product export process, the vendor must go to their vendor dashboard, click the Products panel, and then click the Export button.
Putting it all together
Ultimately, which of the aforementioned options you enable or disable is up to you. However, the two most important settings to make are:
- Enable Submit Products
- Disable Publish Approval
With this configuration, all vendors in your marketplace can submit products, but only products you’ve approved are added to their stores. This way, you can ensure all items on your marketplace meet your standards.
And now, for one final step…
Step 3: Save your work!
Scroll down to the bottom of the page and click the Save Changes button. This activates all the configurations you’ve made.
And that’s it! Your vendors can now enjoy the product control abilities you’ve enabled for them!
Conclusion
Granting vendors control over their products isn’t just about delegation; it’s about encouraging collaboration, empowering store ownership, and driving the overall success of your marketplace.
By prioritizing vendor empowerment and facilitating efficient product management, you create a thriving ecosystem where vendors can thrive and customers can find the products they love.
To recap, you must enable and disable specific product permission options to give vendors control over their products. You can do this by simply observing the following steps:
Do you have any questions about the product permission options for your vendors? Reach out to us and let us know; we’d be happy to hear from you!
