
If your vendors need to send invoices to their customers, WC Vendors Pro lets each vendor email a PDF invoice from their order dashboard. This article shows you how to turn on the feature, customise the email, and choose what appears on the invoice.
What are per-vendor invoice emails?
When this feature is on, a Send Invoice button appears on each order in a vendor’s order list. The vendor clicks it, and the customer gets an email with a PDF invoice attached. The invoice shows only that vendor’s items from the order.
If a customer bought from multiple vendors in one order, each vendor can send their own separate invoice. The customer gets one email per vendor, each with its own PDF.
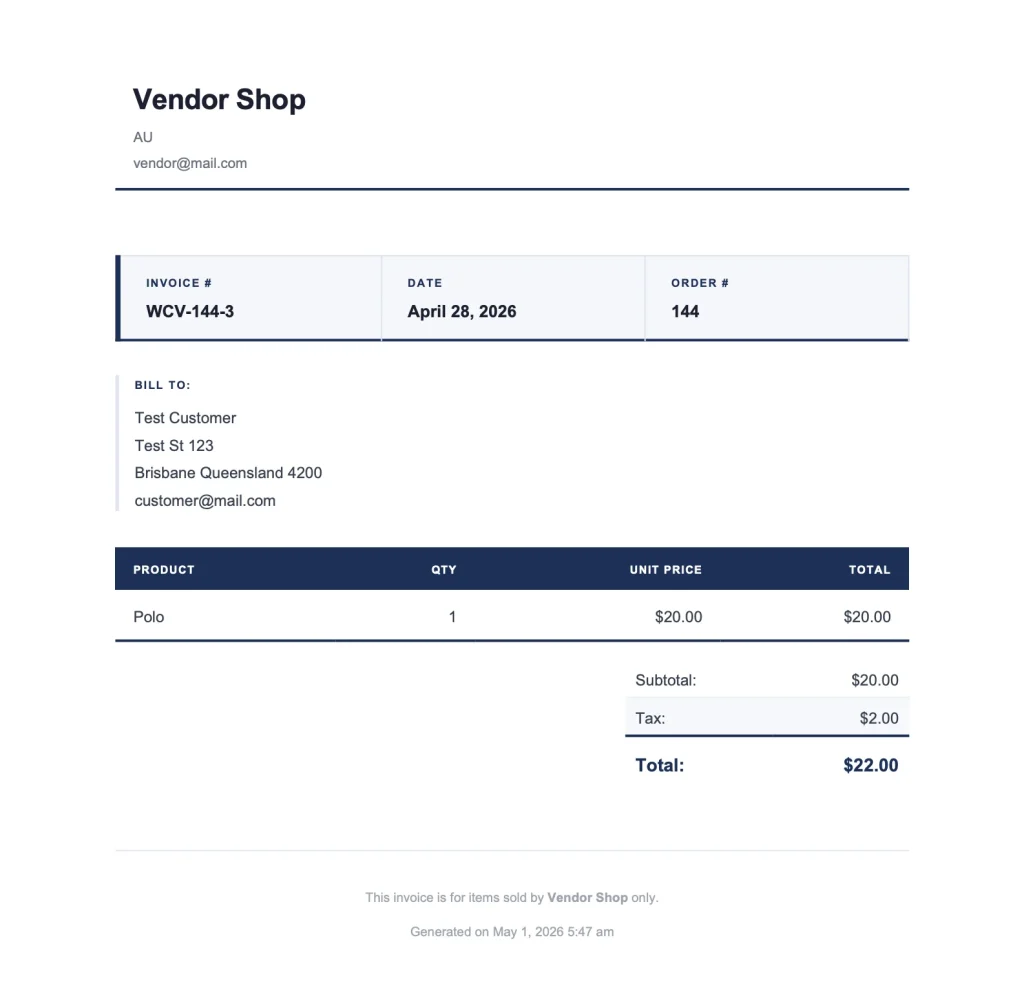
By default, the PDF invoice shows the vendor’s shop name and logo (if set), their contact details, a list of the customer’s items from that vendor, and that vendor’s subtotal and total, plus shipping and tax when your commission settings give them to the vendor. As the admin, you can hide any of the vendor’s details, or show your marketplace details in the PDF header instead. See Step 2 below.
Requirements
You need the following in place before you enable vendor invoices:
- WC Vendors Pro version 2.0.9 or later, installed and active
- WooCommerce installed and active
- WC Vendors (free) installed and active
Step 1: Enable PDF invoices
This feature is off by default.
- In your WordPress admin, go to WC Vendors → Settings.
- Click the Capabilities tab.
- Click Invoice in the sub-navigation under the tabs.
- Check PDF Invoices.
- Click Save changes.
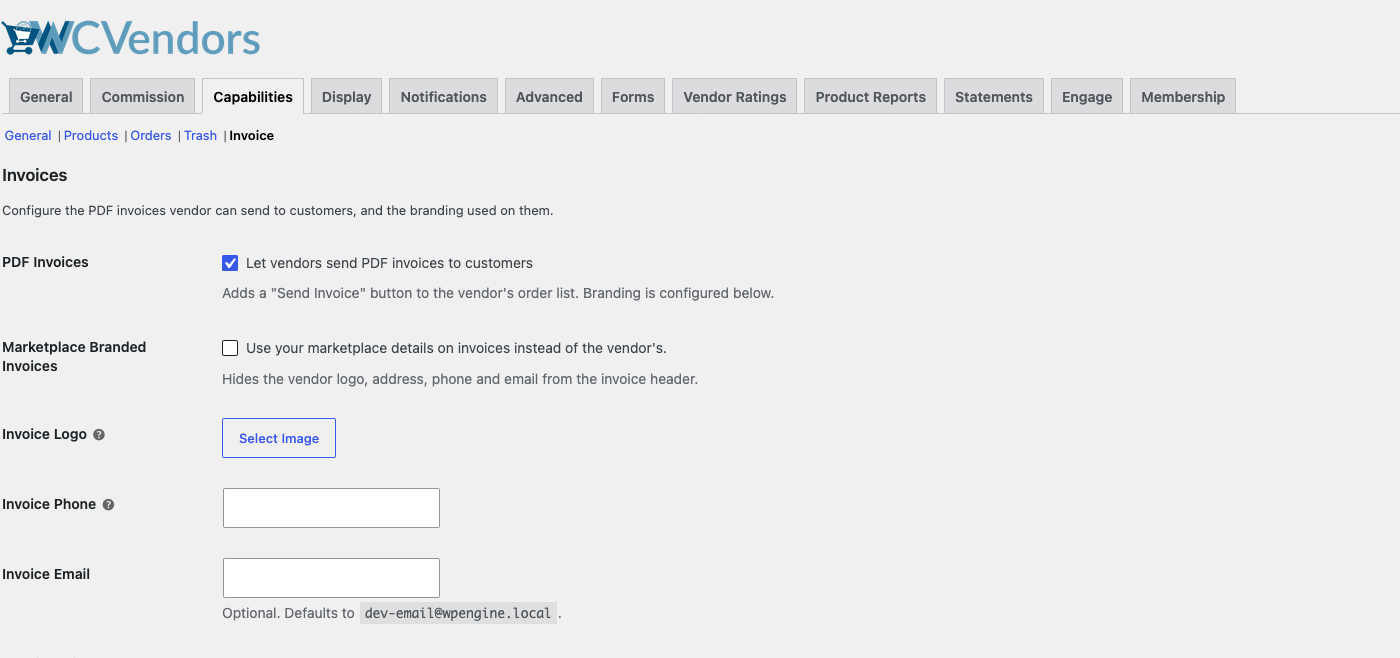
Vendors now see a Send Invoice button on their orders.
Step 2: Choose what appears on the invoice (optional)
The same Invoice section has two more groups of settings. Both are optional.
- Marketplace Branded Invoices: shows your marketplace logo, name, and contact details in the PDF header instead of the vendor’s. The name is your site title from Settings → General. The address is the store address from WooCommerce → Settings → General. You can set an Invoice Logo, Invoice Phone, and Invoice Email. If you leave Invoice Logo empty, your site logo is used. If you leave Invoice Phone empty, no phone number shows. If you leave Invoice Email empty, your WordPress admin email is used. The PDF footer still names the vendor: This invoice is for items sold by [Shop Name] only. This setting changes the PDF only. The email still uses the vendor’s details.
- Invoice Fields: checkboxes for the logo, shop name, store address, phone number, and email address. All of them are on by default. Uncheck a field to hide it. The logo shows only in the PDF header. The other fields show in both the email and the PDF.
To change these settings:
- Optional: Check Marketplace Branded Invoices to show your marketplace details in the PDF header.
- Optional: Under Invoice Fields, uncheck each detail you want to hide.
- Click Save changes.
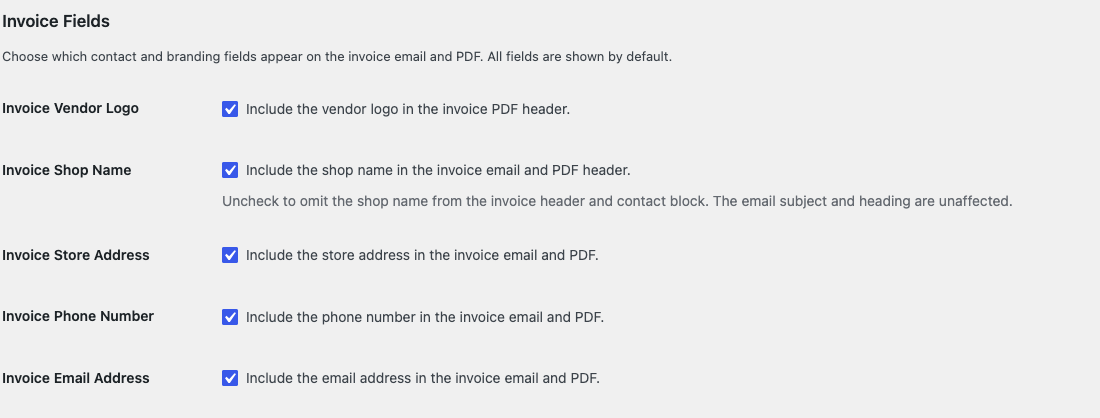
Hiding the shop name removes it from the PDF header and the email contact details. The vendor’s shop name still shows in these places:
- The email subject.
- The email heading.
- The opening line of the email, for example Your invoice from [Shop Name] for order #[Order Number] is attached.
- The note below the item list in the email: Items sold by [Shop Name] only.
- The PDF footer: This invoice is for items sold by [Shop Name] only.
For the full list of these settings and what each one shows, see How to send separate PDF invoices for each vendor.
Step 3: Customise the email (optional)
The email customers receive uses default subject and heading text. You can change both from the WooCommerce email settings. The PDF Invoices setting in Step 1 controls whether vendors can send invoices.
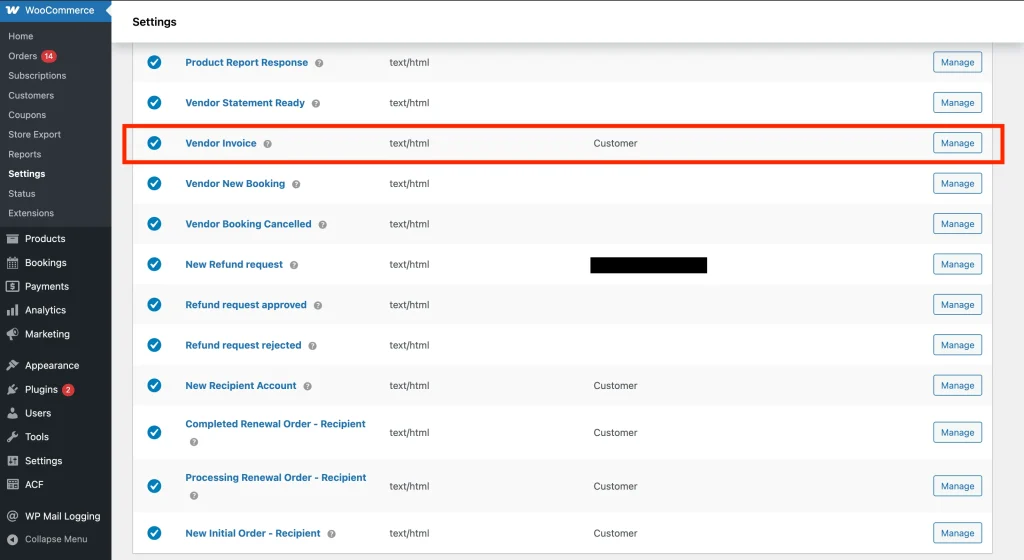
- Go to WooCommerce → Settings → Emails.
- Find Vendor Invoice in the email list and click Manage.
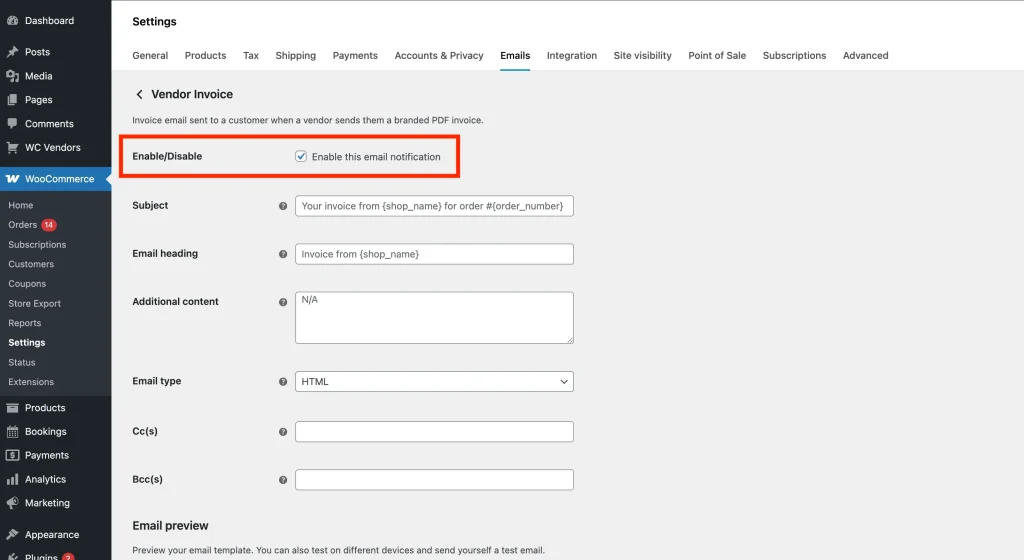
- Update the Subject and Email heading fields as needed.
- Click Save changes when you’re done.
Default values and available placeholders:
- Default subject: Your invoice from {shop_name} for order #{order_number}
- Default heading: Invoice from {shop_name}
{shop_name}: the vendor’s shop name, set in their store profile. It always shows the vendor’s shop name, even when you use marketplace branding or hide the shop name field.{order_number}: the WooCommerce order number that includes the vendor’s items
How vendors send invoices
Vendors send invoices manually. They are not sent automatically when an order is placed. Once you enable the feature, a Send Invoice button appears on each order row in the vendor’s order dashboard.
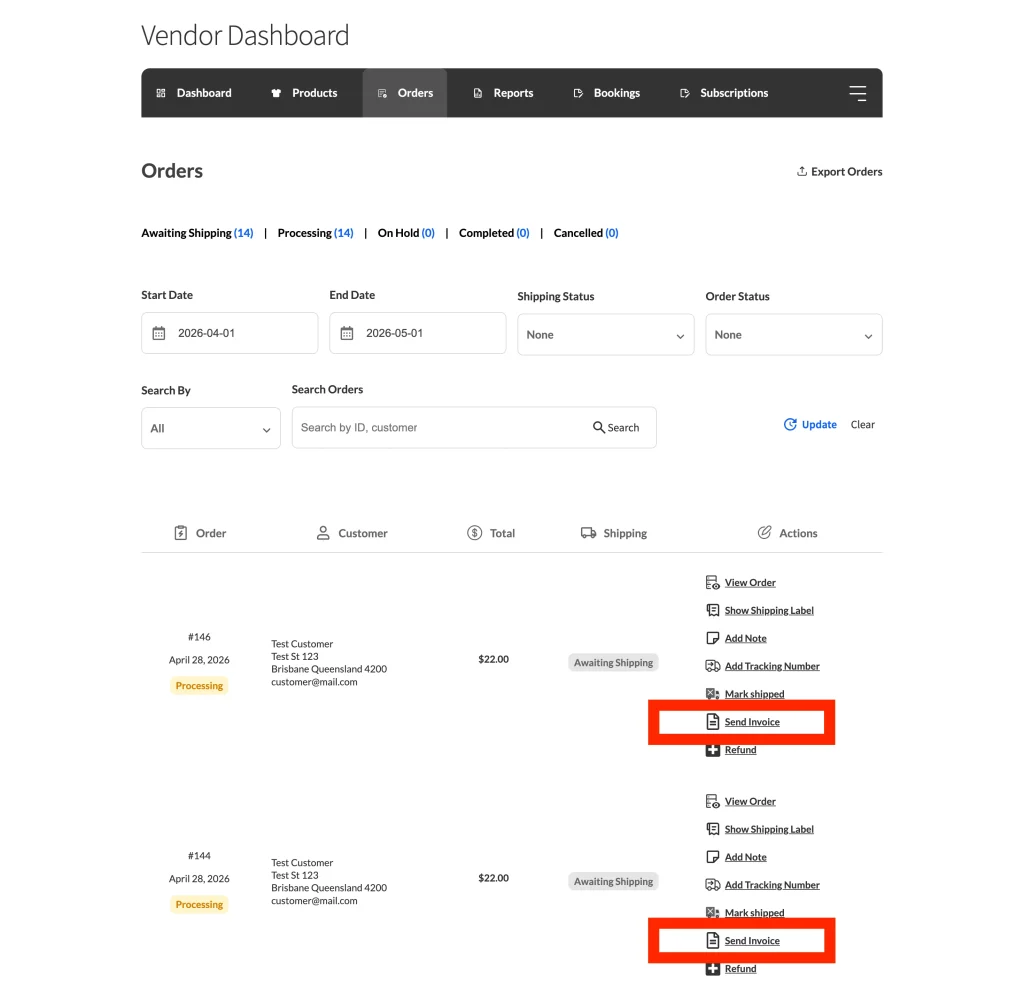
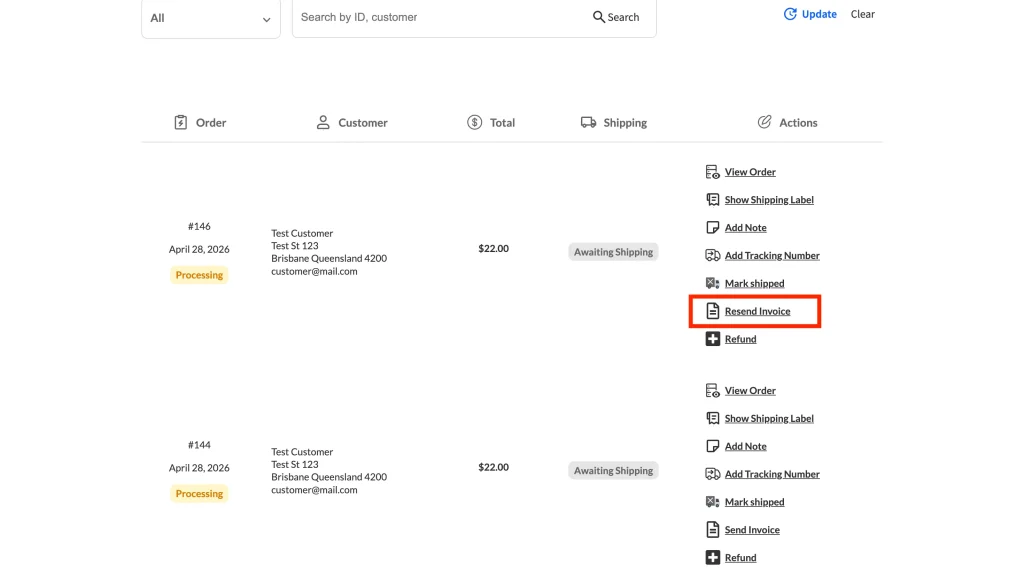
The vendor clicks Send Invoice to send the email to the customer. Once sent, the button changes to Resend Invoice so the vendor can send it again if needed.
What the customer receives
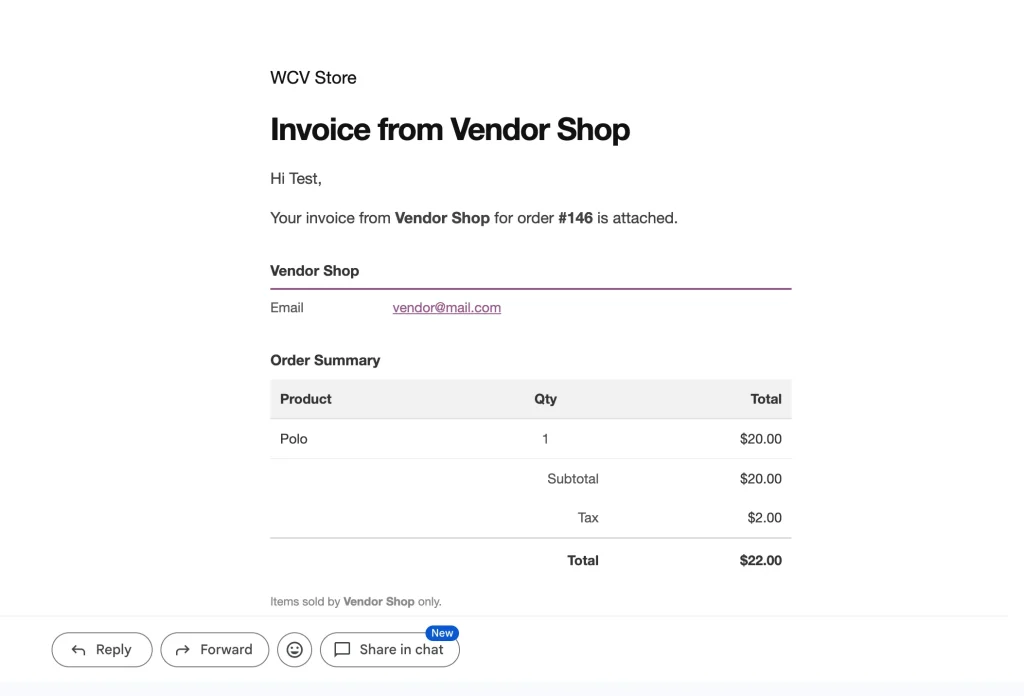
When a vendor sends an invoice, the customer gets an email with the subject Your invoice from [Vendor Shop Name] for order #[Order Number]. The PDF invoice is attached to the email. The email comes from your marketplace’s WooCommerce email sender, which is the “From” name and “From” address in WooCommerce → Settings → Emails. It does not come from the vendor’s own email address.
The email body confirms the invoice is from that vendor. It shows the vendor’s contact details: the address and phone number from their store profile, and the email address of their account. Any field you unchecked under Invoice Fields does not show.
The attached PDF shows a logo, a full breakdown of the customer’s items from that vendor, and that vendor’s subtotal and total, plus shipping and tax when your commission settings give them to the vendor. The logo and contact details in the header come from the vendor’s store profile, or from your marketplace details if Marketplace Branded Invoices is on.
Vendor store information on the invoice
The invoice pulls the vendor’s shop name, logo, address, and phone number from their store profile. The email address on the invoice is the email address of the vendor’s WordPress account. If a vendor has not completed their profile, those fields are blank or missing on the invoice.
Encourage your vendors to fill in their store profile before they send invoices. They can do this from their vendor dashboard under Settings.
Troubleshooting
The Send Invoice button doesn’t appear on vendor orders.
Go to WC Vendors → Settings → Capabilities → Invoice and confirm PDF Invoices is checked. Also check that the vendor has at least one order that contains their items.
The customer didn’t receive the invoice email.
Go to WC Vendors → Settings → Capabilities → Invoice and confirm PDF Invoices is checked. Then check your store’s mail-sending setup (SMTP or host mail configuration).
The PDF is missing the vendor’s logo or contact details.
First, go to WC Vendors → Settings → Capabilities → Invoice and check that the field is checked under Invoice Fields. If it is, the vendor needs to complete their store profile from their vendor dashboard under Settings. See the Vendor store information on the invoice section above.
The PDF shows my marketplace details instead of the vendor’s.
Go to WC Vendors → Settings → Capabilities → Invoice, uncheck Marketplace Branded Invoices, and click Save changes.
Frequently asked questions
Do vendors send invoices manually or are they sent automatically?
Manually. The Send Invoice button appears on each order in the vendor’s order list once you enable the feature. The customer only receives the invoice when the vendor clicks the button.
What happens if a customer buys from multiple vendors in one order?
Each vendor handles their own invoice separately. The customer receives one invoice email per vendor, each containing only that vendor’s items. Vendors send them independently of each other.
Can I customise the PDF invoice design?
Yes, using WooCommerce’s template override system. Copy templates/invoices/pdf-invoice.php from the WC Vendors Pro plugin folder into your theme at wc-vendors/invoices/pdf-invoice.php. Edits there are not overwritten when the plugin updates.
Need help?
If you have a question or run into any issues, we’re here to help.
- Premium users: Open a support ticket
- Free users: Visit our community forum