For business-to-business sellers, the order confirmation email is not just a receipt. It is the document buyers file away for their tax records, and for many of them a VAT line on that paperwork is a compliance requirement rather than a nice-to-have. Until now, WC Vendors Signup collected a seller’s VAT details at signup and showed them on the product page and in the cart, then dropped them the moment a customer checked out. Version 1.0.3 closes that gap, so the vendor VAT number follows the sale through every order email.
This release makes the VAT number print directly beneath each vendor’s line item, in the order confirmation email, the invoice email, the admin notification, the order-received page, and the customer’s My Account order view. It carries through the whole purchase journey instead of stopping at the cart. If you already collect VAT at signup, the change is automatic as soon as you update.
Below, we walk through exactly what shipped, an important note about whose number is shown, and a step-by-step setup so you can switch it on with confidence.
What Changed In The 1.0.3 Release
Since version 1.0.2, the VAT number was already visible on the single product page and in the cart as item meta. It never reached the paperwork customers actually keep. The order confirmation email, the record buyers rely on for their accounts, carried no VAT information at all.
The request goes back to March: order confirmations and invoices are official purchase records, and for B2B sales a VAT number on that document is often a tax-reporting requirement. Customers were contacting support asking for corrected invoices, even though the information was already being collected. It simply was not reaching the email.
Version 1.0.3 answers that. The vendor VAT number now renders beneath each product line in every order-related email WooCommerce sends. Because it hooks into the shared order-items template rather than a single email, it appears wherever that template is used. Both the styled HTML email and the plain-text version are handled, so it looks right whichever format a customer’s mail client requests. If a seller has not entered a number, nothing renders, so you never get an empty “VAT Number:” label sitting under a line.
Worth knowing before you update: There is no on/off switch. The feature activates the moment a registration form field is mapped to VAT Number and a vendor has a number saved. If VAT was already mapped on 1.0.2, updating to 1.0.3 will start placing VAT numbers in your customers’ emails immediately, with no further action from you. That is almost certainly what you want, but since it is customer-facing, it should not catch you by surprise.
Where The Vendor VAT Number Now Appears
Here is every surface the number now reaches, and when each one arrived.
| Where the number appears | Available since |
|---|---|
| Order confirmation email (processing / completed) | New in 1.0.3 |
| Invoice email | New in 1.0.3 |
| Admin new-order notification | New in 1.0.3 |
| Order-received “thank you” page | New in 1.0.3 |
| My Account → order details | New in 1.0.3 |
| Single product page | 1.0.2 |
| Cart, as item meta | 1.0.2 |
| Vendor’s own Store Settings screen | 1.0.2 |
The five new surfaces all share one order-items template, which is why the feature reaches them together rather than one at a time. If you’d rather trim what else prints alongside it, the new invoice field controls let you switch off a vendor’s phone number, address, or logo independently. On the order-received page and in the My Account view, the number sits under the relevant line item exactly as it does in the email, so the buyer sees consistent paperwork from checkout through to their account history.
Whose Number Is Displayed, The Vendor Or The Buyer?
This is the single most important thing to understand before you roll the feature out. The number shown is the seller’s, meaning the store’s own VAT registration, printed under each line item. It is not the customer’s number.
The original request was actually worded around the customer’s VAT number in the billing section. What shipped is the vendor VAT number instead, and that was a deliberate, documented decision. The plugin has only ever modeled VAT as a vendor field: it is collected at signup and stored against the seller, which is exactly why it already appeared on product pages and in the cart. The plugin has no customer VAT field to surface.
If you sell wholesale and want a refresher on why these records matter, Wholesale Suite has a guide to B2B invoicing that is worth a read.
How To Set Up The VAT Number Display Step By Step
Before you start
- WooCommerce and WC Vendors (the free base plugin) both active. The VAT display checks for WC Vendors and quietly skips if it isn’t there.
- WC Vendors Signup 1.0.3 or later.
Step 1: Add a VAT field and map it
This is the actual switch. There is no VAT field on the registration form by default, so you create one, and the setting that matters is Field Mapping.
Go to WP Admin → WC Vendors → Settings → Registration Form → Form Fields. If you are still building this form, our guide to adding a dedicated vendor registration page walks through the drag-and-drop builder.
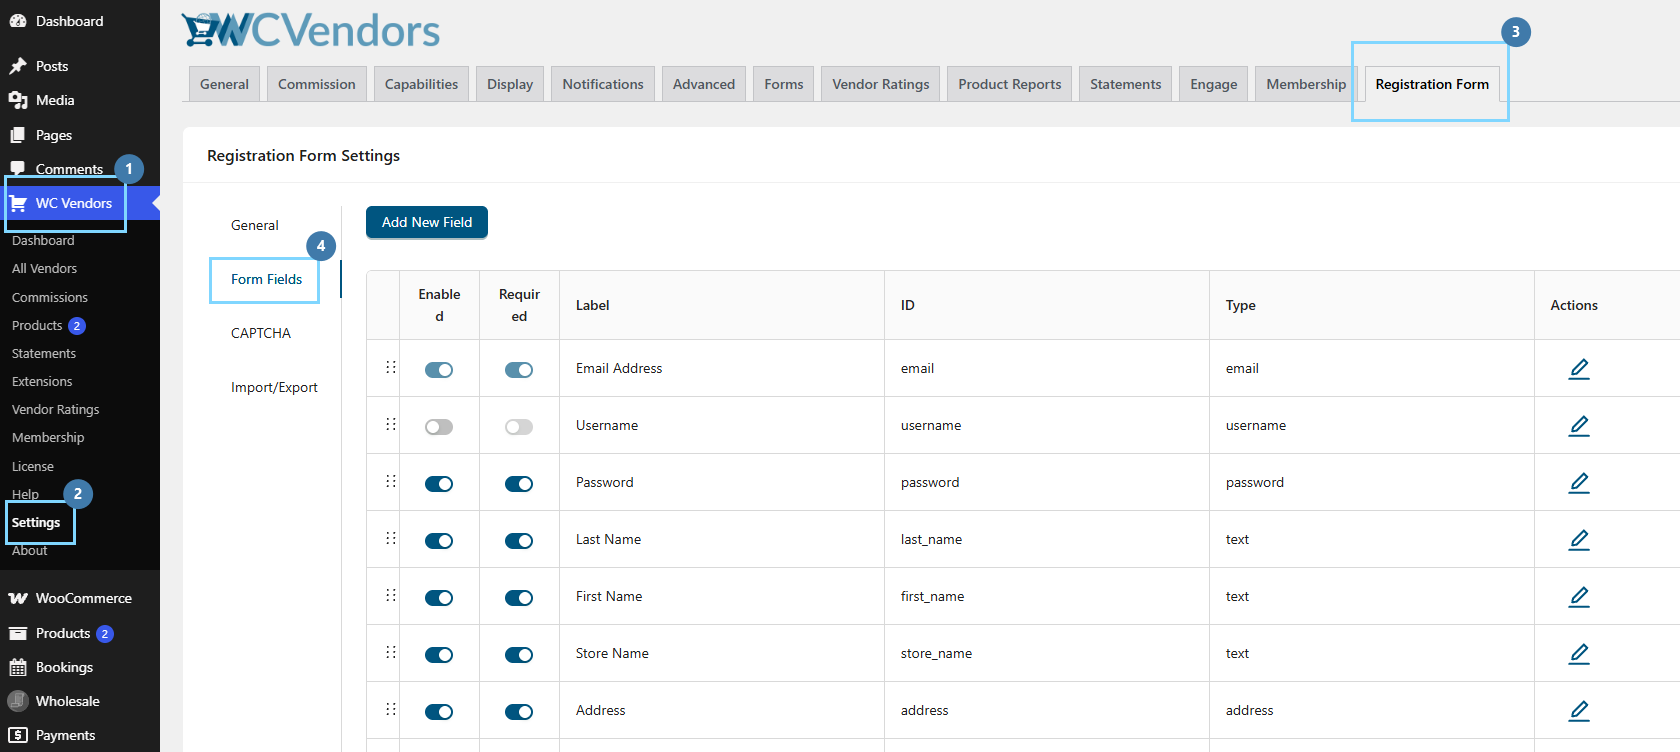
Open the add-field dialog, choose the Text field type, and set the following:
- Field type: Text
- Label: VAT Number
- Placeholder: Please enter your VAT number
- Field Mapping: VAT Number (this is the one that matters)
- Enabled: On
- Required: your call; turn it on if you only accept VAT-registered sellers
- Show on checkout: optional, see step 4
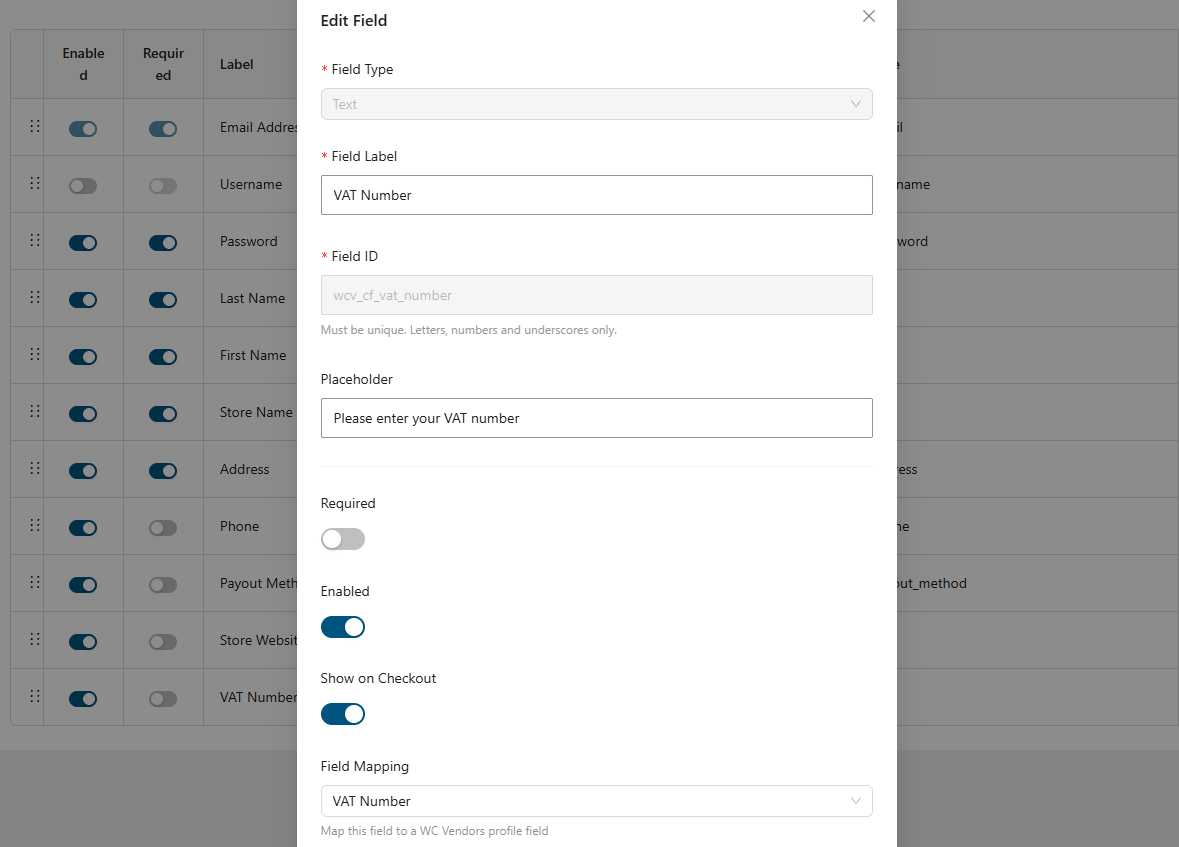
And then save the form.
Two things happen behind the scenes worth knowing: the plugin prefixes your field’s ID so it becomes,wcv_cf_vat_number, and the Field Mapping choice stores each value against the vendor under _wcv_store_vat_number. One detail to remember: the label you type is printed verbatim in the order email. Type “VAT Number” and the email reads VAT Number: GB123456789. If your market expects “VAT Reg. No.” or “ABN,” set that here, because there is no separate display label to configure. Getting this mapping right is what makes the vendor VAT number appear everywhere downstream.
Step 3: Collect numbers from existing vendors
New vendors who sign up after step two have their number captured on the form and saved automatically. Existing vendors will not have one yet, and since nothing displays for a seller with no value saved, their orders look exactly as they do today until they fill it in.
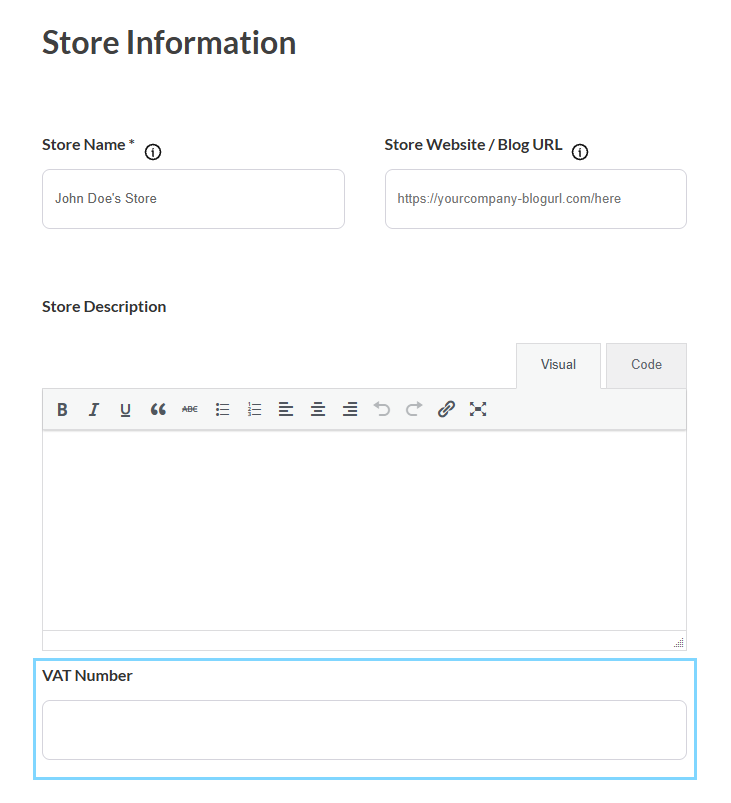
Vendors add it themselves from Vendor Dashboard → Store Settings, where the field now appears just below the store description. Those with WP-admin access can use WP Admin → Shop Settings instead. Send a short note asking them to add it, because until each vendor VAT number is saved, there is nothing for the emails to show. It is a one-field, thirty-second job on their end.
Step 4: Optionally show it at checkout
If you turn on Show on checkout in the field’s settings, the number also appears in the vendor information block on the checkout page, alongside the other seller details you choose to surface there. This is independent of the email display, so you do not need it on for the order-email feature to work.
Step 5: Place a test order and check every surface
Buy a product from a vendor who has a number saved, then confirm it shows in each place: the order-received page right after checkout, My Account → Orders → View, the order confirmation email in your inbox, and the admin new-order notification that lands in your store’s mail.
Troubleshooting When The VAT Number Is Not Showing
| What you are seeing | Most likely cause | Fix |
|---|---|---|
| Nothing anywhere, not even the product page | Field Mapping is not set to “VAT Number.” A field merely labeled VAT is not enough. | Revisit step 2 |
| Shows for some vendors, not others | Working as intended: those vendors have no number saved. | Revisit step 3 |
| Shows on the product page and cart, but not in emails | Still running 1.0.2. The email display is the new part. | Revisit step 1 |
| Wrong wording in the email | The email label copies the form field’s Label. | Rename the field in step 2 |
| Stopped working after a plugin or theme change | Custom code, or another plugin, is suppressing the display filter. | Check custom snippets |
One useful quirk is worth calling out: The display only checks that a field exists with the VAT Number mapping. It does not check whether that field is switched on in the registration form. So you can turn the field off on the signup form, collect numbers only through Store Settings, and it will still print correctly on product pages, in the cart, and in order emails. That is handy if you would rather not ask for VAT during signup but still want it on your paperwork.
Conclusion
For any marketplace serving business buyers, getting the vendor VAT number onto the order email removes a small but persistent friction point. Version 1.0.3 lets the information you already collect follow the sale all the way to the record your customers actually keep.
The setup comes down to one dropdown. Map a text field to VAT Number, ask your existing vendors to fill theirs in, run a couple of test orders to check both the populated and the empty cases, and you are done. Keep in mind that what shows is the seller’s registration and not the buyer’s, and that the display is automatic if you already had VAT mapped on 1.0.2.
Here is what we covered in this article:
- What changed in the 1.0.3 release
- Where the vendor VAT number now appears
- Whose number is displayed, the vendor or the buyer
- How to set up the VAT number display step by step
- Troubleshooting when the VAT number is not showing
Frequently Asked Questions
Does version 1.0.3 show the customer’s VAT number or the vendor’s?
It shows the vendor’s, meaning the store’s own VAT registration, printed under each line item. The plugin has no customer VAT field. If you need the buyer’s VAT registration number on the invoice, you would add a separate checkout field plugin for the buyer’s side.
Do I have to turn the feature on after updating?
There is no on/off switch. The display activates automatically once a registration form field is mapped to VAT Number and a vendor has a number saved. If VAT was already mapped on 1.0.2, updating starts placing the number in order emails right away.
Why is the VAT number missing for some vendors but not others?
That is expected. Nothing renders for a vendor who has not saved a number, so those orders look unchanged until the seller adds theirs in Store Settings.
Can I change the label from “VAT Number” to something like “ABN” or “VAT Reg. No.”?
Yes. The email prints whatever you type in the field’s Label verbatim, so set the wording there. There is no separate display label to configure.