Until recently, a WooCommerce vendor invoice included every one of a seller’s contact details, whether the marketplace wanted them there or not, and the vendor statement PDF arrived with a layout you simply couldn’t change. WC Vendors Pro 2.0.9 changes both, giving marketplace administrators real control over the documents their store generates.
With online marketplaces now accounting for the largest share of online purchases worldwide, the paperwork your store sends out carries real weight. A WooCommerce vendor invoice goes straight to your customer, and a vendor statement goes straight to your seller, so both deserve to look exactly the way you intend. This release gives you switch-level control over the first and full branding control over the second.
Below, we walk through what each feature does, why it exists, and precisely how to switch it on from the WordPress admin.
Feature 1: Take Control Of Your WooCommerce Vendor Invoice
WC Vendors Pro lets a vendor send a PDF invoice to a customer straight from their vendor dashboard. That is useful, but until now the invoice carried every piece of the vendor’s contact information: their logo, shop name, full store address, phone number, and email address, all printed on a document going to your customer.
For many marketplaces, a WooCommerce vendor invoice is really the marketplace’s own document, since it takes the payment, handles refunds, and carries the tax obligations. A vendor’s phone number on it is then an open invitation for the customer to go around you next time.
Previously the only workaround was to switch vendor invoices off entirely, losing a genuinely useful feature just to suppress two lines of text. The new Invoice Fields controls fix that.
The new Invoice Fields controls
Invoice settings now have their own home, and inside it a new group of five switches called Invoice Fields. Each switch controls one piece of vendor information that would otherwise print on the invoice, and you turn off the ones you don’t want on the document. You will find them under WC Vendors > Settings > Capabilities > Invoice.
If you already use vendor invoices, the PDF Invoices toggle and the marketplace branding options used to sit under Capabilities, General and Pro Features. They now live on this new Invoice tab, and your saved values came with them. The five field switches are:
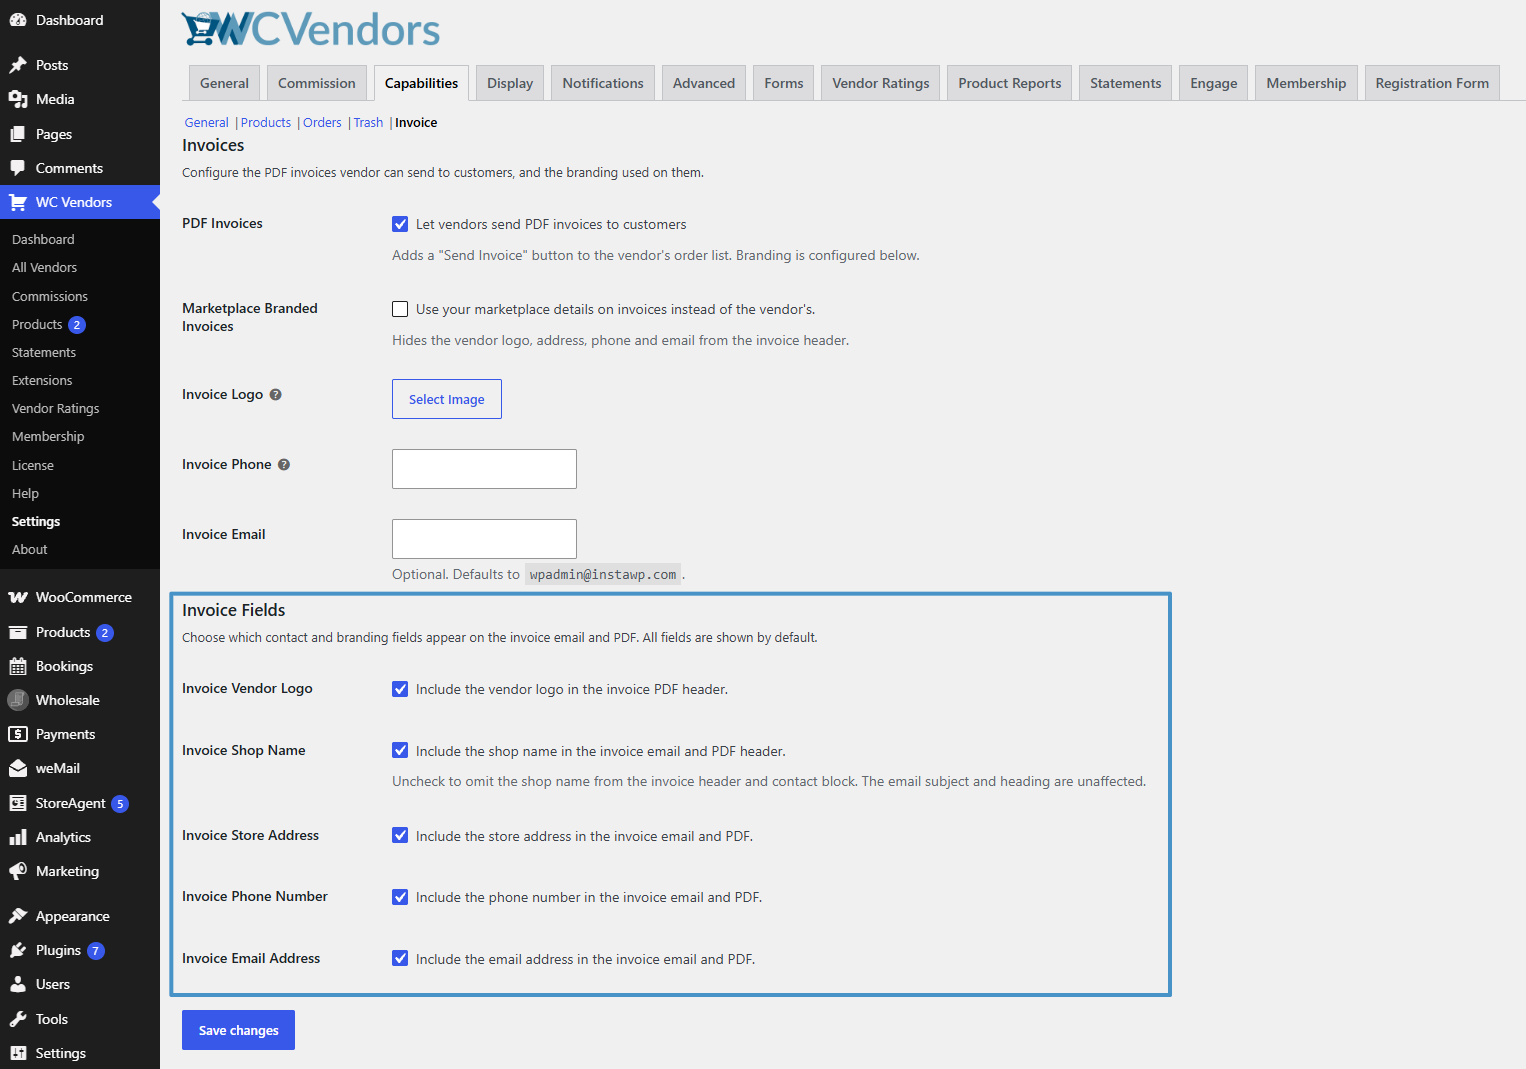
- Invoice Vendor Logo includes the vendor logo in the invoice PDF header. This is PDF only, so the logo never appears in the email body.
- Invoice Shop Name includes the shop name in the invoice email and PDF header. Turning it off still leaves the shop name in the email subject line and heading, so the customer knows what the message is about.
- Invoice Store Address includes the store address in the invoice email and PDF.
- Invoice Phone Number includes the phone number in the invoice email and PDF.
- Invoice Email Address includes the email address in the invoice email and PDF.
All five are shown by default, so nothing changes until you untick something.
Two settings that sound alike but aren’t
It is easy to confuse Marketplace Branded Invoices with the new Invoice Fields switches, because both can make a vendor’s phone number disappear. The difference is what takes its place. Marketplace Branded Invoices is a swap: it replaces the vendor’s identity in the invoice header with yours, so your logo, your phone, and your email appear instead. Invoice Fields is a filter: it removes a field from the document altogether, and nothing takes its place.
They work together, too. You can run marketplace branding and switch off individual fields, which is how you would produce a WooCommerce vendor invoice that shows your logo and your support email but no phone number at all. If your theme or a developer has customized the invoice or email templates, the field switches still apply, because suppressed details are stripped out before the template ever sees them. Developers extending this can hook the wcvendors_invoice_field_visibility filter.
How To Set Up The Invoice Field Controls
Here is how to configure your WooCommerce vendor invoice from start to finish, from the master switch down to a test send.
- Open the Invoice settings tab. From your WordPress dashboard go to WC Vendors, Settings, open the Capabilities tab, then click Invoice in the row of sub-links at the top.
- Turn on PDF Invoices if it isn’t already. Tick PDF Invoices. This is the master switch, and it puts a Send Invoice button on each vendor’s order list. Leave it off and none of the settings below have any effect.
- Decide whose branding the invoice carries. If you want the invoice to represent your marketplace rather than the individual vendor, tick Marketplace Branded Invoices and fill in Invoice Logo, Invoice Phone, and Invoice Email. Skip this step if you are happy for vendors to brand their own invoices.
- Untick the vendor fields you don’t want shown. Scroll to the Invoice Fields group, where all five are ticked. For most marketplaces protecting the customer relationship, that means unticking Invoice Phone Number to stop customers calling vendors directly, and Invoice Email Address to route replies back through you. Leave Invoice Shop Name ticked unless you have a reason not to, since customers generally still need to know which seller fulfilled their order.
- Save changes. Click Save changes at the bottom of the page. The settings apply to every invoice generated from that moment on.
- Send yourself a test invoice. Log in as one of your vendors, open Vendor Dashboard, Orders, and click Send Invoice on an order tied to an address you control. Open both the email and the attached PDF and confirm the fields you unticked really are gone from both.
Feature 2: Make The Vendor Statement Your Own Document
Vendor statements are the monthly summary of what a vendor earned: orders, revenue, commissions, tax, shipping, refunds, fees, and the net payout you owe them. Vendors can view them in their dashboard and download a PDF. If you are new to statements, our guide to vendor monthly statement automatic generation walks through how they are produced.
The catch was that the PDF had a fixed layout. No logo, no room for a note or your company details, and every financial row appeared whether or not it applied to your business. A marketplace that never charges fees still had a Fees row sitting at zero, and there was no way to reflect local tax rules.
What the Statement PDF Customization section gives you
A new Statement PDF Customization section on the Statements settings page adds six options covering branding, wording, which rows are shown, and an optional extra tax line. You will find it under WC Vendors > Settings > Statements, and these options affect presentation only, never the stored statement amounts.
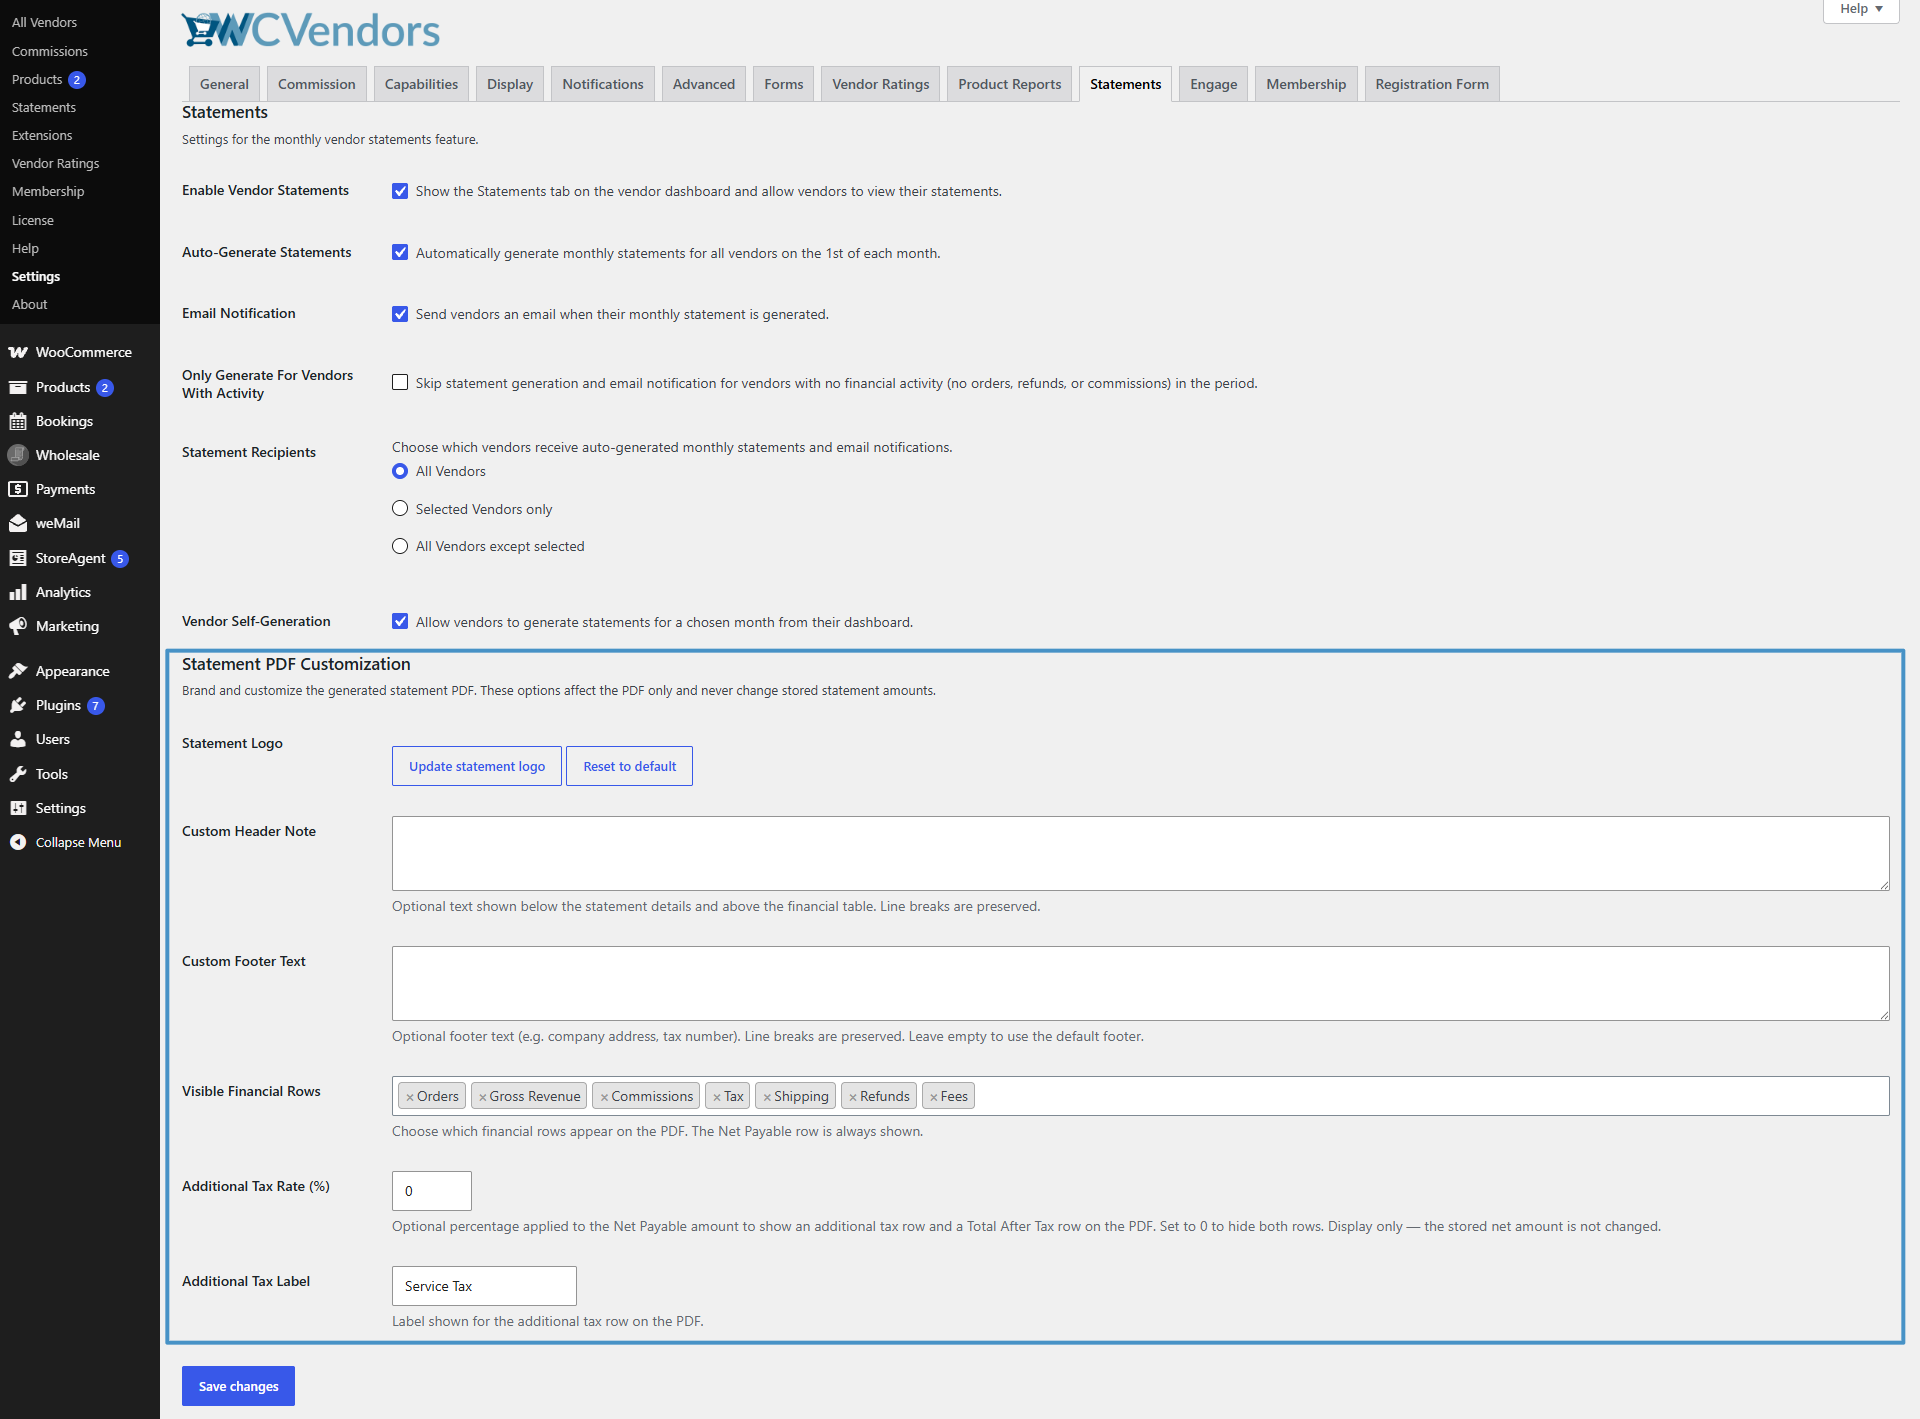
- Statement Logo is a media picker for an image shown at the top of the PDF, above the site name. Around 200px wide works best. Leave it empty, and the PDF falls back to your plain site name.
- Custom Header Note is optional text that appears below the statement details and above the financial table. Line breaks are preserved.
- Custom Footer Text is an optional footer for your company address, registered number, tax ID, or payment terms.
- Visible Financial Rows lets you pick which rows appear from Orders, Gross Revenue, Commissions, Tax, Shipping, Refunds, and Fees. Net Payable always appears and cannot be hidden, because it is the number the whole document exists to communicate.
- Additional Tax Rate (%) is a percentage applied to the Net Payable figure. Set it to 0, the default, and no tax rows appear anywhere.
- Additional Tax Label controls what to call that row. It defaults to Service Tax, and you can rename it to Royalty Tax, Withholding, VAT, or whatever your jurisdiction uses.
Row visibility and the additional tax are resolved once and shared by every place a statement is displayed, so the vendor’s on-screen figures always match the PDF they download and the email they were sent. The branding options are PDF only, since your logo does not get pasted into an email.
The additional tax row, worked through
This is the setting most likely to cause a nervous moment, so to be completely clear: it changes nothing about what you owe. The rate is applied to the net figure purely for display, and the amount stored against the statement in your database is never touched. Reset the rate to 0, and both extra rows vanish everywhere.
Say a vendor’s statement comes to a net payable of $250.00, and you set the rate to 6 with the label Service Tax. The statement then shows Net Payable at $250.00, Service Tax (6%) at $15.00, and a Total After Tax of $265.00. The label carries the rate, so the vendor can see how the figure was reached without having to ask. That solves the Swedish scenario completely, and no one has to calculate anything by hand.
One smaller addition is worth knowing about. Each statement PDF now prints a reference number in its details block, zero-padded to five digits, such as Statement #00042. This makes it much easier to quote a statement in a support ticket or your accounts than to describe “the one from May.”
How To Customize The Vendor Statement PDF
- Make sure statements are switched on. Go to WC Vendors > Settings > Statements, and check that Enable vendor statements is ticked. This adds the Statements tab to the vendor dashboard.
- Add your logo. Scroll to Statement PDF Customization and use the media button beside Statement Logo to pick or upload an image around 200px wide. Leave it empty if you would rather keep the plain site-name header.
- Write your header note and footer. Use Custom Header Note for anything the vendor should read before the numbers, such as payment timing or a reminder to invoice you back. Use Custom Footer Text for fixed company details like your registered address, company number, and tax ID. Both keep your line breaks.
- Trim the financial rows. In Visible Financial Rows, remove anything that doesn’t apply to your marketplace. Drop Fees if you never charge them, or Shipping if you don’t handle it. Every row you remove is one less zero for a vendor to puzzle over, and Net Payable stays regardless.
- Set the additional tax only if you need it. Leave Additional Tax Rate at 0 unless your payouts genuinely carry an extra tax on top. If they do, enter the percentage as a plain number (e.g., 6 rather than 0.06), and set Additional Tax Label to the name your vendors and accountant will recognize. WooCommerce’s own tax documentation is a helpful reference if you are still mapping out how tax applies across your store.
- Save and check that all three views agree. Click Save changes, which applies immediately, including to statements generated before the change. Then open a real statement in the dashboard, download its PDF, and look at a notification email to confirm the hidden rows, tax rows, logo, header note, footer, and reference number all read correctly.
If the Statements tab returns a “page not found” after you recently enabled statements, go to Settings > Permalinks and click Save changes without altering anything to rebuild the dashboard’s page addresses. Version 2.0.9 handles this automatically, so it should only affect a tab toggled on in an earlier version.
Every New Setting In One Place
Here is a quick reference to every new option in WC Vendors Pro 2.0.9, including where to find it and what it defaults to.
| Setting | Where to find it | Type | Default |
|---|---|---|---|
| Invoice Vendor Logo | Capabilities, Invoice | Checkbox | On |
| Invoice Shop Name | Capabilities, Invoice | Checkbox | On |
| Invoice Store Address | Capabilities, Invoice | Checkbox | On |
| Invoice Phone Number | Capabilities, Invoice | Checkbox | On |
| Invoice Email Address | Capabilities, Invoice | Checkbox | On |
| Statement Logo | Settings, Statements | Media picker | Empty |
| Custom Header Note | Settings, Statements | Text area | Empty |
| Custom Footer Text | Settings, Statements | Text area | Empty |
| Visible Financial Rows | Settings, Statements | Multi-select | All 7 selected |
| Additional Tax Rate (%) | Settings, Statements | Number | 0 |
| Additional Tax Label | Settings, Statements | Text | Service Tax |
Conclusion
The documents your marketplace produces should represent your marketplace, not work against it. Whether you are trimming a phone number off a customer-facing invoice or adding a royalty tax line to a vendor statement, the goal is the same: giving you control that used to require a developer or a monthly spreadsheet.
If protecting your customer relationships or reflecting local tax rules has been a recurring headache, these two features were built with your exact situation in mind.
Here is what we covered in this article:
- Feature 1: take control of your WooCommerce vendor invoice
- How to set up the invoice field controls
- Feature 2: make the vendor statement your own document
- How to customize the vendor statement PDF
- Every new setting in one place
Frequently Asked Questions
Will updating to WC Vendors Pro 2.0.9 change my existing invoices or statements?
No. Every new option ships with a default that reproduces your current behavior, so nothing on an invoice or statement changes until you actively adjust a setting. You can update safely and customize on your own schedule.
What is the difference between Marketplace Branded Invoices and the Invoice Fields switches?
Marketplace Branded Invoices swaps the vendor’s identity for yours, showing your logo, phone, and email in the header. The Invoice Fields switches simply remove a field from the document with nothing replacing it. You can use both together to show your branding while hiding specific fields.
Does the additional tax row change how much I actually owe my vendors?
No. The additional tax is display only. It is applied to the net figure purely so vendors can see the number to invoice back, and the amount stored in your database is never altered. Set the rate to 0, and the tax rows disappear everywhere.
Can I hide financial rows that my marketplace never uses on the vendor statement?
Yes. Visible Financial Rows lets you pick which of the seven rows appear, so you can drop Fees or Shipping if they never apply. Net Payable is the only row that cannot be hidden, since it is the figure the statement exists to communicate.
Where did the WooCommerce vendor invoice settings move to in 2.0.9?
They now live on a dedicated Invoice tab under WC Vendors > Settings > Capabilities. The PDF Invoices toggle and marketplace branding options moved there from the General and Pro Features area, and your saved values came with them, so you don’t need to re-enter anything.