Running a multi-vendor marketplace means every seller expects a clear record of what they sold, what was refunded, and what commission they earned. When monthly vendor statements arrived in WC Vendors Pro, they automated that paperwork for the whole marketplace at once. The catch was that “the whole marketplace” was the only option, and that is exactly what the new WooCommerce vendor statement settings in version 2.0.9 fix.
Before this release, the monthly run built a statement for every vendor and emailed it out, whether or not that vendor wanted one. Store owners on a mixed payout arrangement, or who pay their sellers another way entirely, had no built-in way to narrow the list or hide the feature.
This guide walks through each of the three new controls, where they live, and how to set them up for a few common marketplace situations.
Where To Find The WooCommerce Vendor Statement Settings
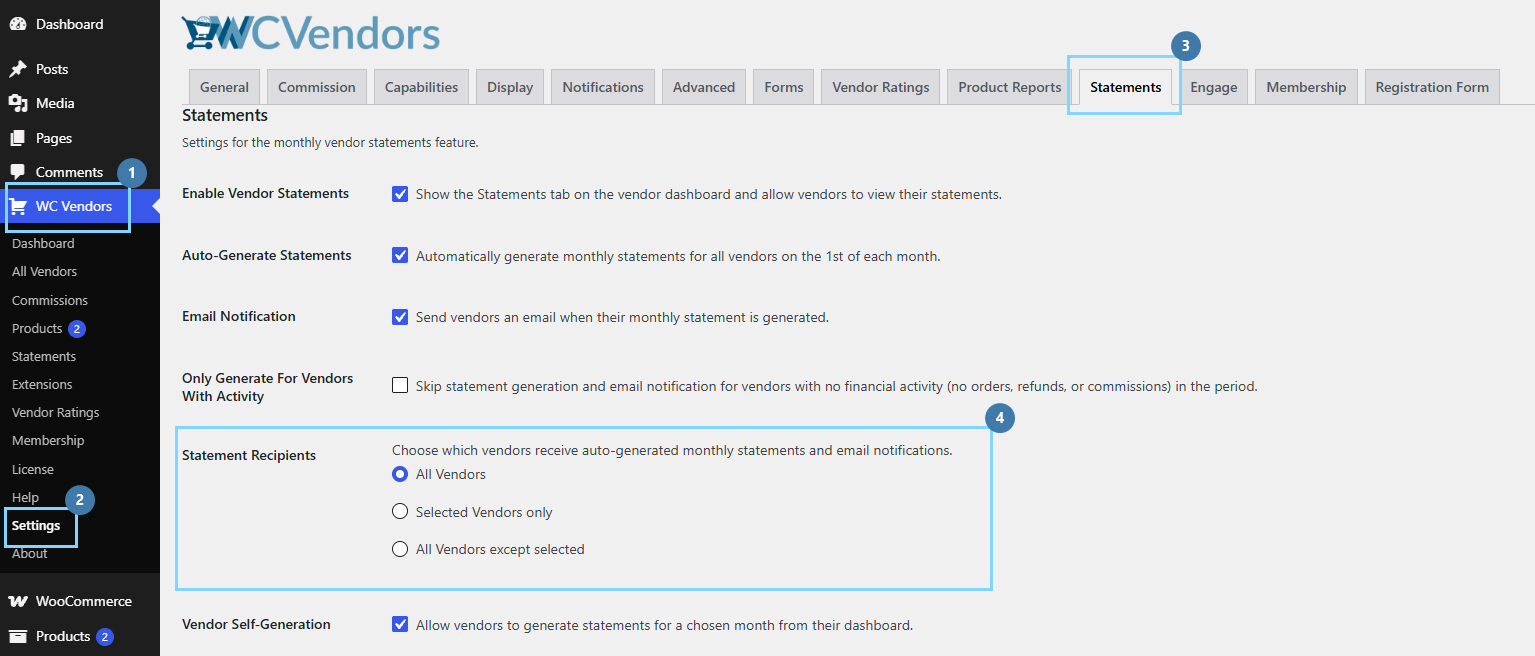
From your WordPress admin, go to WC Vendors > Settings > Statements. Only store administrators can change these options, and updating to 2.0.9 has no effect on statements you have already generated.
The three new rows sit alongside the settings that were already there, such as Auto-Generate Statements, Email Notification, and Vendor Self-Generation. The new WooCommerce vendor statement settings in this release are Statement Recipients, Enable Vendor Statements, and Only Generate For Vendors With Activity.
If you have renamed “Vendor”
WC Vendors lets you rename “Vendor” to whatever suits your marketplace, such as Seller, Shop, or Partner. These labels follow that name. If you have set yours to “Sellers,” the first checkbox reads Enable Seller Statements and the radio options read All Sellers, Selected Sellers only, and so on. Same settings, your wording.
How To Use Statement Recipients
Before this setting existed, the monthly run had one behavior: build a statement for every vendor on the site. Statement Recipients gives you three behaviors to choose from instead.
| Mode | What happens on the 1st of the month | Best for |
|---|---|---|
| All Vendors | Every vendor gets a statement. This is the default, and it matches how statements behaved before 2.0.9. | Marketplaces where everyone is on the same arrangement |
| Selected Vendors only | Only the vendors you add to the picker get a statement. Everyone else is skipped completely. | A pilot group, a premium tier, or a short list on a special agreement |
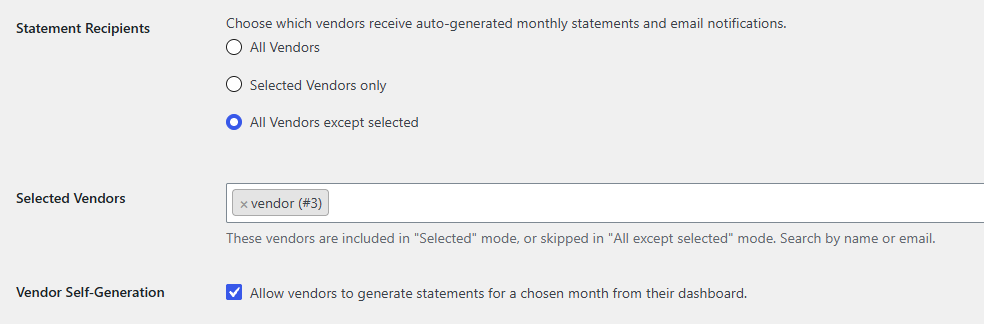
| All Vendors except selected | Everyone gets a statement apart from the vendors you add to the picker. | When almost everyone should get one, and you just need a few exceptions |
The last two modes are the same tool pointed in opposite directions, so pick whichever gives you the shorter list to manage. If three vendors out of two hundred need statements, use Selected Vendors only. If 197 do, use All Vendors except selected instead.
How to switch it on
- Go to WC Vendors > Settings > Statements.
- Find the Statement Recipients row. It shows three radio buttons, with All Vendors selected.
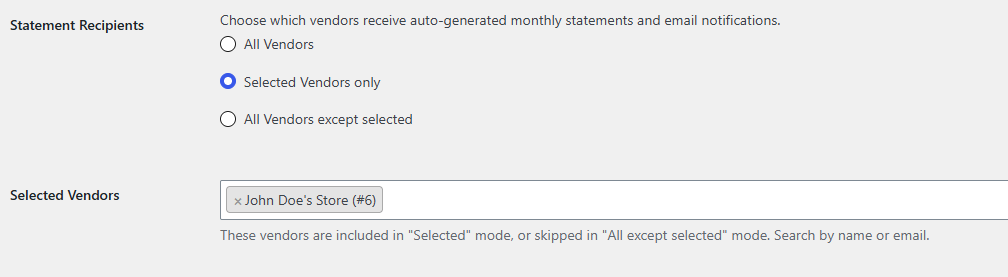
- Choose Selected Vendors only or All Vendors except selected. A new Selected Vendors row appears underneath the moment you do, because there is nothing to pick while you are on All Vendors.
- Click into the Selected Vendors box and start typing a vendor’s name or email address. Matching vendors appear as you type, so you never need to look up a vendor ID.
- Click a vendor to add them as a small tag. Repeat for each one, and click the × on a tag to remove it.
- Click Save changes, then reload the page.
The one mistake to avoid
If you choose Selected Vendors only and leave the picker empty, nobody gets a statement. The plugin warns you on screen the moment this happens, telling you that no vendors are selected and no statements will be generated. That is deliberate, because doing nothing is safer than quietly emailing all two hundred of your vendors. The reverse is harmless: All Vendors except selected with an empty picker simply excludes no one, so it behaves exactly like All Vendors.
What this setting does not stop
Restricting recipients only governs the bulk runs, meaning the automatic monthly generation and the “generate for all vendors” button in your admin. Three things intentionally ignore it. Generating a statement for one specific vendor from the admin always works, even for an excluded vendor, because an explicit request wins. A vendor generating their own statement from the dashboard still works too, as long as Vendor Self-Generation is on. Statements that already exist are never deleted, and emails already sent are not retracted.
One more thing happens automatically: vendors you have marked as deactivated are excluded from every mode, including All Vendors. You don’t need to add them to an exclusion list, since 2.0.9 skips them automatically.
How To Use Enable Vendor Statements
When statements shipped, a Statements item appeared in every vendor’s dashboard menu with no way to remove it. For marketplaces that pay sellers through other means, that menu item is something vendors click, don’t understand, and then email you about. The Enable Vendor Statements checkbox, one of the three new WooCommerce vendor statement settings, turns off the entire vendor-facing side of the feature site-wide.
When you uncheck it, the Statements item disappears from every vendor’s dashboard menu, statement pages and PDF downloads stop opening even for a vendor who saved the direct link, and vendors can no longer generate a statement for themselves. It is on by default, so updating to 2.0.9 changes nothing until you decide otherwise.
How to switch it off
- Go to WC Vendors > Settings > Statements.
- Uncheck Enable Vendor Statements, which is the first row on the panel.
- Click Save changes.
- Log in as one of your vendors, or use a test vendor account, and open the dashboard. The Statements item should be gone from the menu.
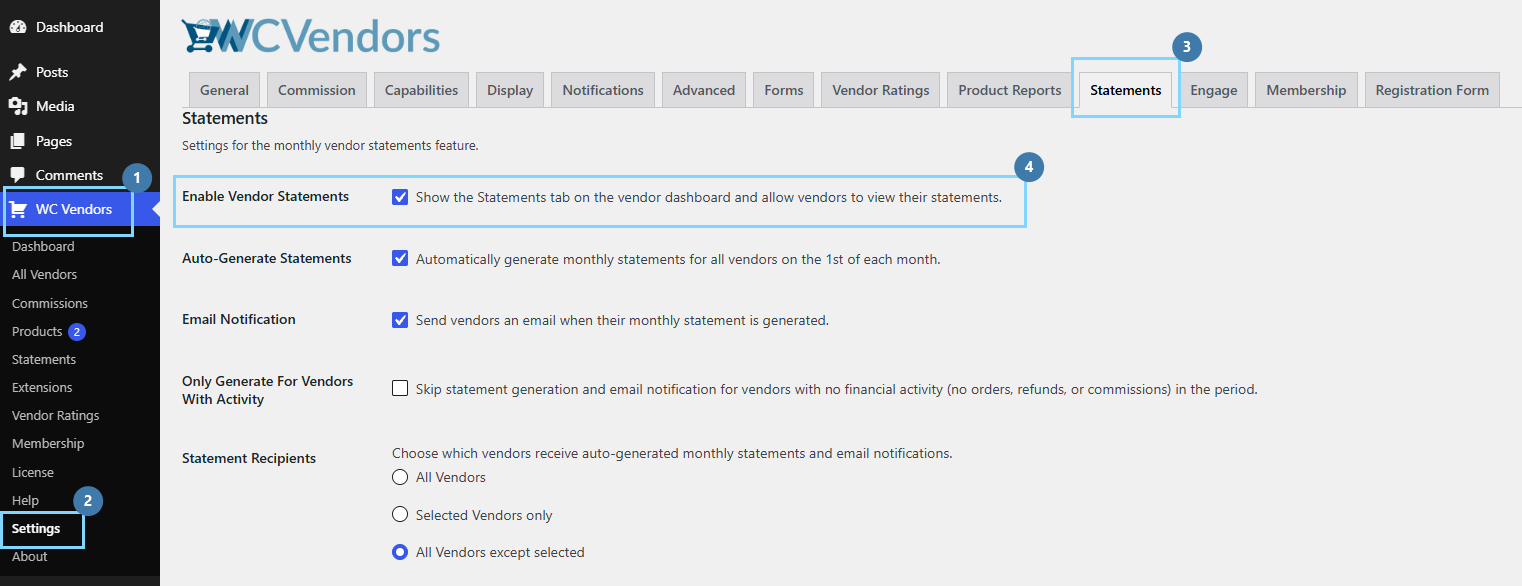
You don’t need to re-save your permalinks or clear anything, because the plugin rebuilds its dashboard links when you save this setting. Turning it back on brings the tab back the same way.
This hides the tab; it does not stop the emails
This is the part worth reading twice. Enable Vendor Statements controls what vendors see, not what your site does in the background. With this box unchecked but Auto-Generate Statements and Email Notification still on, your site keeps building statements every month and keeps emailing them to sellers, who then click through to a page they can no longer open.
To switch statements off properly, uncheck all three: Enable Vendor Statements, Auto-Generate Statements, and Email Notification. This separation is deliberate, not an oversight. It lets you keep generating statements for your own bookkeeping, which stay visible and downloadable from the admin Statements screen, while keeping the vendor dashboard clean.
How To Use Only Generate For Vendors With Activity
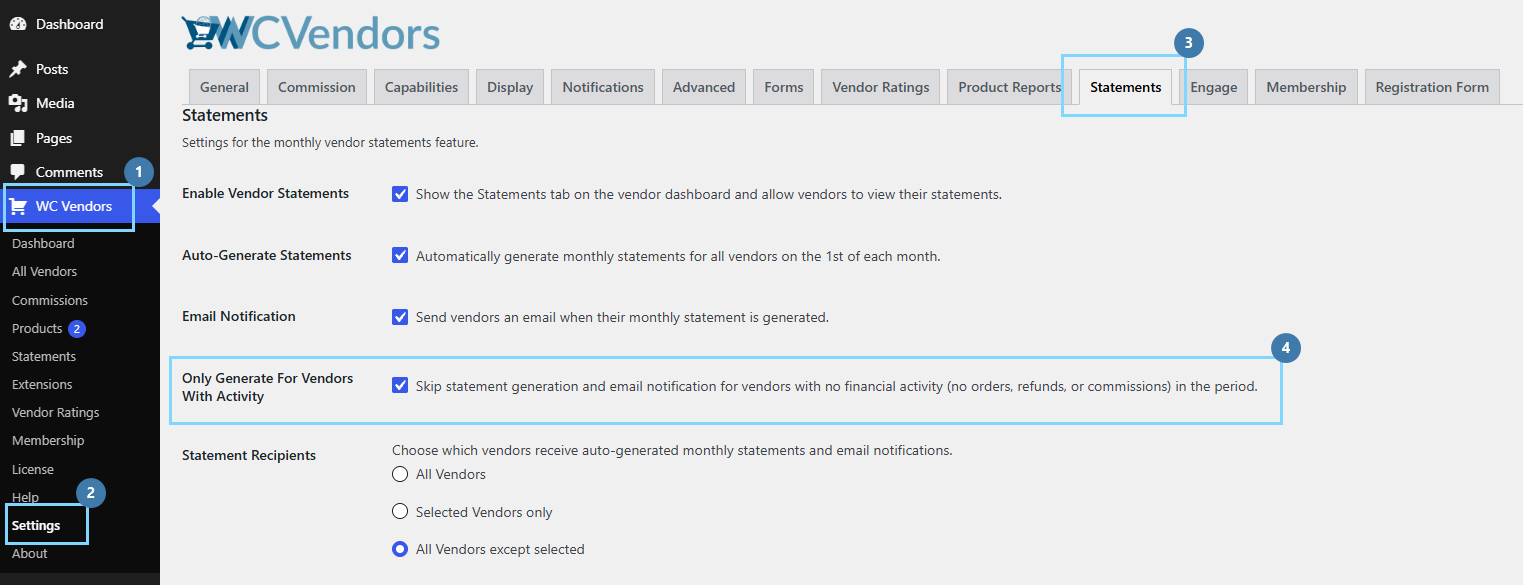
This third setting solves a related complaint: a vendor who sold nothing in March still received a March statement, every line reading zero. Tick Only Generate For Vendors With Activity and the monthly run skips those vendors entirely, so no statement is stored and no email is sent. It is off by default, meaning nothing changes until you turn it on.
What counts as activity
A vendor is skipped only when all three of these are empty for the month: orders, refunds, and commissions. That last pair matters more than it looks. A vendor can have zero new orders in a month and still have a refund clawback or a commission adjustment to account for, and those months carry real numbers, so they are never skipped. If you want a refresher on how WooCommerce itself records refunds and returns, its analytics documentation explains the distinction well.
Like the recipient restriction, this setting steps aside for explicit requests. Forcing a regeneration from the admin, or a vendor generating their own statement, both produce a statement regardless of activity. Zero-value statements already in your database stay where they are, since the setting stops new ones being created rather than tidying up old ones.
How to switch it on
- Go to WC Vendors > Settings > Statements.
- Tick Only Generate For Vendors With Activity.
- Click Save changes. It applies starting with the next monthly run.
How The Settings Apply In Sequence
You now have several controls that can each stop a statement being generated, and they do not compete. Instead, they run in sequence, each narrowing the list a little further. Picture a marketplace with 120 vendors going through a monthly run.
- Auto-Generate Statements. If this is unchecked, the monthly run doesn’t happen, and nothing below matters.
- Statement Recipients. Your chosen mode sets the starting pool. With five vendors on an exclusion list, 115 remain.
- Deactivated vendors. Applied automatically in every mode, with no setting to configure. Say that leaves 108.
- Per-vendor statement setting. Any vendor set to “Never” on the Statements, Vendors tab drops out here, leaving 104.
- Only Generate For Vendors With Activity. If ticked, vendors with no orders, refunds, or commissions that month are skipped, leaving 71.
- Statements written, then emailed. Emails go out only if Email Notification is also ticked.
Alongside the site-wide WooCommerce vendor statement settings in this guide, you can manage vendors one at a time. Go to WC Vendors > Statements > Vendors tab. You will find a searchable list with a Sales column and a Statement column, plus an “Enroll vendors with sales” button that switches on statements for everyone who has actually sold something. Use the per-vendor tab when the exceptions are about individual sellers and change often, and use Statement Recipients when you want one site-wide rule.
Recipes For Common Marketplace Setups
If one of these describes your marketplace, match the settings, and you are done. Statements document what each seller earned, which is a separate question from how you actually send a vendor payout, so these recipes focus only on the statement side.
Trial statements with a small group first
Set Enable Vendor Statements to On, Auto-Generate Statements to On, and Email Notification to On. Then set Statement Recipients to Selected Vendors only, with your pilot group added to the picker.
Everyone except a few special arrangements
Keep Enable Vendor Statements, Auto-Generate Statements, and Email Notification all on. Set Statement Recipients to All Vendors except selected, with your exceptions added to the picker.
Statements for your records only
Set Enable Vendor Statements to off, Auto-Generate Statements to on, Email Notification to off, and Statement Recipients to All Vendors. Vendors never see these statements, but you keep a full set that stays downloadable from the admin screen for your bookkeeping.
Turn statements off completely
Set Enable Vendor Statements to off, Auto-Generate Statements to off, Email Notification to off, and Vendor Self-Generation to off. That switches the entire feature down, both what runs in the background and what sellers can reach.
Whichever recipe you land on, consider ticking Only Generate For Vendors With Activity as well. On a marketplace with dormant or seasonal vendors, it removes the most common complaint, the all-zero statement, without changing who is eligible for one.
Updating To WC Vendors Pro 2.0.9
Every new setting in 2.0.9 defaults to your current behavior, so a plain update changes nothing. These steps are only to turn on the new controls.
Before you update
Back up your site, as you would for any plugin update. Note that 2.0.9 is currently published as a pre-release, so test it on a staging site first if you have one.
After you update
Open WC Vendors, then Settings, then Statements, and confirm the three new rows are there. If you only want some sellers to receive statements, set Statement Recipients, add your vendors, and save, then reload to check they are still listed. Should you pick Selected Vendors only, make sure you are not looking at the empty-selection warning. If you do not use statements, uncheck Enable Vendor Statements, and switch off Auto-Generate Statements and Email Notification too, unless you want statements to keep generating quietly. Log in as a vendor to confirm the dashboard menu looks the way you intended, and optionally tick Only Generate For Vendors With Activity to stop all-zero statements going out.
There is no data to convert and no settings to re-save. Statements already in your database are untouched by all three of the WooCommerce vendor statement settings, and each one takes effect from the next generation run onward.
Conclusion
The three WooCommerce vendor statement settings in WC Vendors Pro 2.0.9 turn what used to be an all-or-nothing feature into something you can shape around how your marketplace actually runs. Statement Recipients decides who is in the monthly run, Enable Vendor Statements decides whether sellers see the feature at all, and Only Generate For Vendors With Activity trims the empty statements nobody wants to receive.
Because every one of these controls defaults to your current behavior, there is no pressure to change anything the day you update. You can leave the defaults in place, reach for a single recipe, or combine all three to match a more complex payout structure. The controls run in a predictable sequence, so once you understand the order they apply in, the outcome of any combination is easy to reason about.
Whether you are piloting statements with a handful of sellers, hiding them from a marketplace that pays another way, or simply cutting the all-zero noise, these controls give you a clean, code-free way to get there. Set them once, and the monthly run does what you actually meant it to.
Here is what we covered in this article:
- Where to find the WooCommerce vendor statement settings
- How to use Statement Recipients
- How to use Enable Vendor Statements
- How to use Only Generate For Vendors With Activity
- How the settings apply in sequence
- Recipes for common marketplace setups
- Updating to WC Vendors Pro 2.0.9
Frequently Asked Questions
Where are the WooCommerce vendor statement settings located?
All three live on one screen. In your WordPress admin, go to WC Vendors, then Settings, then Statements. Only store administrators can change them, and you do not need to touch permalinks or any other screen.
Will updating to 2.0.9 change how my statements work?
No. Every new setting defaults to your existing behavior, so a plain update generates and emails statements exactly as before. The controls only change things once you turn them on.
If I hide the Statements tab, do statements stop generating?
Hiding the tab does not stop generation. Enable Vendor Statements only controls what vendors see. To stop generation and emails as well, also uncheck Auto-Generate Statements and Email Notification, or your site keeps building and sending statements in the background.
Can I still create a statement for a vendor I excluded?
Yes. Recipient restrictions and the activity filter only apply to the bulk monthly run. Generating a statement for one vendor from the admin, or a vendor self-generating from their dashboard, always works because an explicit request wins.
Does turning these settings on delete my old statements?
It does not. None of the three settings remove statements that already exist. They only affect which statements are created from the next generation run onward, so your historical records stay exactly where they are.