Getting a new vendor paid should be easy when running a marketplace. Yet the first payout often stalls at one small step: connecting the vendor’s Stripe account. Some sellers don’t have a Stripe account yet, and others get lost bouncing between your site and Stripe’s login screen. WC Vendors Stripe Connect 2.2.8 adds a new way to handle that step: Stripe Connect onboarding. Instead of asking each vendor to log in and authorize an existing Stripe account, your marketplace can now create a fresh Stripe account for the vendor and send them straight to a Stripe-hosted form that collects everything Stripe needs.
In this article, we’ll explain what the new Vendor Connection Method setting does, when to choose it over the classic Stripe OAuth flow, and how to set it up step by step.
What Is Stripe Connect Onboarding In WC Vendors?
Stripe Connect onboarding is a second way for vendors to link a Stripe account to your marketplace. When it’s turned on, the “Connect with Stripe” button in the vendor dashboard does three things in a row:
- It creates a new Stripe account for that vendor on your platform.
- It sends the vendor to a Stripe-hosted form, where they enter their business, identity, and bank details.
- When they finish, Stripe sends them back to their shop settings page in your vendor dashboard, already connected.
Vendors never have to sign up for Stripe separately or remember a login before they start. They click one button, fill in one form, and land back on your marketplace ready to receive payouts.
The accounts created this way behave like the Standard accounts WC Vendors vendors already use. Each vendor gets the full Stripe Dashboard, Stripe collects and checks the information it needs, and each vendor’s account pays its own Stripe fees. Your charge model and commission settings don’t change at all.
Why Stripe Recommends Moving Away From OAuth
Until now, WC Vendors connected vendors through Stripe OAuth. The vendor clicks Connect, logs in to (or creates) a Stripe account, and approves the link to your platform. It works well, and it still works today.
However, Stripe’s own guide to using OAuth with Standard accounts now states plainly that “OAuth isn’t recommended for new Connect platforms.” Stripe points new platforms toward its Stripe-hosted onboarding instead, which is the flow this release adds.
Version 2.2.8 gives every store owner that choice without forcing anyone who is happy with OAuth to switch.
Stripe OAuth Vs. Stripe Connect Onboarding: Which One Fits Your Marketplace?
The two options solve slightly different problems, so it helps to compare them side by side before you change anything.
| Stripe OAuth | Onboarding | |
|---|---|---|
| Setting label | Stripe OAuth (connect an existing account) | Stripe Connect Onboarding (create a new account) |
| Stripe account | Vendor links an account they already have | A new Stripe account is created for the vendor |
| Where the vendor fills in details | Stripe login and authorization screens | A Stripe-hosted onboarding form |
| Existing balance and history | Kept, because it’s the vendor’s existing account | Starts fresh on a new account |
| Extra setup for you | Client ID | Client ID plus brand name, color, and icon in Stripe |
| Default | Yes | No, you switch it on |
Choose the onboarding option if you’re launching a new marketplace, recruiting sellers who are new to online payments, or simply want to follow Stripe’s recommended setup. Keep OAuth if many of your vendors already run established Stripe accounts and want to keep their existing balance and transaction history in one place.
If you’re still weighing Stripe against other gateways, our guide to setting up Stripe for marketplaces walks through the bigger picture, and Store Owner Tips has a broader comparison of the best WooCommerce payment gateways.
How To Set Up Stripe Connect Onboarding In WC Vendors
Setup takes a few minutes. You’ll need the WC Vendors Stripe Connect add-on and access to your platform’s Stripe Dashboard.
Step 1: Add your brand details in Stripe
Stripe shows your marketplace’s branding on the onboarding form, so it requires a brand name, color, and icon before the flow can start. Log in to your Stripe Dashboard, open your Connect settings, and fill in the branding section. This is the step store owners most often skip, so do it first.
Step 2: Update to WC Vendors Stripe Connect 2.2.8
Go to Plugins in your WordPress admin and update WC Vendors Stripe Connect to version 2.2.8 or later. The new setting only appears after the update.
Step 3: Choose the vendor connection method
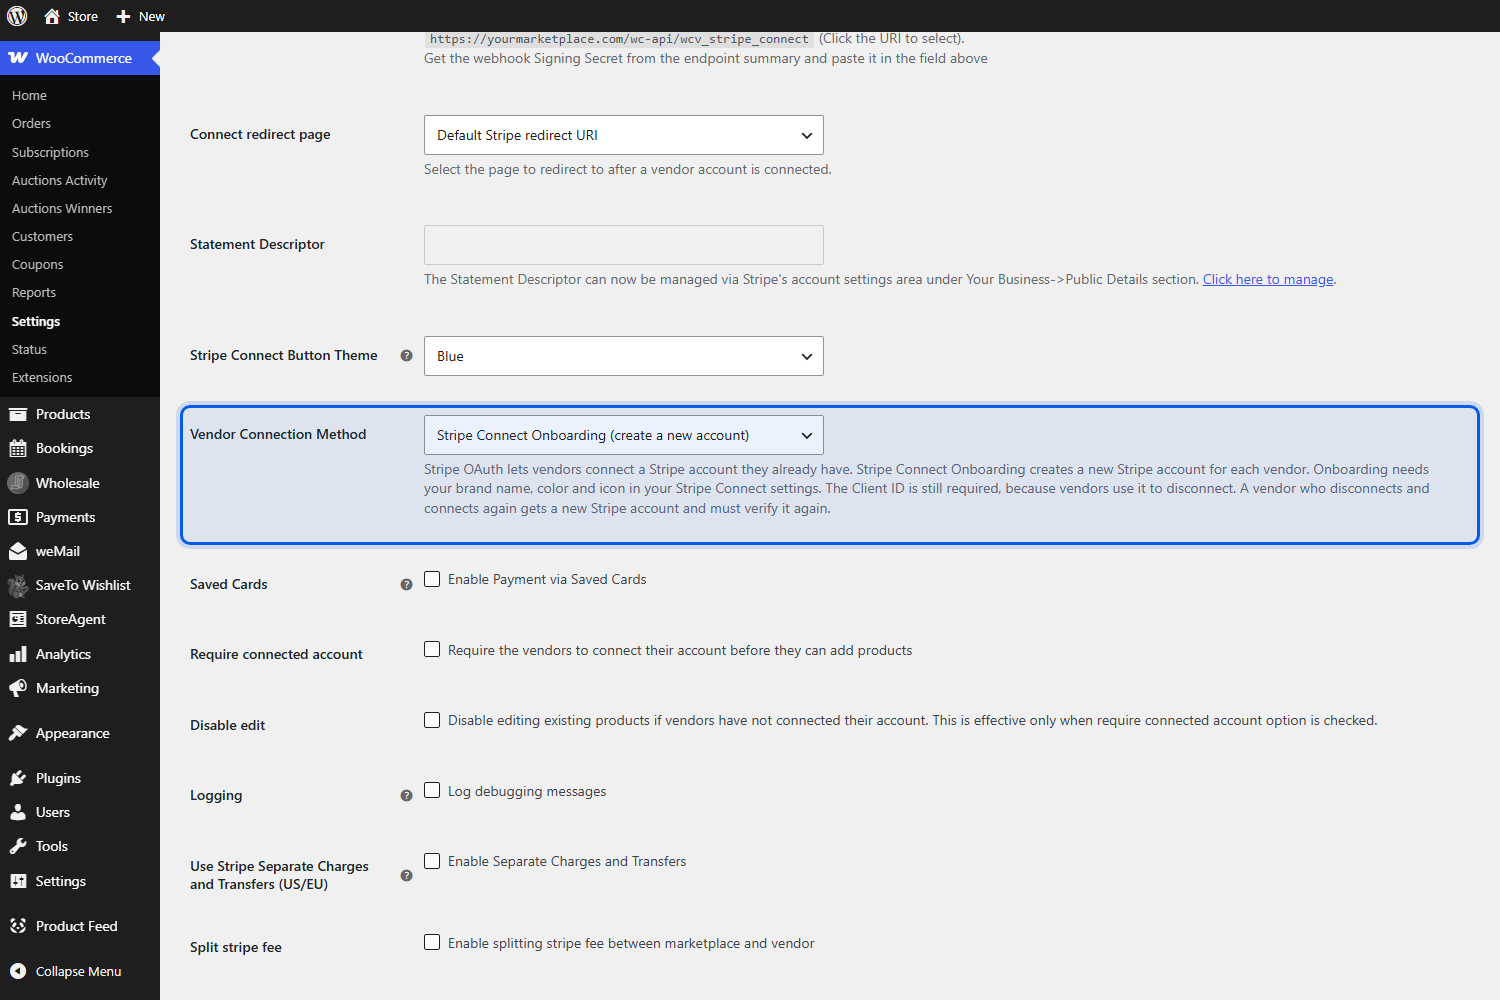
Go to WooCommerce > Settings > Payments > Stripe Connect. Scroll down past the Stripe Connect Button Theme option and find the new Vendor Connection Method dropdown. It has two choices:
- Stripe OAuth (connect an existing account): the classic flow and the default.
- Stripe Connect Onboarding (create a new account): the new flow.
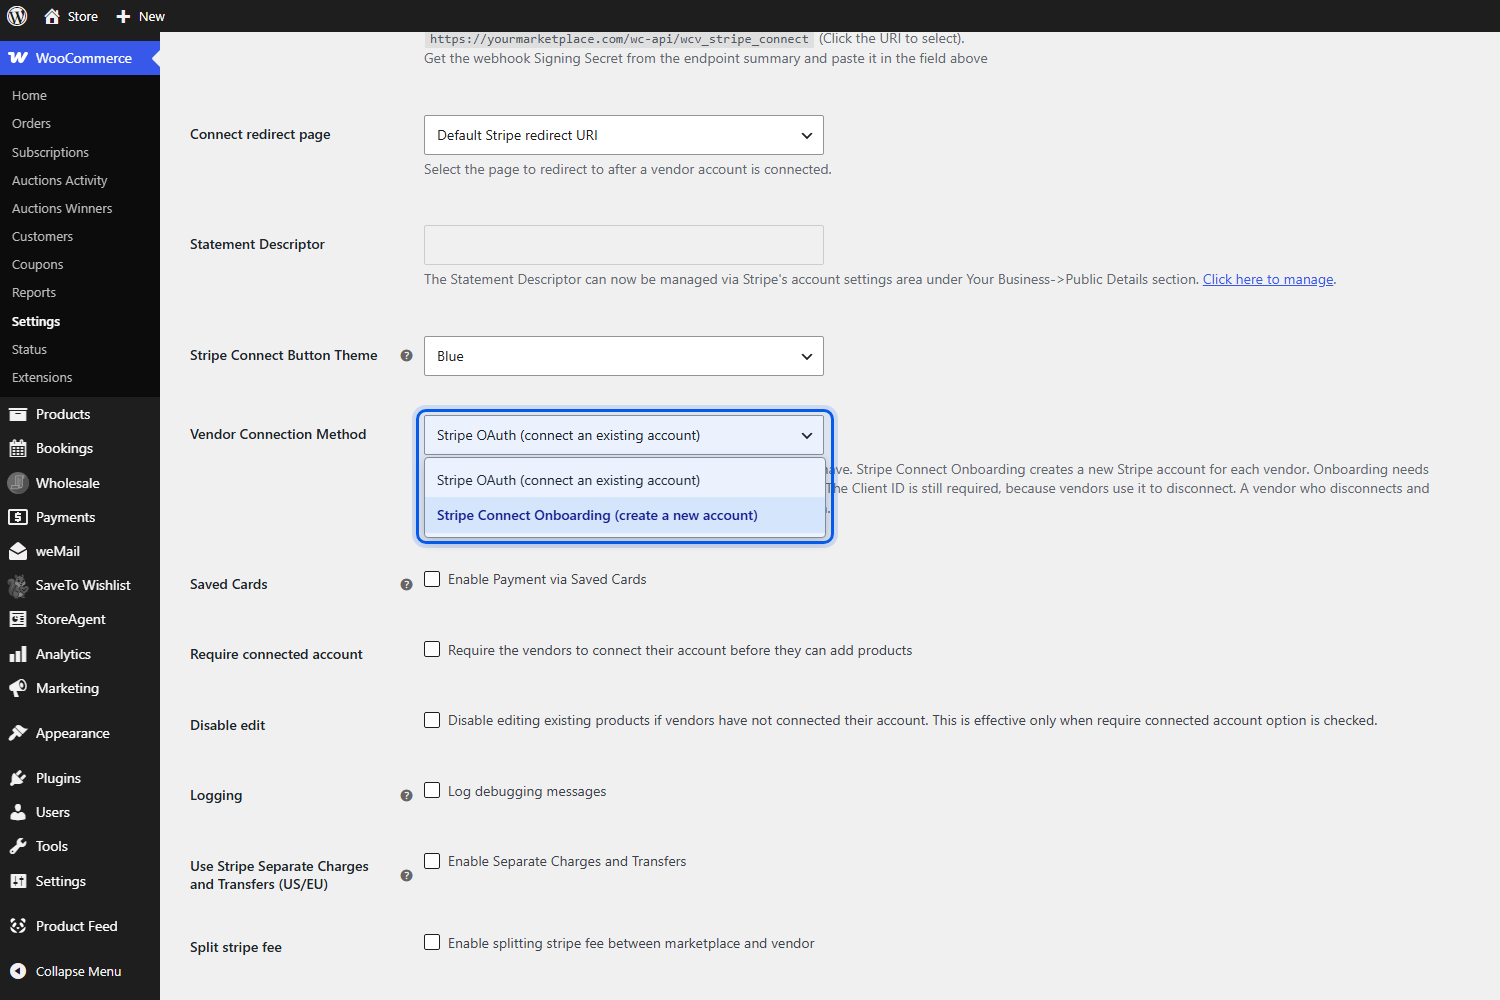
Select Stripe Connect Onboarding (create a new account) and click Save changes. Keep your Client ID filled in, even though onboarding doesn’t use it to connect. Vendors still need it when they disconnect their account.
Step 4: Let vendors choose Stripe as their payout method
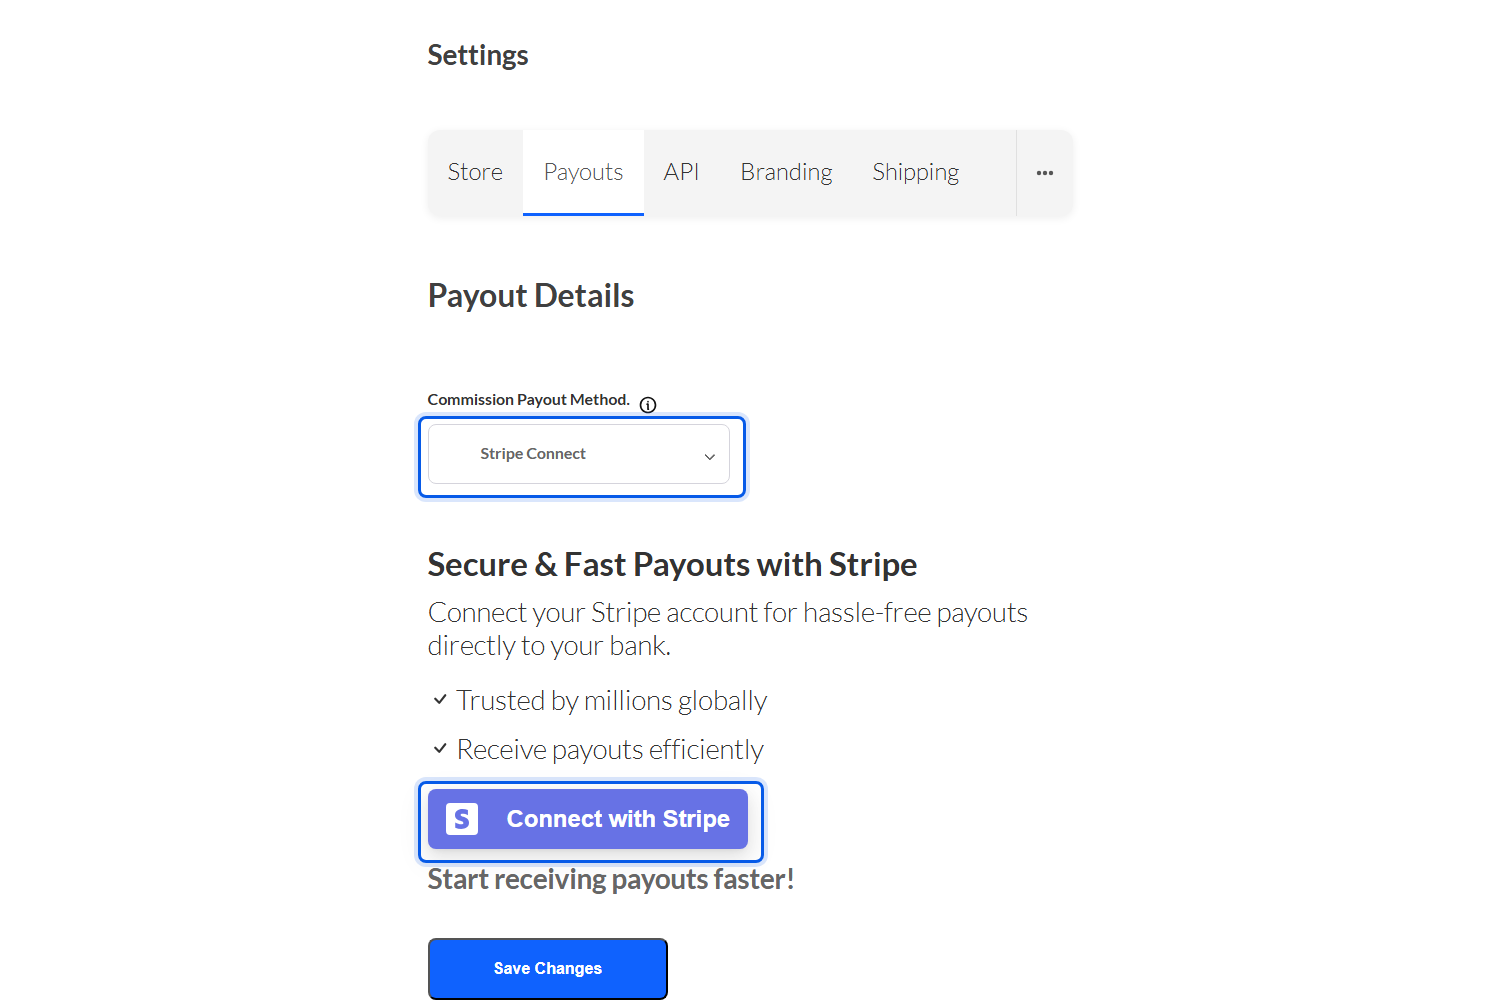
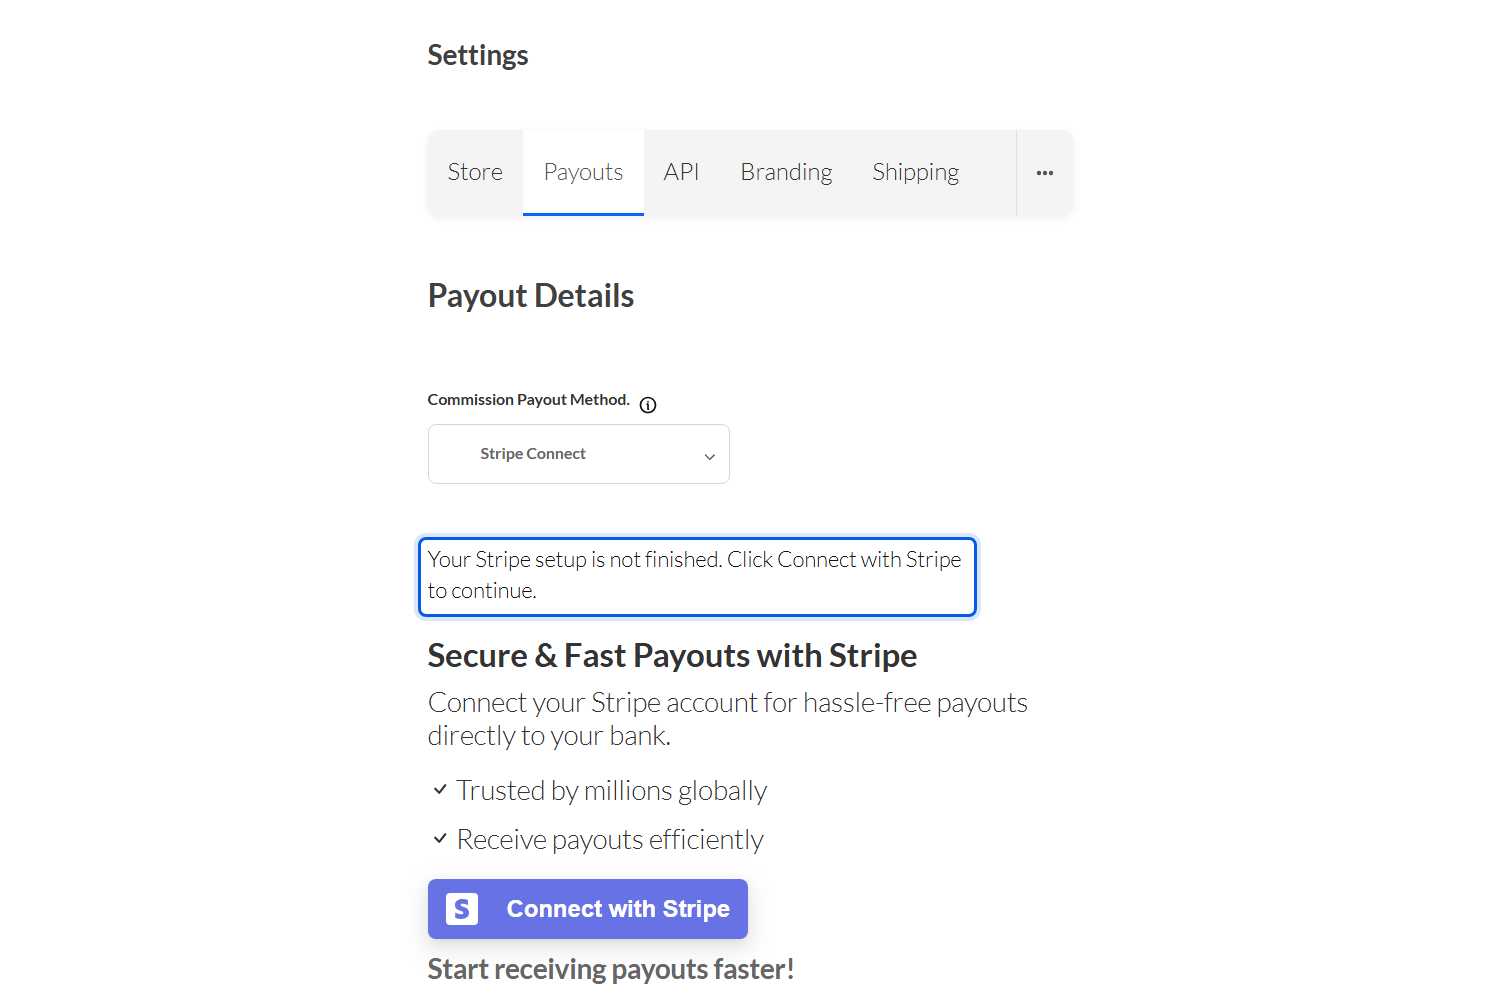
Vendors connect from their own dashboard. In the frontend vendor dashboard, they go to Settings > Payouts and set the commission payout method to Stripe Connect. The Connect with Stripe button then appears in the same panel.
Step 5: Test the flow before you announce it
Switch Stripe Connect to test mode and run through the flow as a test vendor. Click Connect with Stripe, complete the Stripe form with Stripe’s test data, and confirm you land back on the shop settings page in a connected state. Our walkthrough on testing Stripe marketplace payments covers test mode and test cards in more detail.
What Your Vendors See During Onboarding
Most vendors will click the button, finish the form, and come back connected. The new flow also handles the less tidy cases, so you don’t get support tickets from vendors stuck halfway.
If a vendor leaves the form early
Plenty of sellers stop partway through to find a bank statement or a tax ID. When they come back, the Stripe panel in their dashboard shows a short reminder: “Your Stripe setup is not finished. Click Connect with Stripe to continue.” Clicking the button reuses the same Stripe account, so duplicate accounts don’t pile up on your platform.
Stripe’s onboarding links also expire after a while. If a vendor opens an old link, the plugin quietly opens a new form for the same account rather than starting over. Double-clicking the button won’t create two accounts either.
If Stripe is still reviewing their details
Finishing the form doesn’t always mean Stripe has approved the account yet. Until Stripe enables payments on it, the account stays pending, and the vendor sees: “Stripe is still checking your details, so you cannot receive payments yet. Click Connect with Stripe later to check your status.” Once Stripe gives the green light, the next click completes the connection.
If you use Separate Charges and Transfers
Marketplaces that run Separate Charges and Transfers have a country rule for vendor accounts. With the onboarding option, the new account is created in the country of the vendor’s store address, and the vendor is told up front that this country can’t change later. If a vendor hasn’t set a store country yet, they’re asked to add one in their store settings before Stripe opens, and no account is created until they do.
Paying sellers in other countries? Our article on Stripe fees computation and cross-border payouts explains how international payouts work in WC Vendors.
What Happens To Vendors Who Already Connected With OAuth
Nothing changes for them. Stripe OAuth stays the default, so updating the plugin doesn’t switch any marketplace to the new flow. Even after you switch to onboarding, vendors who connected through OAuth stay connected and keep receiving orders and payouts as before.
The new setting only affects vendors who click Connect with Stripe after you change it. That makes it safe to switch on a live marketplace: new sellers get the onboarding form, and your existing sellers never notice.
One thing to keep in mind is disconnecting. A vendor who disconnects and then connects again through onboarding gets a brand-new Stripe account and has to verify it again. The setting description in your admin says so, but it’s worth adding to your vendor FAQ or vendor onboarding checklist too.
Other Improvements In Stripe Connect 2.2.8
Stripe Connect onboarding is the headline feature, but 2.2.8 makes the connection process sturdier in a few other ways too:
- Safer OAuth returns: the plugin now saves a connection only for the logged-in vendor who clicked Connect. A vendor who opened the Connect link before the update, or whose login expired, simply clicks Connect again.
- Force disconnect: if a vendor can’t disconnect because your marketplace can’t reach Stripe, the error now includes a force disconnect link that removes the saved account from your store.
- Clearer payout schedule errors: if Stripe rejects the marketplace payout schedule during connection, the vendor stays connected and is asked to contact you, instead of the whole connection failing.
- Restricted key warning: the Secret Key fields now warn you that a Stripe restricted key (starting with rk_) can’t connect vendor accounts.
The release also fixes a long list of checkout, 3D Secure, Bancontact, and webhook issues. If your vendors are paid through Stripe, our guide to Stripe Connect vendor payouts is a good refresher on how commissions reach each seller.
Conclusion
Connecting a Stripe account is often the last thing standing between a new vendor and their first payout. With Stripe Connect onboarding, WC Vendors can now create that account for the vendor and send them a single Stripe-hosted form, following Stripe’s recommendation for new platforms and removing a common point where sellers give up.
Because Stripe OAuth remains the default and existing connections keep working, you can adopt the new flow at your own pace. Add your brand details in Stripe, flip the Vendor Connection Method setting, and test it once as a vendor. Your next seller can then go from sign-up to payout-ready without leaving the path you’ve set for them.
If you sell in other Rymera ecosystems too, Wholesale Suite took a similar approach with its guided WooCommerce Stripe setup for wholesale stores.
Here is what we covered in this article:
- What is Stripe Connect onboarding in WC Vendors?
- Why Stripe recommends moving away from OAuth
- Stripe OAuth vs. Stripe Connect onboarding: which one fits your marketplace?
- How to set up Stripe Connect onboarding in WC Vendors
- What your vendors see during onboarding
- What happens to vendors who already connected with OAuth
- Other improvements in Stripe Connect 2.2.8
Frequently Asked Questions
Do I have to switch to Stripe Connect onboarding?
No. Stripe OAuth stays the default after you update to WC Vendors Stripe Connect 2.2.8. You only get the new flow if you change the Vendor Connection Method setting yourself.
Will my existing vendors need to reconnect their Stripe accounts?
No. Vendors who connected through OAuth stay connected and keep receiving orders and payouts, even after you switch the setting to onboarding.
Can a vendor use an existing Stripe account with the onboarding option?
No. The onboarding option always creates a new Stripe account for the vendor. If your vendors want to link a Stripe account they already have, keep the Stripe OAuth option selected.
Why does Stripe ask me for a brand name, color, and icon?
Stripe shows your marketplace branding on the hosted onboarding form, so it requires these details in your Stripe Connect settings before vendors can start the form.
Do I still need a Client ID?
Yes. The new flow doesn’t use the Client ID to connect vendors, but vendors still need it to disconnect their Stripe account from your marketplace.