
Running a marketplace means trusting vendors to list accurate, well-described products—but sometimes a customer spots something that shouldn’t be there. Product Reports in WC Vendors Pro lets customers flag those products directly from the product page. This article walks you through enabling the feature, configuring the report form, and managing the full report workflow from your admin dashboard.
Requirements
- WC Vendors Pro installed and activated
- WC Vendors (free) installed and activated
Step 1: Enable product reports
Product Reports are disabled by default. Turn the feature on before anything else.
- Go to WC Vendors → Settings.
- Click the Product Reports tab.
- Check Enable Product Reports.
- Click Save changes.
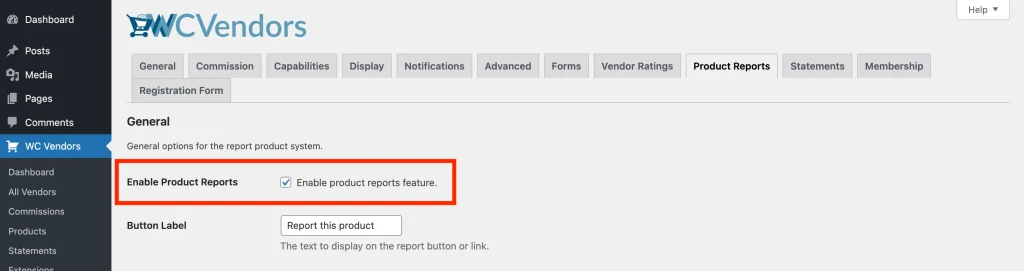
Once saved, a Product Reports submenu item appears under WC Vendors in your admin sidebar.
Step 2: Configure the report form
You can control how the report option looks on product pages and who can see it.
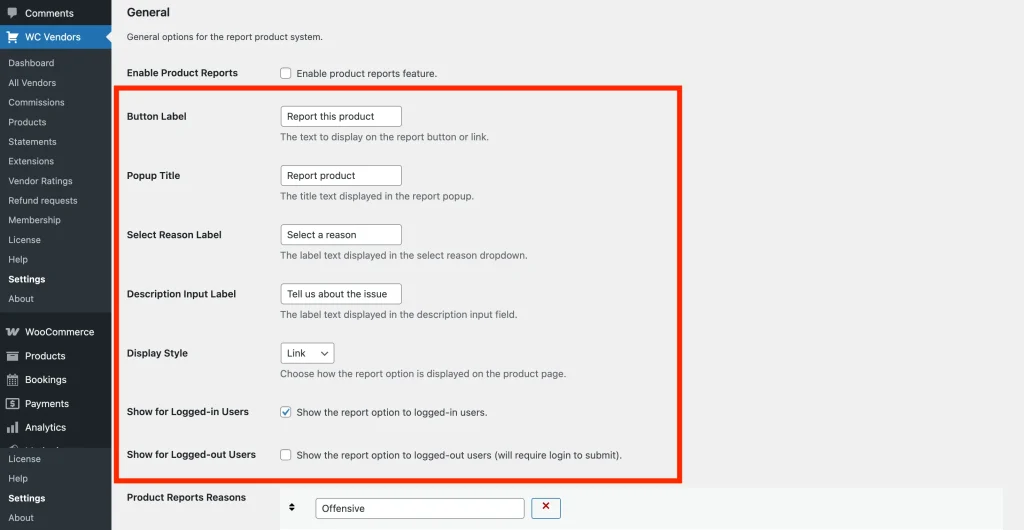
- Still on the Product Reports tab, update the text labels:
- Button Label — what customers click on the product page. Default: “Report this product”.
- Popup Title — the heading inside the report popup. Default: “Report product”.
- Select Reason Label — the label above the reason dropdown. Default: “Select a reason”.
- Description Input Label — the label above the description field. Default: “Tell us about the issue”.
- Set Display Style to Button or Link. This controls whether the report option appears as a styled button or a plain text link on the product page.
- Configure visibility:
- Show for Logged-in Users — enabled by default. Logged-in customers see the report option.
- Show for Logged-out Users — disabled by default. When enabled, guests will see the option but are prompted to log in before they can submit a report.
- Click Save changes.
Vendors can’t see the report option on their own products—it’s hidden automatically, regardless of your visibility settings.
Step 3: Add report reasons
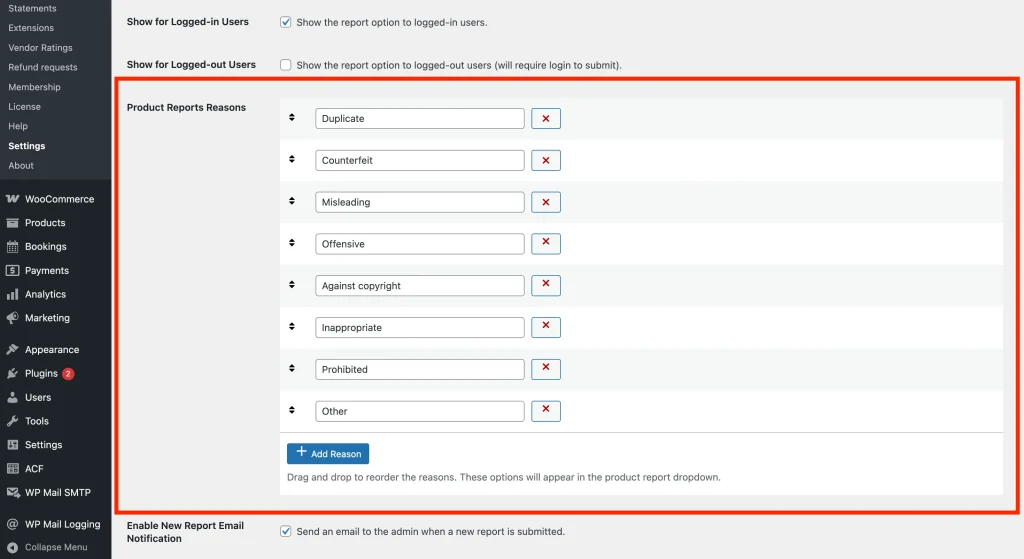
Report reasons are the options customers choose from when submitting a report. WC Vendors Pro includes a default set, and you can add, remove, or reorder them at any time.
- Scroll down to the Product Reports Reasons section on the Product Reports tab.
- Click Add Reason and type a reason in the new text field.
- To remove a reason, click the red × next to it.
- Drag and drop rows using the sort handle on the left to reorder them.
- Click Save changes.
Step 4: Review submitted reports
When a customer submits a report, it appears in your reports queue. Go to WC Vendors → Product Reports to see it.
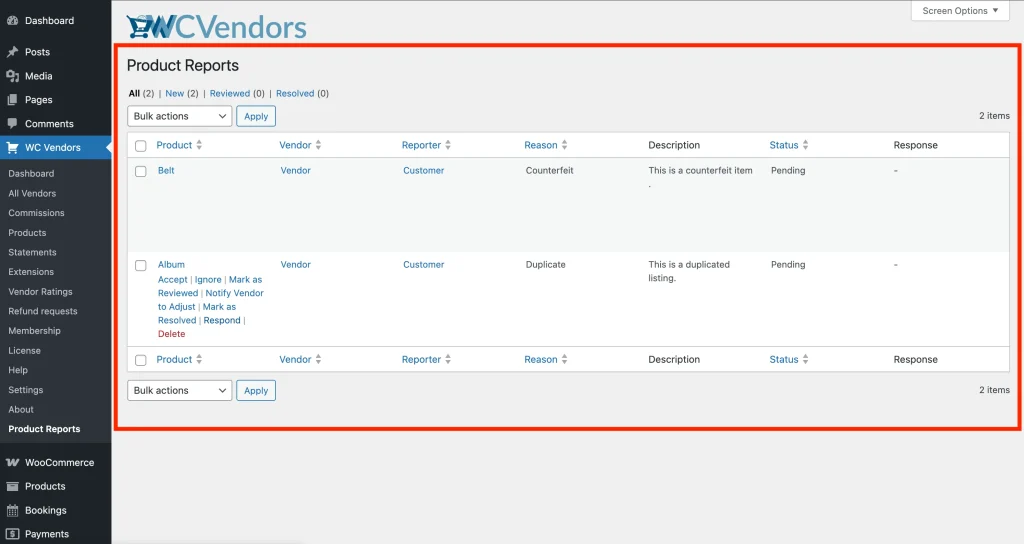
The table shows each report with the product name (linked to the edit screen), the vendor who owns it (linked to their user profile in WP Admin), the customer who reported it, the reason they chose, their description, the current status, and any admin responses. Use the filter tabs at the top (All, New, Reviewed, Resolved) to focus on reports at a particular stage.
If a product has an open report, you’ll also see a “Has been reported” notice next to it in your vendor product lists.
Step 5: Take action on a report
Hover over the product name in any report row to see the available actions. Each action moves the report through the workflow and may trigger an email notification.
Respond
Use Respond to send a message to the vendor or the reporter, without changing the report’s status.
- Click Respond in the row actions.
- Choose whether to send the response to the Vendor or the Reporter.
- Write your message in the Response notes field.
- Optionally check Also delete this product. This deletes the product and closes the report at the same time.
- Click Submit.
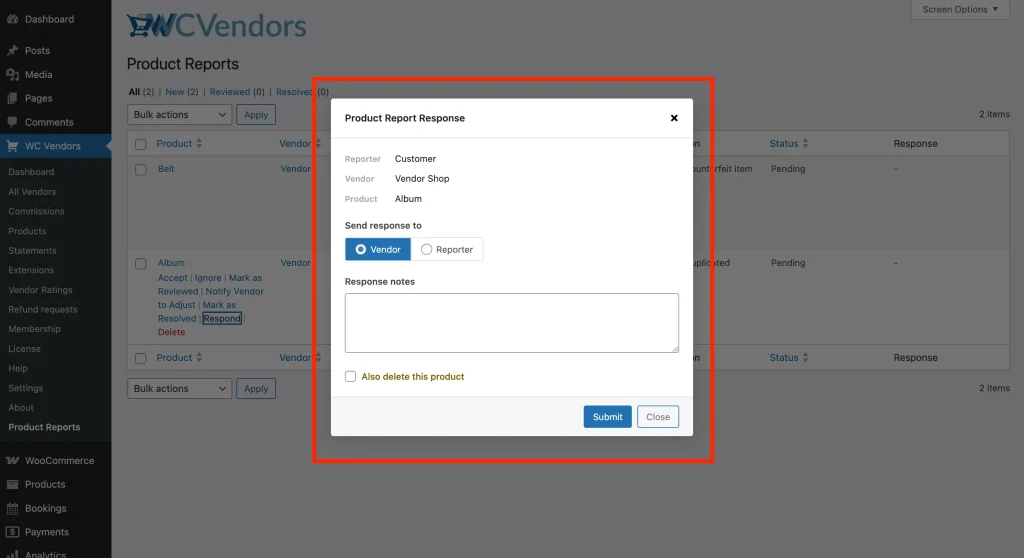
The recipient receives your message by email. If you send more than one response, all previous responses are logged and viewable by clicking the response count in the Response column.
Mark as reviewed
Click Mark as Reviewed to flag that you’ve looked at the report. The status updates to Reviewed and no email is sent. Use this as an intermediate step while you investigate before deciding what action to take.
Notify vendor to adjust
Click Notify Vendor to Adjust when the product has an issue the vendor needs to fix themselves. This hides the product from your store’s catalog immediately and sends the vendor an email asking them to make an adjustment. The report stays open while the vendor works on it—once the fix is in, use Mark as Resolved to close it out.
Accept
Click Accept when the report is valid and the product should be removed from your store. The product is permanently deleted, the status changes to Accepted, and two emails go out automatically: one to the vendor notifying them the product was removed, and one to the reporter confirming their report was accepted.
Mark as resolved
Click Mark as Resolved once the issue has been addressed and no further action is needed. The status changes to Resolved and the vendor receives an email confirming the report is closed. This is the right action after a vendor has fixed their product following a “Notify Vendor to Adjust” step, or any time you want to close out a report without removing the product.
Ignore
Click Ignore to dismiss the report without taking any action. No email is sent and the product is unaffected. Useful for reports that are inaccurate or appear to be spam.
Delete
Click Delete to permanently remove the report record from the table. No email is sent and the product is unaffected. This is different from Ignore, Delete removes the record entirely rather than leaving a closed entry in the table.
Email notifications
WC Vendors Pro sends automated emails at each stage of the report workflow. All templates can be customised under WooCommerce → Emails.
| Recipient | When it sends | |
|---|---|---|
| Product Report Submitted | Admin | A customer submits a report from the product page |
| Product Report Response | Vendor or Reporter | Admin sends a response via the Respond popup |
| Product Report Accepted | Vendor | Admin accepts the report, product is deleted |
| Product Report Accepted (Reporter) | Reporter | Admin accepts the report, product is deleted |
| Product Report Adjustment | Vendor | Admin clicks “Notify Vendor to Adjust” |
| Product Report Resolved | Vendor | Admin marks the report as Resolved |
To turn off the admin notification for new submissions, go to WC Vendors → Settings → Product Reports and uncheck Enable New Report Email Notification.
Troubleshooting
Customers don’t see the Report button on product pages.
Confirm Enable Product Reports is checked under WC Vendors → Settings → Product Reports. Then check that Show for Logged-in Users (or Show for Logged-out Users) matches the customer’s login state. If the customer is the product’s vendor, the button is always hidden automatically.
A vendor’s product still appears in the catalog after I clicked Notify Vendor to Adjust.
The product is hidden from the storefront when this action runs. If it still appears, clear your page and object caches and check the product’s status in WooCommerce → Products to confirm it is set to “Pending” or similar.
The admin notification email never arrives.
Confirm Enable New Report Email Notification is checked under WC Vendors → Settings → Product Reports. If it is checked, verify your store’s mail-sending setup — an SMTP plugin or your hosting mail configuration may be the issue.
Frequently asked questions
Can a customer report the same product more than once?
No. Each customer can only submit one report per product. Once they’ve submitted a report, the report button no longer appears for them on that product page.
Can a vendor report their own product?
No. The report option is always hidden from the product’s vendor and author, regardless of your visibility settings.
What happens to the product when I click “Accept”?
The product is permanently deleted from your store. This can’t be undone. Two emails go out—one to the vendor and one to the reporter. Only use Accept when you’re sure the product needs to come down.
What’s the difference between “Accept” and “Mark as Resolved”?
Accept deletes the product and closes the report. Mark as Resolved changes the status and notifies the vendor, but the product stays in your store. Use Mark as Resolved when the vendor has fixed the issue rather than when the product needs to be removed.
Need help?
If you have a question or run into any issues, we’re here to help.
- Premium users: Open a support ticket
- Free users: Visit our community forum