If you run a WooCommerce marketplace, you have probably noticed that the row of tabs across the top of the vendor dashboard does not always show everything. Products, Orders, and Coupons sit right there, while Ratings, Reports, and Settings quietly vanish behind a small three-line button. WC Vendors 2.7.2 introduces a new menu items setting that puts a stop to that behavior.
The feature is called Show All Menu Items, and it does exactly what the name promises. Rather than collapsing extra tabs into a burger menu, Show All Menu Items keeps every dashboard tab visible the moment a seller logs in. This guide walks through what the option does, who needs it, and precisely how to switch it on.
Why The Vendor Dashboard Hides Some Of Its Own Tabs
It is not a bug, at least not by design. WC Vendors measures how much horizontal room the menu bar has, works out how many tabs will fit, and tucks the leftovers into a dropdown behind the ☰ button. On a standard theme with a handful of tabs, that is sensible behavior, since it stops the menu from spilling messily off the edge of the screen.
Trouble starts when something interferes with that measurement. A theme with strong opinions about layout, or a snippet of custom styling, can throw the sums off. The result is a menu that behaves oddly, so the ☰ button appears when there is obviously plenty of space, tabs go missing on a wide desktop monitor, or the spacing across the bar comes out visibly wrong.
Marketplaces with a long list of tabs feel it worst, because more of the vendor dashboard ends up out of sight. As of 2.7.2, that fix is simply a checkbox in your settings.
Before, with the setting off
Only four tabs fit on the bar. The other six sit behind the ☰ button, and a seller has to know to click it to find them.
Visible: Dashboard, Products, Orders, Coupons.
Hidden behind ☰: Ratings, Commission, Refund Requests, Reports, Settings, View Store.
After, with the setting on
All ten tabs stay in the main bar, wrapping onto a second row. There is no ☰ button at all.
Visible across two rows: Dashboard, Products, Orders, Coupons, Ratings, Commission, Refund Requests, Reports, Settings, View Store.
How To Turn On The Show All Menu Items Setting Step By Step
Switching on the menu items setting takes about a minute. Nothing here touches your products, orders, sellers, or commission payouts, since it only changes how the menu is laid out.
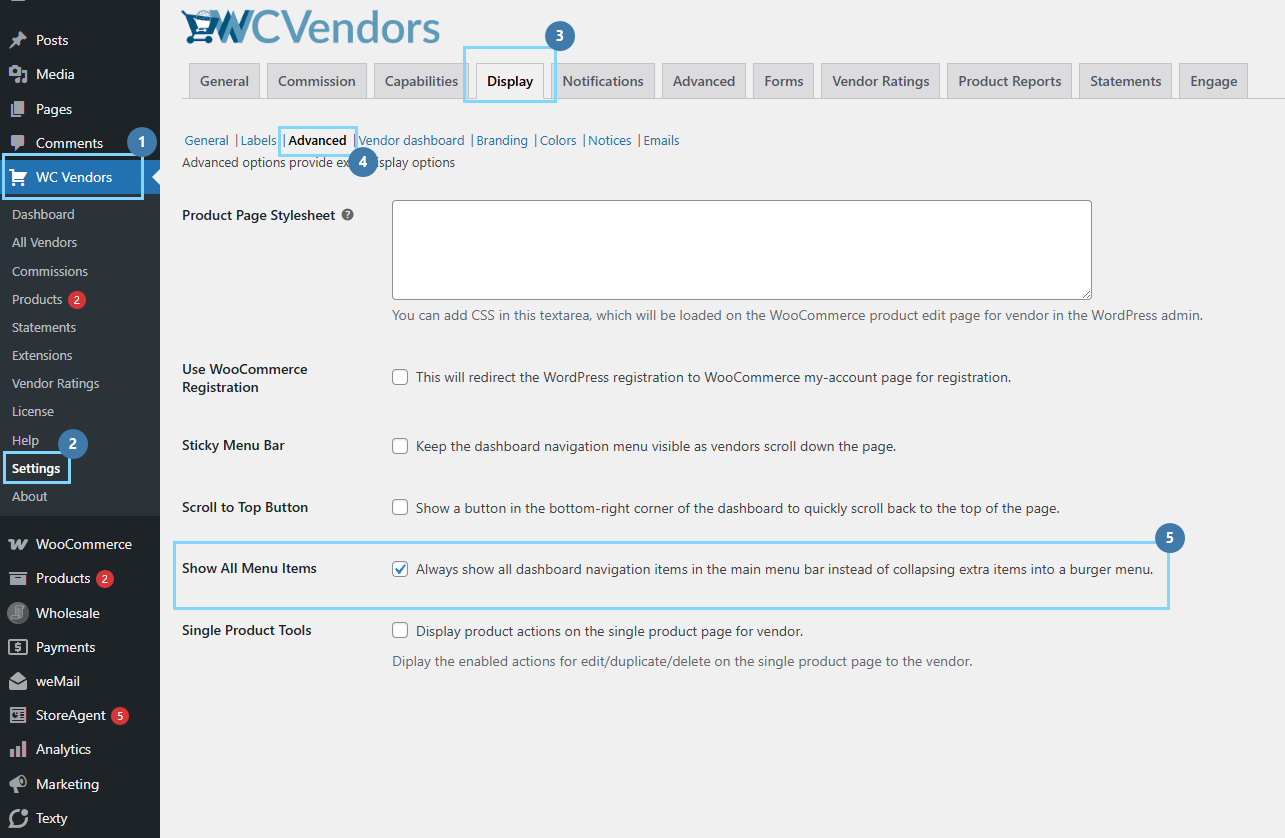
Check which version you are running
In your WordPress admin, go to Plugins and look at the version number under WC Vendors. You need 2.7.2 or later. If you are on anything earlier, update first; otherwise, the option will not be there to find.
Open your WC Vendors display settings
Navigate to WC Vendors > Display > Advanced. Scroll down the Advanced page. It is grouped with the other menu options, sitting directly below Sticky Menu Bar and Scroll to Top Button.
The on-screen label reads: “Always show all dashboard navigation items in the main menu bar instead of collapsing extra items into a burger menu.”
Click Save changes.
Check the result
Log in as one of your sellers, or use a test account, and open the vendor dashboard. Make the browser window narrower, down to roughly the width of a small laptop screen. Every tab should stay visible, moving onto a second row instead of disappearing, and the ☰ button should be gone entirely.
If support gave you a code snippet (optional)
Remove it once the feature is on. That older workaround forced the menu into shape with custom styling, and leaving it in place alongside the new option is exactly the kind of override that caused the original layout problems. Ask your developer to take it out, or contact support if you are not sure where it was added.
Conclusion
Show All Menu Items is a small change with an outsized payoff for the marketplaces that need it. For years, a mismeasured menu bar meant that sellers on certain themes lost sight of half their dashboard tabs, and the only remedy was a hand-issued code snippet. Now that fix lives in one checkbox, and it works even on themes that have rewritten the menu template entirely.
If your vendor dashboard has ever hidden tabs behind the ☰ button at the wrong moment, this is the option to reach for. Turn it on, clear your cache, check a seller’s view at a narrow window width, and pull out any old snippet that was doing the job before. Everything else about your marketplace stays exactly as it was, which is the whole point of keeping the feature so tightly focused.
More than anything, the menu items setting gives you certainty. Once it is on, no theme update, styling conflict, or browser resize can quietly tuck a tab out of view, and your sellers see every option the moment they log in.
Here is what we covered in this article:
Frequently Asked Questions
Does the menu items setting change the vendor dashboard on mobile?
No. On narrow phone screens the menu already stacks into a single column with no ☰ button, in both states. Sellers browsing on a phone will not see any difference.
Will Show All Menu Items work if my theme has customized the menu?
Yes. The feature was built with that case in mind, which is the whole reason it exists. Even on a theme that has replaced the menu’s own template, the ☰ button is still suppressed.
Do I need WC Vendors Pro to use Show All Menu Items?
No. It is part of the free WC Vendors plugin, and it works whether or not Pro is installed alongside it.
Is there a limit to how many tabs it can show?
No fixed limit. The menu wraps onto as many rows as it needs. That said, if you are carrying so many tabs that they fill three or four rows, it is worth asking whether every one of them earns its place.
Will the option slow the page down?
If anything, marginally the opposite. With the setting on, the browser skips the measuring work it would otherwise do on load and on every window resize.