Shoppers already know how to follow their favorite sellers. If you want that same behavior on your own marketplace, you need a follow stores system that lets customers follow the vendors they like and keep coming back for more.
Until now, most WooCommerce marketplaces had no built-in way for shoppers to build an ongoing relationship with individual stores. A follow stores system closes that gap by turning one-time buyers into followers who see a personalized feed of new products and receive follower-only discounts that apply automatically at checkout. WC Vendors Engage brings this follow stores system to your marketplace.
In this guide, we will walk through everything a follow stores system does, who benefits from it, and exactly how to set one up screen by screen using WC Vendors Engage. Because this is a fresh plugin rather than an update, there is new setup to do, but nothing to migrate.
What Is WC Vendors Engage And Why Follow Stores System Matters
A follow stores system lets customers follow the vendors they like, then see a personalized feed of those vendors’ newest products and claim discounts reserved for followers. WC Vendors Engage delivers this as a brand-new feature. It works the same way customers follow shops on Etsy or save sellers on eBay, and it applies follower-only discounts automatically at checkout.
The reason a follow stores system matters comes down to retention. According to Harvard Business Review, increasing customer retention by just 5 percent can boost profits by 25 percent to 95 percent. A follow relationship gives shoppers a reason to return, which is far cheaper than paying to acquire someone new for every sale.
Personalization plays a role too. McKinsey research found that faster-growing companies derive 40 percent more revenue from personalization than their slower-growing peers, and that 71 percent of consumers now expect personalized interactions. A follow stores system delivers that personalization through a tailored product feed and offers built around the exact stores each shopper follows. It also strengthens your broader marketplace customer experience, since a shopper who follows a store feels a closer connection to it.
If you run an Etsy-style platform, this three-way value is exactly what keeps a marketplace healthy. Customers get a reason to return, vendors get an audience they can market to, and you keep the guardrails around privacy. For more on structuring such a platform, see our guide to building a WooCommerce marketplace.
The Core Features Of A Follow Stores System
Here is what WC Vendors Engage presents to each audience:
Follow buttons and a personalized product feed
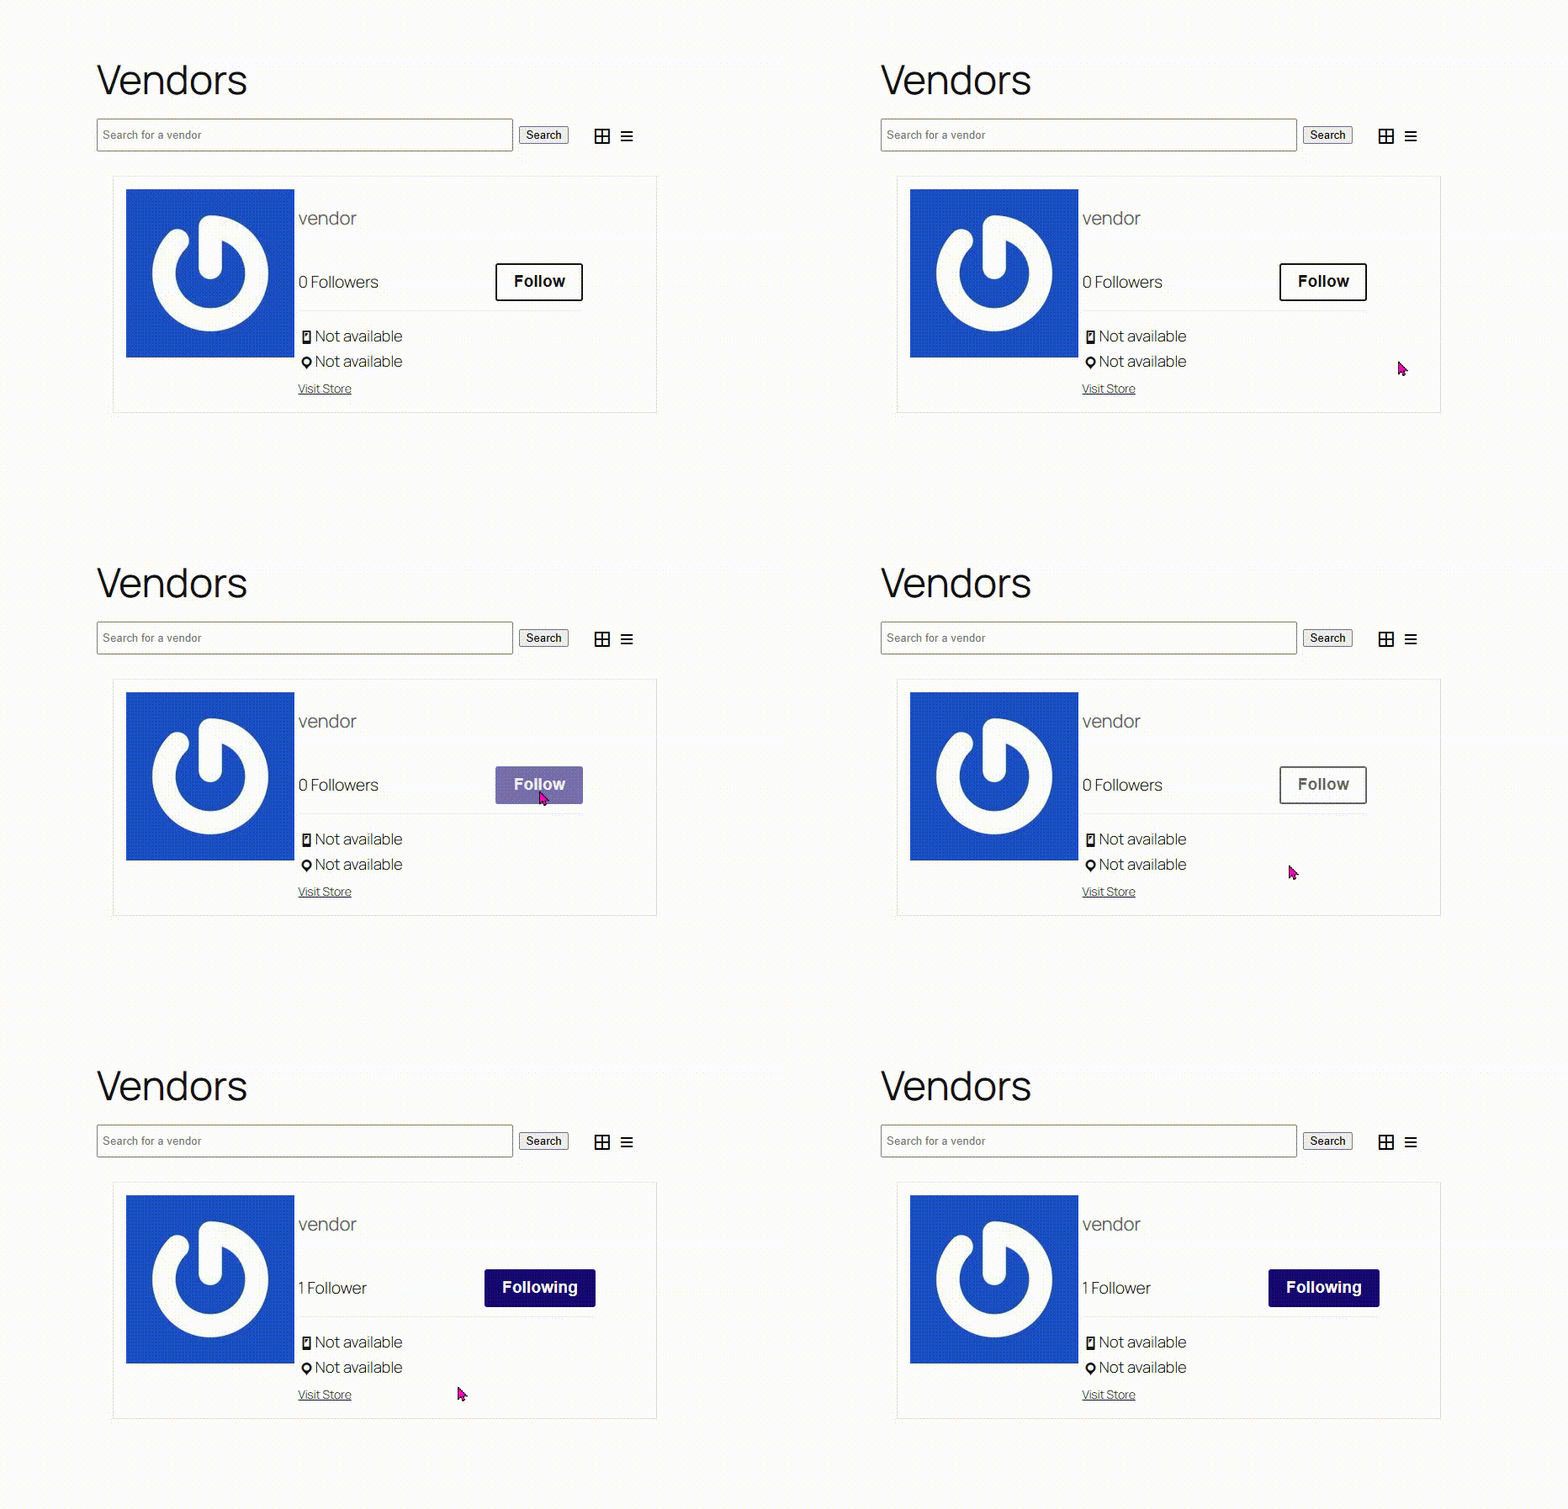
The heart of any follow stores system is the Follow button. It appears on each vendor’s store header, and you can optionally add it to your vendor list shortcodes as well. A later Engage update added two more places to catch a follow: a button on single product pages, and a Post-Purchase Follow Prompt on the order confirmation page that asks buyers to follow the stores they just bought from. When a customer follows a store, their Following Stores area fills with a feed of the newest products from those stores, working like a social feed built for shopping.
Following Stores and Offers in My Account
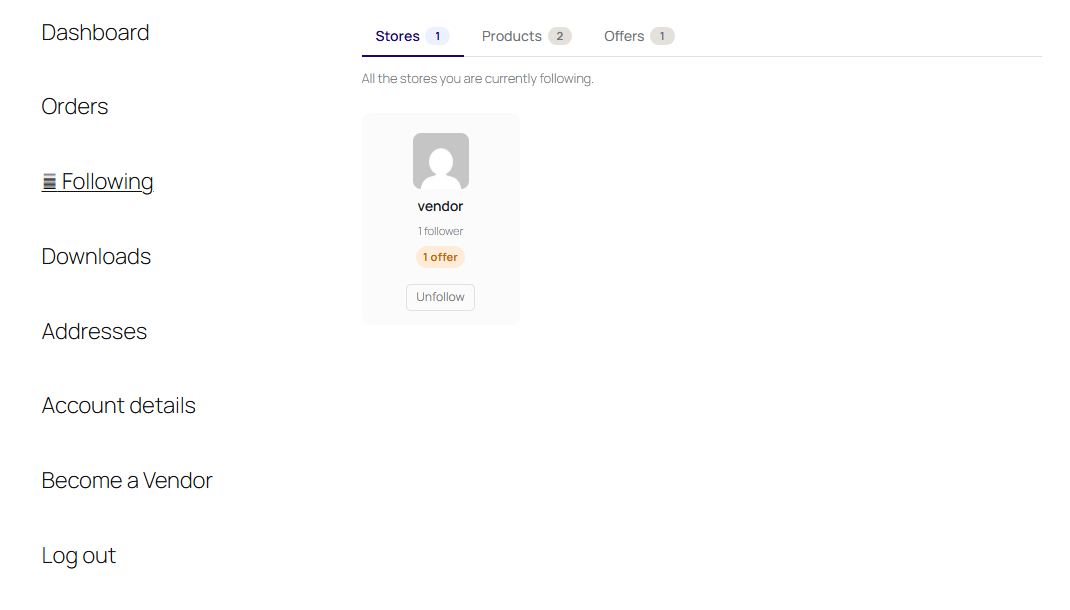
Two customer-facing pages live inside the standard WooCommerce My Account area. The Following Stores page shows the stores a shopper follows, along with the product feed, while the Offers view lists all active follower-only discounts from those stores. Each offer card shows the vendor’s shop name and logo, the discount, any minimum order requirement, and an “Apply offer & shop” button that takes the customer straight to that vendor’s store with the deal queued. If a followed store has no active offer, that offer simply does not appear.
Follower-only offers with auto-apply of the best deal
Vendors can create discounts that only their followers get. At the cart and checkout, the follow stores system automatically applies the best-value offer the customer qualifies for, so there is no coupon code to hunt for or paste. If a shopper clicked “Apply offer & shop” for a specific deal, the system honors that choice; otherwise it picks the highest-value one. Vendors aren’t limited to percentage or fixed discounts either; they can waive their own shipping as part of a follower offer, stacked on top of whatever conditions the offer already carries. When a cart holds items from several followed stores, it applies the single most valuable eligible offer rather than stacking them. This mirrors the exclusive-discount approach that sister brand Advanced Coupons recommends for rewarding loyal customers.
Flexible offer placement
You control where a follower offer shows up. An Offers Placement setting lets you choose how offers appear, for example as a tab within Following Stores, and separate toggles let you show the offer on single product pages and as a banner on the cart and checkout. Each placement has its own switch, so you are never forced to show offers everywhere.
Cart Block and Checkout Block support
The follower-offer banner works on both the classic Cart and Checkout pages and the newer WooCommerce Cart Block and Checkout Block. Shoppers can apply, remove, or switch offers right there and watch the cart total update, with an “Applied” badge confirming it worked. Many stores have moved to block-based checkout, so this ensures the deal appears regardless of the checkout style you use.
Vendor dashboard with follower stats and CSV export
Vendors get a new Engage tab on their dashboard, plus a stat card showing followers for Today, This Week, This Month, and Total, with a one-time milestone celebration when they reach thresholds such as 100 followers. They also get a 30-day follower growth chart, a searchable, paginated follower list, a shortcut to create an offer, and the option to export their follower list to CSV, if you allow it.
Admin settings with owner privacy controls
A dedicated Engage tab under WC Vendors settings gives you owner-only controls over privacy. You decide whether vendors can export follower data and whether each follower’s total spend is visible in the list and export. Both are turned off by default to protect customer information.
License manager with automatic updates
Enter your license key once and the follow stores system updates itself automatically going forward, with no manual re-uploading of ZIP files for future versions.
How To Set Up Your Follow Stores System Step By Step
WC Vendors Engage is a new feature in WC Vendors Growth and Business Plans. The settings screens for your follow stores system are organized into four sections: General, My Account, Vendor Dashboard, and Data & Privacy.
Before you start
Back up your site, as you would with any new updates. Confirm you are running WordPress 6.0 or higher, WooCommerce 7.0 or higher, PHP 8.0 or higher, and that WC Vendors Marketplace (Free or Pro) is active.
Step 1: Install and activate
Go to Plugins, then Add New, then Upload Plugin. Choose the wc-vendors-engage zip file, click Install Now, then Activate. Open the WC Vendors license screen and enter your license key so you receive automatic updates.
Step 2: Turn on features in the General section
Navigate to WC Vendors, then Settings, then the Engage tab. You land on the General section first, where each row is a checkbox. Tick the options you want:
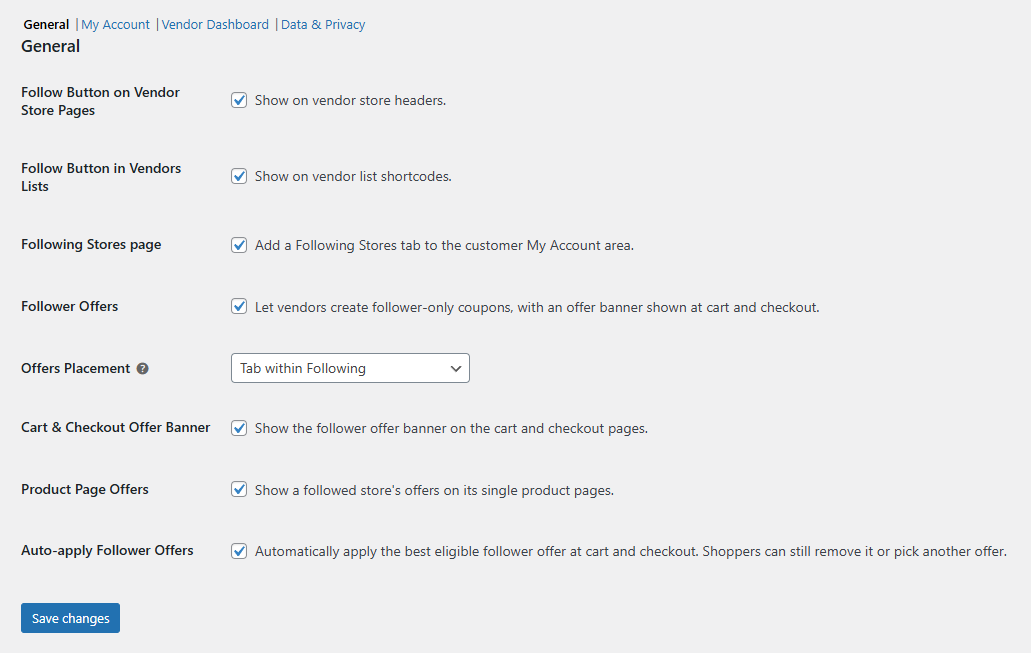
- Follow Button on Vendor Store Pages – shows the Follow button on vendor store headers.
- Follow Button in Vendors Lists – adds it to your vendor list shortcodes.
- Following Stores page – adds the Following Stores tab to the customer My Account area.
- Follower Offers – lets vendors create follower-only coupons, with an offer banner shown at cart and checkout.
- Offers Placement – lets you choose how offers appear, such as a tab within Following.
- Cart & Checkout Offer Banner – shows the follower offer banner on the cart and checkout pages.
- Product Page Offers – shows a followed store’s offers on its single product pages.
- Auto-apply Follower Offers – automatically applies the best eligible follower offer at cart and checkout, and shoppers can still remove it or pick another.
Click Save changes when you are done.
📝 One important note: Auto-apply Follower Offers only does anything when the Follower Offers above it is also ticked, so turn Follower Offers on first.
Step 3: Tune the feed in the My Account section
Click My Account in the section row. These are number fields rather than checkboxes:
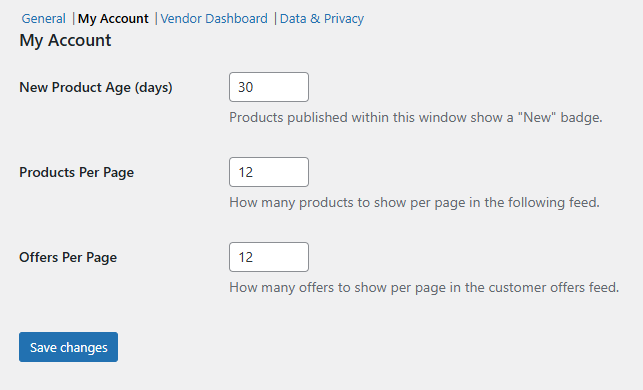
- New Product Age (days) sets how long a product keeps its New badge in the feed. The default is 30.
- Products Per Page sets how many products show per page in the following feed. The default is 12.
- Offers Per Page sets how many offers show per page in the customer offers feed. The default is 12.
Enter your numbers, then click Save changes. Each section saves on its own, so save before switching sections or you will lose your changes.
Step 4: Set followers per page in the Vendor Dashboard section
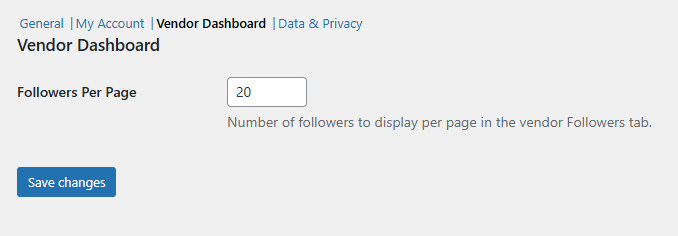
Click Vendor Dashboard. There is one number field, Followers Per Page, which controls how many followers show per page in a vendor’s Followers tab. The default is 20. Set it, then Save changes.
Step 5: Set privacy in the Data & Privacy section
Click Data & Privacy. This is where the owner controls that protect your follow stores system live:
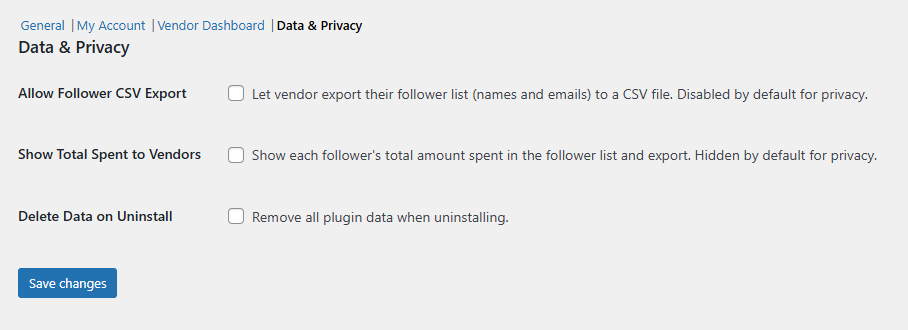
- Allow Follower CSV Export lets vendors export their follower list, including names and emails, to a CSV file. It is disabled by default for privacy.
- Show Total Spent to Vendors reveals each follower’s total amount spent in the list and export. It is hidden by default for privacy.
- Delete Data on Uninstall removes all plugin data when you uninstall. Leave it unticked if you want to keep your follow data.
Set these as you prefer, then Save changes.
Step 6: Vendors create an offer (optional)
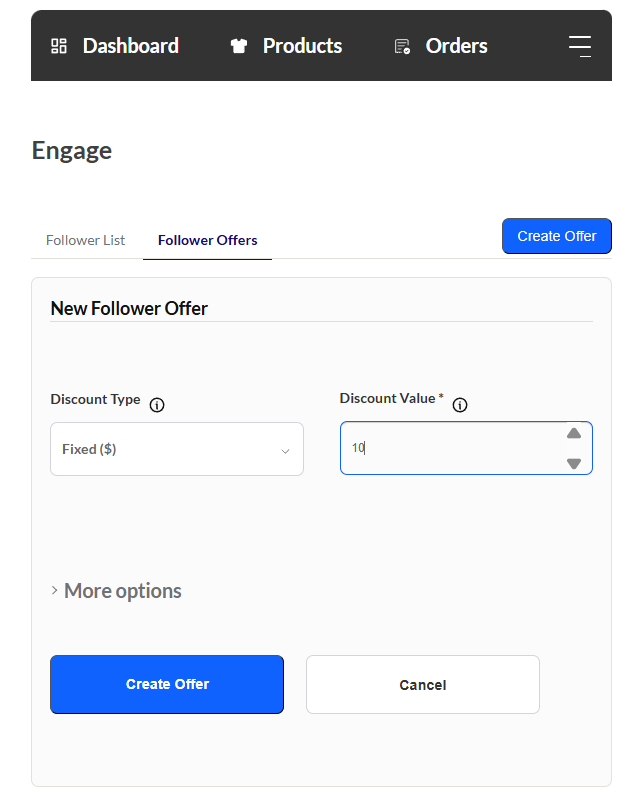
Open as a vendor, go to the Vendor Dashboard, then Engage. Under the Offers section, you should be able to create a follower-only offer, choosing a percentage or fixed discount and setting any minimum order and expiry. The stat card and 30-day trend chart then track follower counts, while the search and pagination tools make the follower list easy to browse. You can export that list to CSV if you allowed it in Step 5.
Step 7: Test the full flow as a customer
Run one end-to-end test as a real customer. Follow a store, visit My Account, and open Following Stores to see the product feed and offers. Add a discounted product to the cart, then confirm that the best follower discount applies automatically at checkout on both your classic pages and the Cart and Checkout Blocks.
Tips And Best Practices For Your Follow Stores System
Since WC Vendors Engage v1.0.0 has been released, treat it as a testing build and run the full customer flow on a staging site before rolling your follow stores system out to live shoppers and vendors. Keep follower CSV export and spend visibility switched off unless a vendor has a clear reason to need them, because both expose customer data. Encourage vendors to launch a modest follower-only offer early, since the milestone celebrations and growth chart give them a reason to keep promoting their Follow button.
Remember that the follow stores system applies only the single best offer rather than stacking discounts, so vendors should price each deal to stand on its own. For ideas on structuring those deals, sister brand Advanced Coupons has a helpful primer on coupon marketing strategies. To turn new followers into repeat buyers, our guide to the consumer purchase journey and our post on marketplace follow-up strategies both pair well with what your follow stores system enables.
Conclusion
A follow stores system gives your marketplace the follow-and-reward loop that shoppers already expect from the biggest platforms. Customers gain a reason to return, vendors gain a growing audience they can market to directly, and you keep control over privacy and data the entire time. That combination is what separates a marketplace people visit once from one they come back to.
The setup is straightforward once you know the four settings sections, and because nothing needs migrating, you can have your follow stores system live in an afternoon. Since this first version of WC Vendors Engage ships as a pre-release, a quick staging test is the smart final step before you go live.
Build the following, reward it with well-priced offers, and let the automatic checkout discounts do the persuading. That is how a follow stores system turns casual one-time buyers into loyal followers of the stores on your platform.
Here is what we covered in this article:
- The core features of a follow stores system
- How to set up your follow stores system step by step
- Tips and best practices for your follow stores system
Frequently Asked Questions
Is the follow stores system a separate plugin or an update to WC Vendors?
The follow stores system ships as WC Vendors Engage, a new feature included in Growth and Business Plans. You install it alongside WC Vendors Marketplace (Free), and there is no data to migrate or resave.
Do customers need a coupon code to use follower offers?
No. When auto-apply is on, the follow stores system automatically applies the best eligible follower offer at the cart and checkout. Shoppers can still remove it or pick a different offer if they prefer.
Can vendors see their followers’ personal details?
Only if you allow it. Follower CSV export and each follower’s total spend are both turned off by default, and you control both from the Data and Privacy section of the Engage settings.
Does the follow stores system work with the new WooCommerce checkout blocks?
Yes. The follower-offer banner works on both the classic Cart and Checkout pages and the newer Cart Block and Checkout Block, so shoppers can apply or switch offers regardless of your checkout style.
What do I need to run a follow stores system with WC Vendors Engage?
You need WordPress 6.0 or higher, WooCommerce 7.0 or higher, PHP 8.0 or higher, and an active WC Vendors Marketplace install (Free or Pro).