
If you’ve just installed WC Vendors Engage, you’ll need to activate your license before automatic updates work. The whole process takes less than a minute. You need your license key and the email address on your WC Vendors account.
What you’ll need
- WooCommerce and WC Vendors (free or Pro) installed and configured
- WC Vendors Engage installed and active
- Your WC Vendors Engage license key: find it by logging into your WC Vendors account
- The email address you used when you purchased
How to activate your license
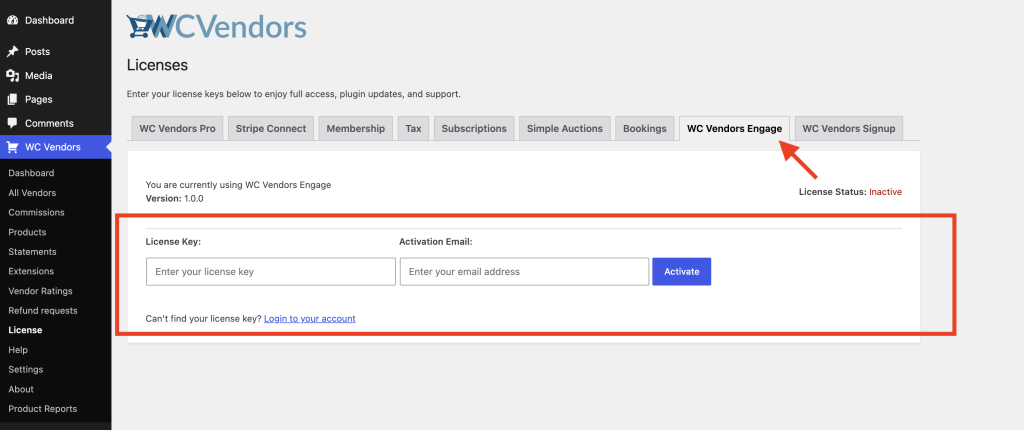
- In your WordPress admin, go to WC Vendors → License.
- Click the WC Vendors Engage tab.
- Paste your license key into the License Key field.
- Enter your purchase email address in the Activation Email field.
- Click Activate.
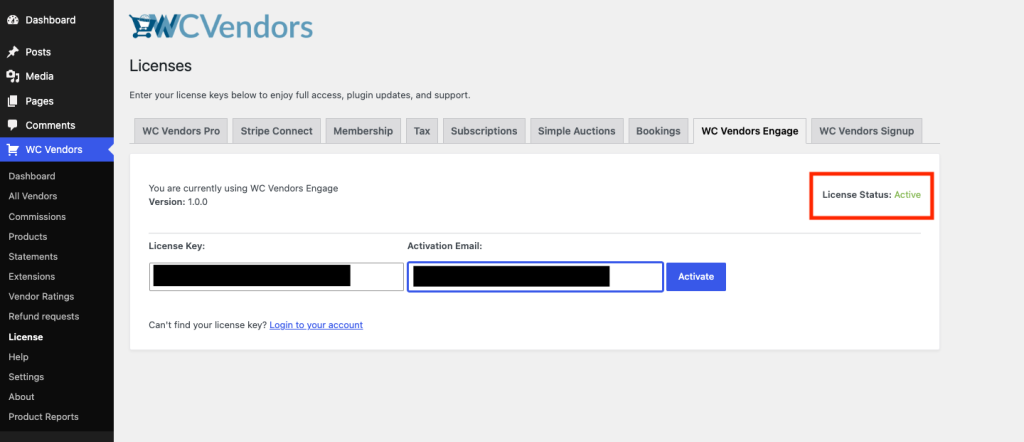
- Confirm the License Status shows Active.
Once activation goes through, the License Status at the top of the tab updates to Active in green.
The inactive license notice
If the license isn’t activated yet, a red notice appears at the top of your WordPress admin: “The WC Vendors Engage license key has not been activated, so you will be unable to get automatic updates or support!”
Clicking Click here in that notice takes you straight to the WC Vendors Engage license tab.

You can dismiss the notice by clicking the X. Once dismissed, it won’t reappear, but the license stays inactive until you actually activate it.
Moving your license to another site
There’s no deactivate button on the license page. To move your license to a different site, log in to your WC Vendors account and manage your active activations from there. Once you free up a slot, you can activate on the new site using the same steps above.
On multisite installs
On a multisite network, the Engage license is stored network-wide (site-wide), so activating it once covers the whole network. You do not need to activate it separately on each site.
Automatic updates
Once your license is active, WC Vendors Engage updates appear in the standard WordPress Dashboard → Updates screen. WordPress checks for new versions in the background. You don’t need to do anything extra to stay up to date.
Frequently asked questions
I can’t find my license key. Where do I look?
Log in to your WC Vendors account. Your purchases and license keys are listed in the account dashboard. There’s also a “Can’t find your license key? Login to your account” link directly on the license tab.
I clicked Activate but the status still shows Inactive. What’s wrong?
Double-check that the license key and email match exactly what’s in your WC Vendors account. Paste the key rather than typing it manually to avoid typos.
Need help?
If you have a question or run into any issues, we’re here to help.
- Premium users: Open a support ticket
- Free users: Visit our community forum