Anyone serious about operating a multi-vendor platform would do well to include their marketplace policies on their website. After all, these policies ensure the legality of your endeavor, thus protecting your customers, vendors, and the platform itself.
Marketplace policies establish the rules of engagement among all those involved with your platform. This means they cover everything from data privacy to shipping procedures. Thus, implementing and presenting these policies is crucial for building trust and growing your marketplace.
Today, we’ll explore marketplace policies and why they’re crucial for e-commerce businesses. Furthermore, we’ll teach you how to use the top-notch WooCommerce marketplace solution, WC Vendors, to display such policies on your platform.
So let’s get cracking!
What Is A Marketplace Policy?
A marketplace policy outlines the rules, guidelines, and terms of service governing the interactions and transactions between buyers, sellers, and the online marketplace. These policies are designed to:
- Guarantee fair and secure transactions
- Safeguard the rights of sellers and buyers
- Maintain the platform’s integrity
- Comply with legal requirements
WC Vendors allows vendors to display the following marketplace policies:
Privacy Policy
This policy outlines how the marketplace collects, uses, stores, and protects user data. Typically, it includes information about the:
- Types of data collected
- Purposes of data processing
- User rights regarding their data
- Measures taken to ensure data security and privacy
Terms and Conditions
This marketplace policy sets out the rules and guidelines governing the use of the marketplace platform. It’s also known as Terms of Service or User Agreement. Normally, it covers various aspects such as:
- User eligibility
- Account registration
- Prohibited activities
- Intellectual property rights
- Dispute resolution
- Limitations of liability
Shipping Policy
This policy outlines the terms and conditions concerning the shipment and delivery of items bought through the marketplace. Typically, it includes information about:
- Shipping methods
- Delivery times
- Shipping costs
- Handling fees
- International shipping
- Tracking orders
- Any applicable limitations or restrictions
Return Policy
This policy outlines the procedures and requirements for returning products purchased on the marketplace. It covers aspects such as:
- Eligibility for returns
- Timeframes for initiating returns
- Condition of returned items
- Refund options
- Restocking fees
- Return shipping costs
- Any exceptions or exclusions
These policies are crucial for any marketplace. After all, they provide transparency and protect the rights of users. Furthermore, they manage expectations and facilitate smooth transactions within the platform.
How To Display Your Vendors’ Marketplace Policies To Customers (In 4 Easy Steps)
Are you operating a multi-vendor platform powered by WC Vendors? Then you’ll have no problems sharing your vendors’ marketplace policies with customers. After all, WC Vendors simplifies the creation, launch, and management of online marketplaces!
However, if you’ve yet to use WC Vendors to build a multi-vendor marketplace, we highly recommend checking out the following guides:
- How To Create An Online Marketplace: A Beginner’s Guide
- How To Build Your First Multi-Vendor E-Commerce Website (Full Guide)
With all that in mind, let’s proceed!
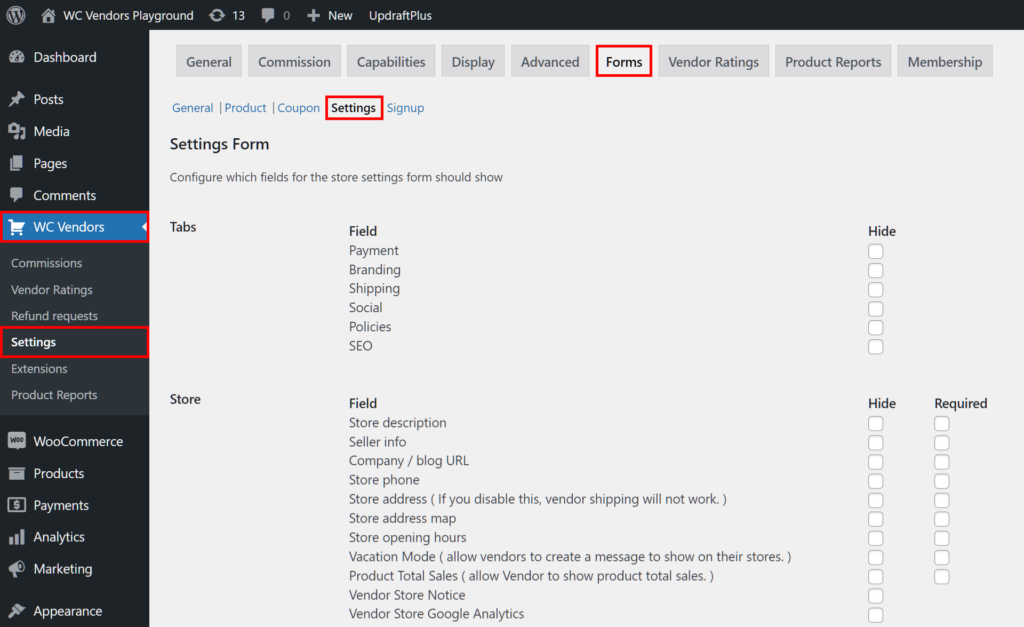
Step 1: Navigate to the Settings Form page
The first step involves navigating to the Settings Form page. After all, this is where you’ll find the options for displaying vital vendor information to customers.
Therefore, go to your WordPress dashboard and click WC Vendors > Settings > Forms > Settings.
Now that you’re on the Settings Form page, you’re ready for the next step…
Step 2: Ensure the Tabs: Policies field is enabled
First, scroll down to the Tabs option and take note of its fields.
Make sure the Policies field doesn’t have its “Hide” checkbox ticked. Later, we’ll discuss the “Hide” checkboxes in more detail. For now, on to the next step!
Step 3: Enable Policies fields
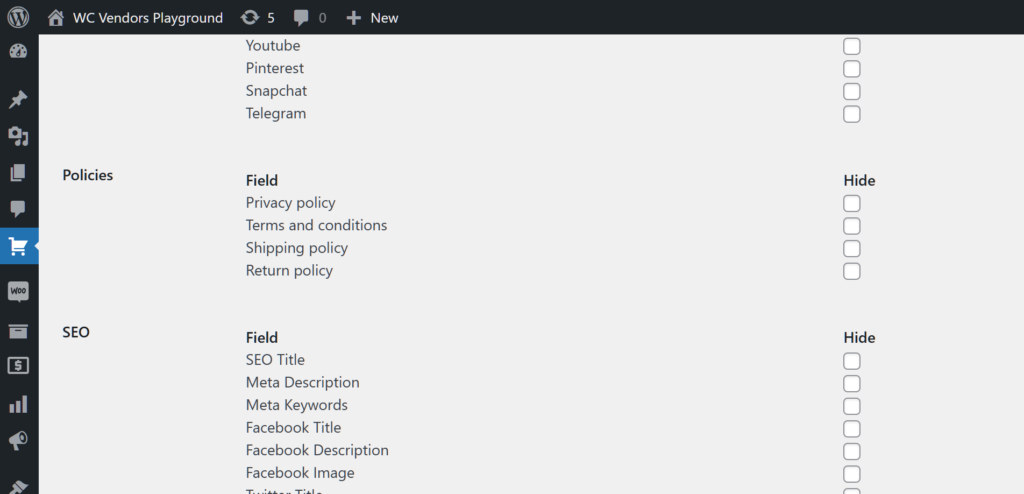
Scroll down to Policies. Once again, examine the option’s fields.
As shown above, Policies comes with four main fields: Privacy policy, Terms and conditions, Shipping policy, and Return policy. Your task is to select the fields you want enabled and the ones you want disabled.
When enabled, each field appears on the vendor dashboard, requesting vendors to enter marketplace policy information. Any information the vendor provides is then displayed on the marketplace frontend, allowing customers to view it.
Thankfully, these four fields are already enabled by default. Thus, you don’t have to do anything to activate them.
But what if you don’t want your vendors to provide specific marketplace policy information? Simple: tick its “Hide” checkbox to hide the field. When a field is hidden, it doesn’t show up on the vendor dashboard. Thus, you prevent vendors from submitting information related to the field.
For example, let’s say you don’t want your platform to present shipping policy information. Basically, all you have to do is tick the Shipping policy’s “Hide” checkbox. This prevents the vendor from providing any information related to shipping. As a result, their store won’t have any shipping details to show customers.
Once you’re done, it’s time to move on to the final step…
Step 4: Save your work!
Scroll down to the bottom of the page and click the Save Changes button. This implements all the settings you’ve made on the page.
And that’s it! Each vendor in your marketplace can now display their marketplace policies on their store. Therefore, customers will be able to examine them, which can boost their trust in your sellers and the entire platform.
Take note: There’s a lot more you can do with the Settings Form page, which allows you to grant vendors a considerable degree of control over their store settings. For example, you can enable options to display each store’s:
- Store description
- Banners and icons
- Opening hours
- Social media buttons
- Seller information
- … and more!
Would you like to know more about the Settings Form page? Then check out our article, “Vendor Store Mastery: Fine-Tuning Your Settings For Success (A Complete Guide).”
Crafting Marketplace Policies: The Vendor’s Perspective
Now that you’ve enabled the Policies fields, vendors can craft marketplace policies for display via their stores.
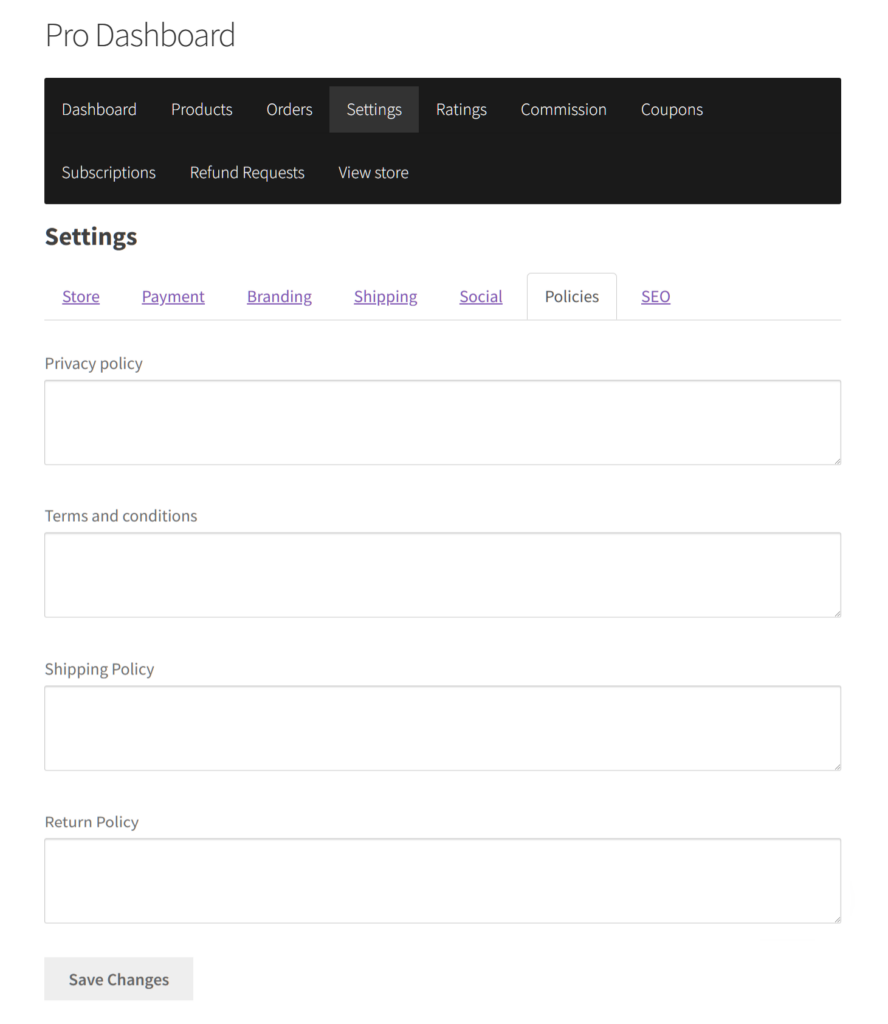
For a vendor to do this, they must first go to their dashboard and choose the Settings panel. This takes them to the Settings page.
Because you enabled the Tabs: Policies field in Step 2 above, one of the available tabs on the Settings page should now be Policies.
Upon clicking the Policies tab, the vendor is given access to text boxes requesting them to provide information about various marketplace policies. The text boxes that appear on this page are the fields you enabled in Step 3.
Now, all the vendor has to do is craft the policies within these boxes.
Once they’re done, they must scroll down the page and click the Save Changes button to publish the marketplace policies on their vendor store.
Viewing Marketplace Policies: The Customer’s Perspective
So, how do customers view a marketplace policy?
First, the customer must visit an online store within your marketplace.
Then, they must view a product listing.
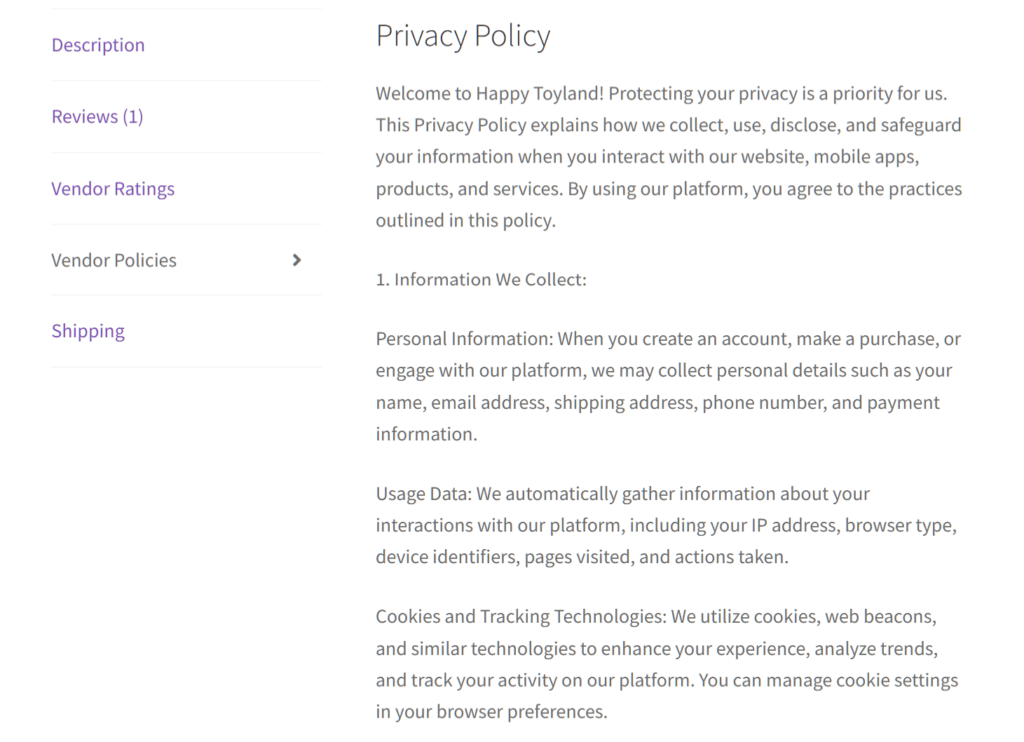
Once they’re on the product page, they must scroll down to the section below the “Add to cart button.” Here, they’ll find panels, typically on the left side of the page. To view the vendor’s marketplace policies, they must click the Vendor Policies panel, which reveals said policies.
And we’re all done! Now, you’re ready to build customer trust and take your platform to new heights!
Conclusion
Marketplace policies play a vital role in contributing to your platform’s success. After all, providing clear guidelines and expectations empowers vendors and customers to interact confidently with one another. As a result, they foster transparency, accountability, and a positive user experience for all.
To recap, you can use WC Vendors to allow vendors to display marketplace policies in their stores. To do so, you simply have to implement the following steps:
- Navigate to the Settings Form page
- Ensure the Tabs: Policies field is enabled
- Enable Policies fields
- Save your work!
Do you have any questions about how to let vendors display marketplace policies? Let us know in the comments below!

