
Managing storage on a marketplace takes work—vendors upload product images, downloadable files, and media that all add up fast. WC Vendors Pro lets you cap how much disk space each vendor can use, how many files they can upload, and the maximum size of any single file. You can set global defaults that apply to every vendor, and override them individually when someone needs a different limit. This article walks you through both.
Requirements
- WC Vendors Pro installed and activated
- WC Vendors (free) installed and activated
Step 1: Set global upload limits
Global limits apply to every vendor on your marketplace unless you override them individually (covered in Step 2).
- Go to WC Vendors → Settings.
- Click the Forms tab.
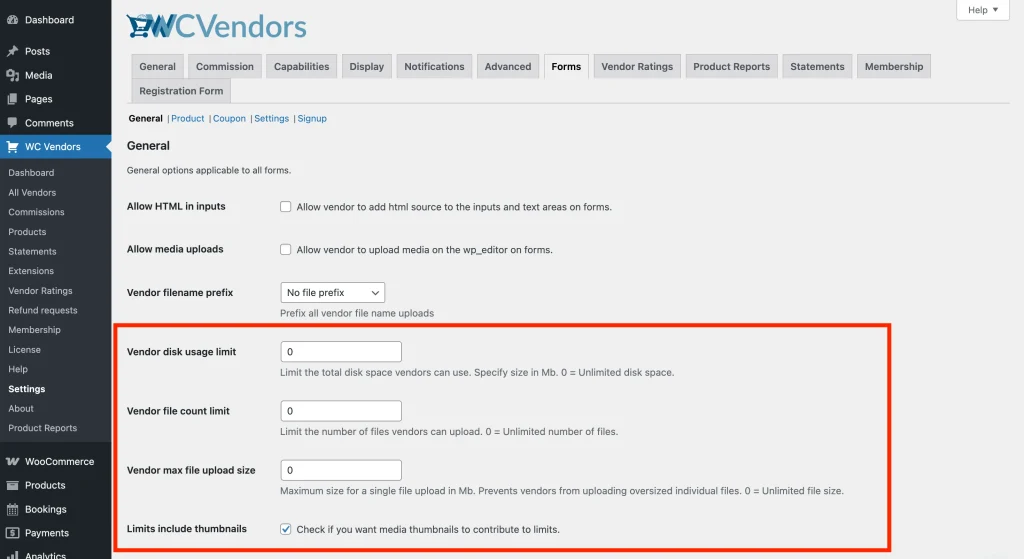
- Make sure the sub-tab at the top is set to General.
- Configure the upload limit fields (see the table below).
- Click Save changes.
| Setting | Description | Default |
|---|---|---|
| Vendor disk usage limit | Maximum total storage a vendor can use, in MB. Set to 0 for unlimited. | 0 (Unlimited) |
| Vendor file count limit | Maximum number of files a vendor can upload. Set to 0 for unlimited. | 0 (Unlimited) |
| Vendor max file upload size | Maximum size for a single file upload, in MB. Set to 0 for unlimited. Available in WC Vendors Pro 2.0.1 and later. | 0 (Unlimited) |
| Limits include thumbnails | When checked, the image thumbnails WordPress automatically generates count toward a vendor’s disk usage total. | Enabled |
Note: The Forms → General sub-tab also shows an older field labelled Vendor Disk usage limit (capital D, default 100) and an older Vendor file count limit field (default 100). These look nearly identical to the global fields described in this article but are not what WC Vendors Pro enforces. The correct fields are the ones with a default of 0 — those are the global upload limit settings the plugin actually reads. The older fields are legacy artefacts.
All three limits enforce independently—a vendor can hit their file count limit before they use up their disk quota, or exceed the max file size on a single upload without having reached either of the other limits.
Step 2: Override limits for a specific vendor (optional)
If a vendor needs more (or less) storage than the global defaults, you can set individual limits on their user profile. Per-vendor limits take precedence over global limits when set.
- Go to Users in your WordPress admin and open the vendor’s profile.
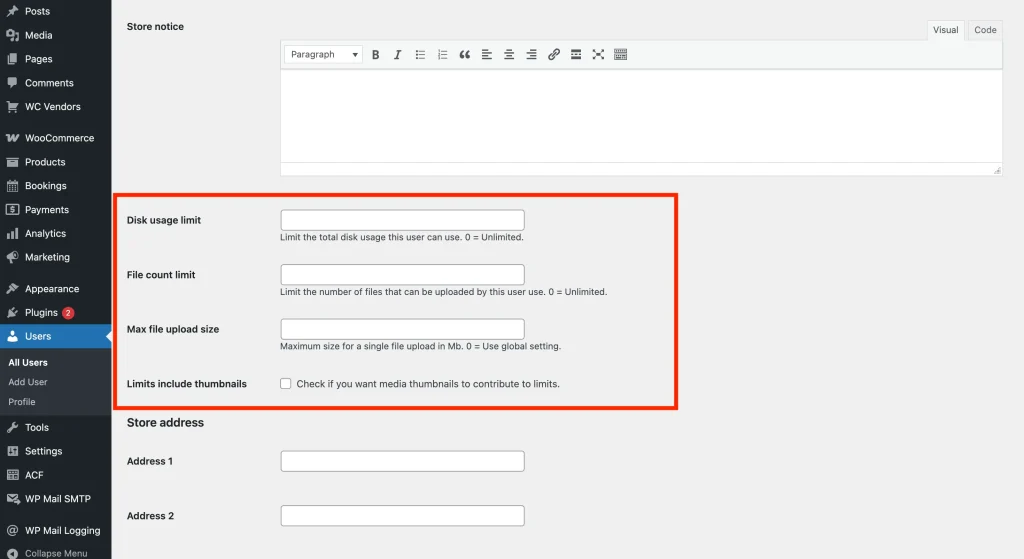
- Scroll down to the Store General section.
- Update any of the upload limit fields (see below).
- Click Update User.
| Field | Description |
|---|---|
| Disk usage limit | Individual disk cap in MB. Overrides the global setting. Set to 0 to use the global setting. |
| File count limit | Individual file count cap. Overrides the global setting. Set to 0 to use the global setting. |
| Max file upload size | Individual single-file size cap in MB. Set to 0 to fall back to the global setting. |
| Limits include thumbnails | Per-vendor override for whether image thumbnails count toward disk usage. |
Note: the in-product tooltips for the Disk usage limit and File count limit fields display “0 = Unlimited”, but setting either to 0 actually tells the plugin to use the global setting—not to remove the limit for that vendor. To give a vendor truly unlimited storage, set the global limit to 0 (unlimited) and leave the per-vendor field blank.
Step 3: Show usage stats on the vendor dashboard (optional)
By default, vendors can’t see how much storage they’ve used. You can switch on a usage display so vendors can keep track before they hit a limit.
- Go to WC Vendors → Settings.
- Click the Display tab.
- Click the Vendor dashboard sub-tab.
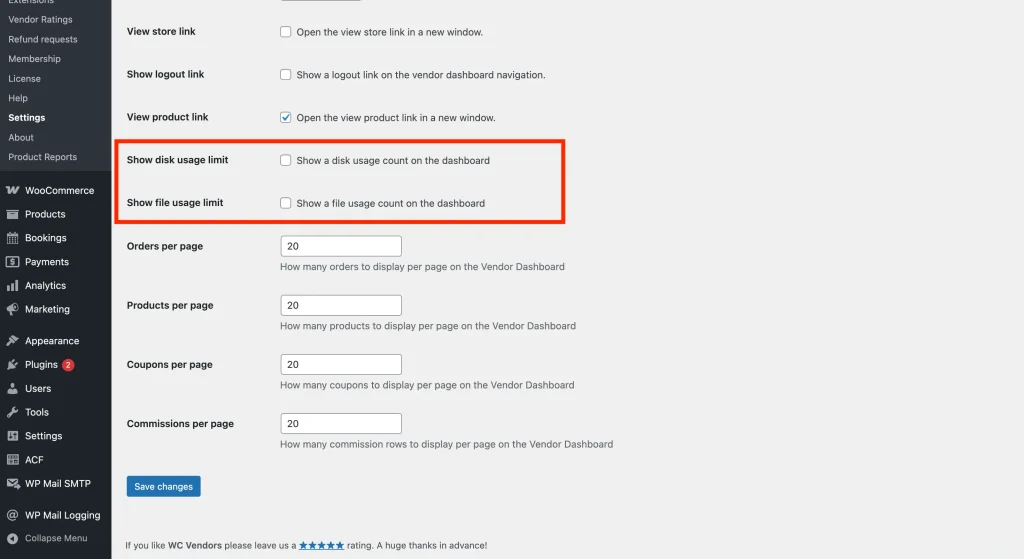
- Check Show disk usage limit to show a disk usage widget, Show file usage limit to show a file count widget, or both.
- Click Save changes.
When enabled, vendors see a small widget in their dashboard header showing their current usage against the limit—for example, 45 MB / 100 MB for disk space or 12 / 50 files for file count.
Step 4: Refresh limit status for all vendors (optional)
WC Vendors Pro tracks whether each vendor has reached their limit so the dashboard notice can show without recalculating on every page load. If you lower a limit and want the notice to update immediately—rather than waiting for each vendor’s next upload, you can trigger a manual check.
- Go to WooCommerce → Status → Tools.
- Find Check vendor upload limits and click the button next to it.
This runs through all vendors, recalculates whether each one has exceeded their limit, and updates the notice flags accordingly.
What vendors see when they hit a limit
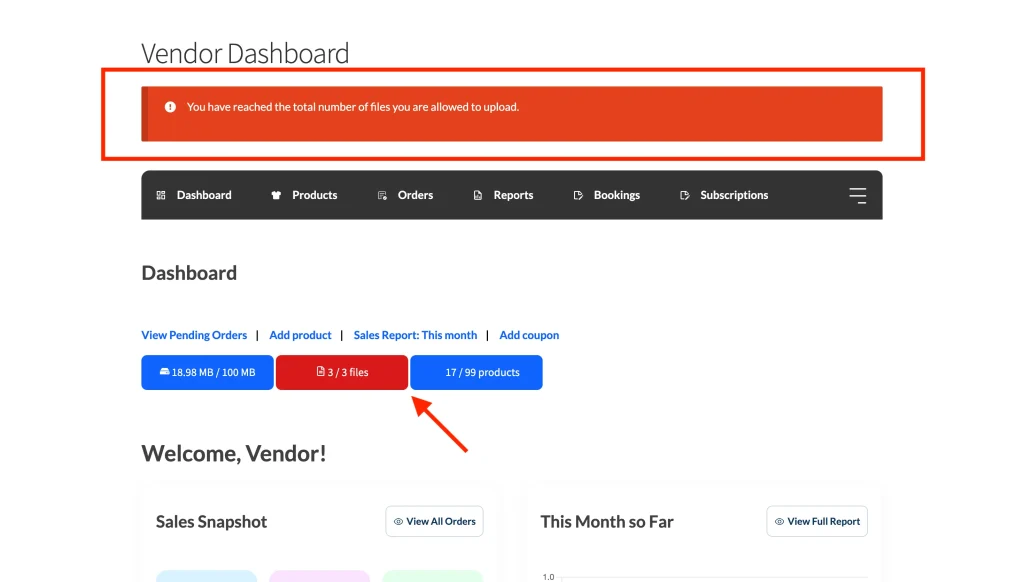
When a vendor reaches a limit, a red error notice appears at the top of their vendor dashboard. When they try to upload a file that would exceed a limit, the upload fails immediately with an error message.
The specific messages vendors see:
- Disk limit reached: “You have reached the total disk usage allowed in your account.”
- File count reached: “You have reached the total number of files you are allowed to upload.”
- File too large: “The file size exceeds the maximum allowed size of [X MB].”
Frequently asked questions
Do per-vendor limits add to the global limits or replace them?
They replace them. When you set a disk usage, file count, or max file upload size on a vendor’s profile, that value takes precedence over the global setting for that vendor only. All other vendors still use the global defaults.
Do the limits apply to all file uploads or only downloadable product files?
All uploads. The limits apply to any file a vendor uploads through their dashboard—product images, gallery images, downloadable files, and any media uploaded through the WordPress editor.
Why is a vendor seeing the disk limit notice even though I raised their limit?
The notice is based on a stored flag that gets updated when a vendor uploads a file or when you run the manual check from WooCommerce → Status → Tools. Run the “Check vendor upload limits” tool to force the flags to refresh immediately.
Need help?
If you have a question or run into any issues, we’re here to help.
- Premium users: Open a support ticket
- Free users: Visit our community forum