
When a vendor deletes a product, it does not disappear right away. It goes to WordPress trash first. By default, though, vendors have no way to see or manage those trashed products from their dashboard. The trash bin feature changes that. Once you enable it, vendors get a Trash tab in their Products dashboard where they can review, restore, or permanently remove their trashed products. This article walks you through enabling the setting and shows vendors how to use each trash bin action in WC Vendors.
Before you begin
- You must be logged in as a WordPress admin or shop manager.
- WC Vendors v2.7.0 or later must be installed and active on your site.
- Vendors must have product management access. Confirm the Submit Products capability is enabled in WC Vendors → Settings → Capabilities → General tab.
Enable the trash bin
The trash bin is turned off by default. You enable it once from the Capabilities settings screen, and it applies to all vendors on your marketplace.
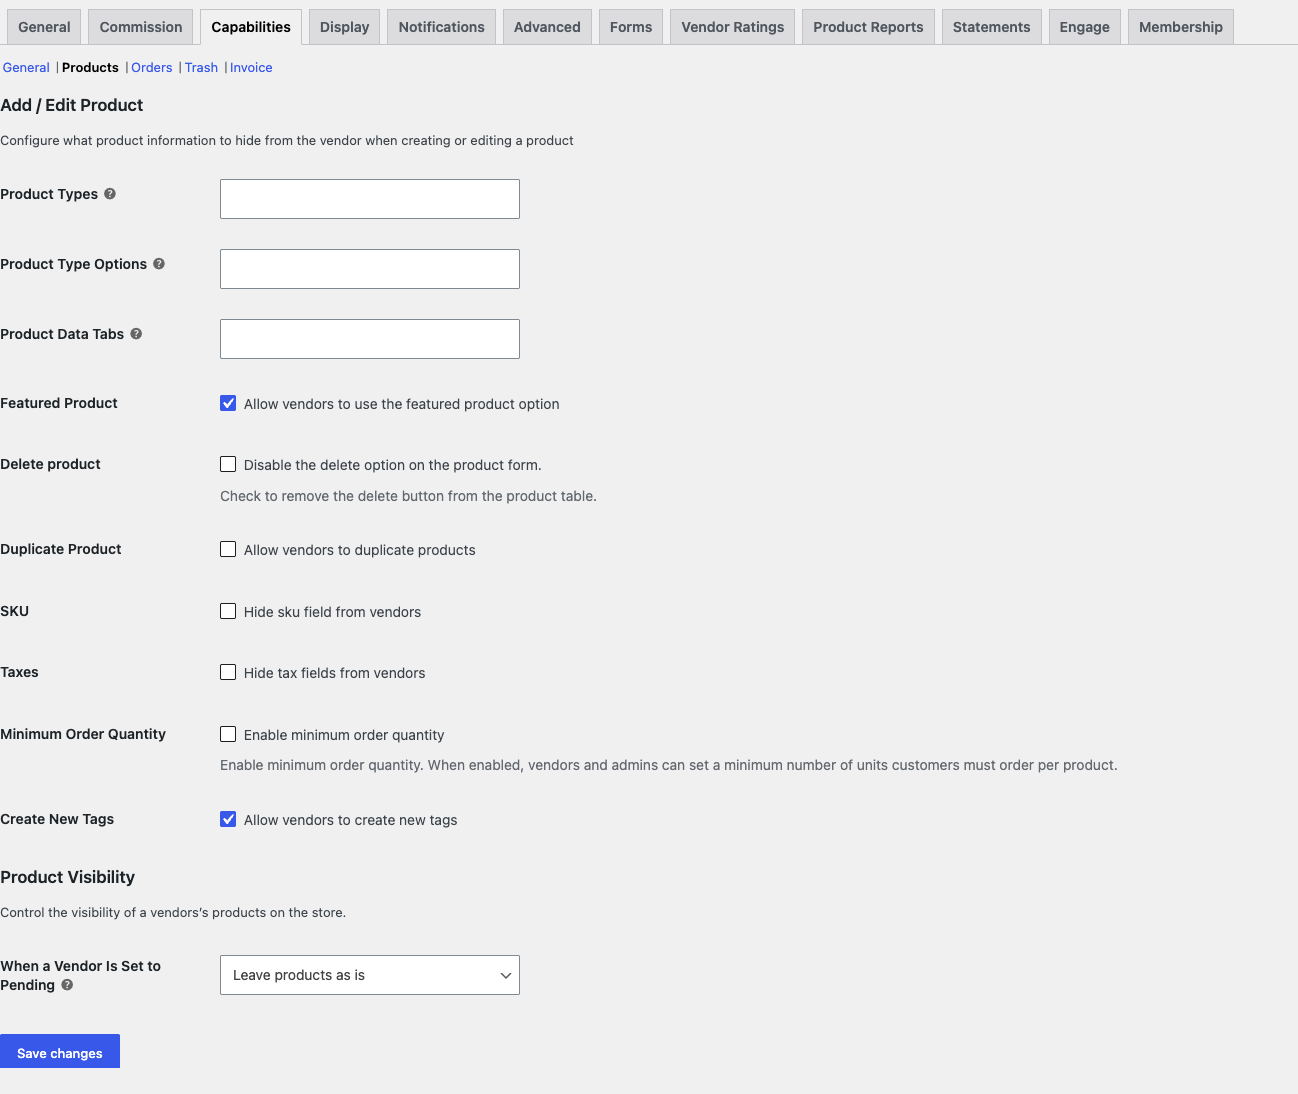
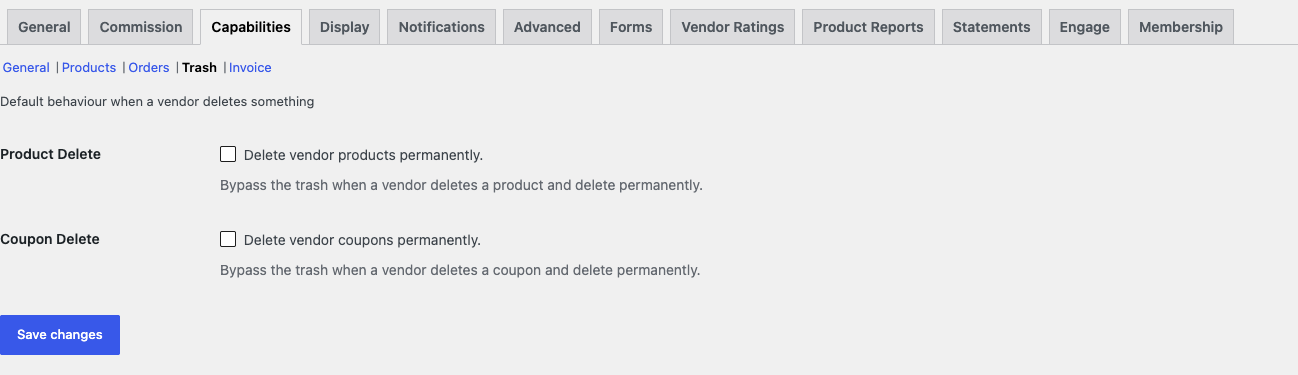
Capabilities has five sections: General, Products, Orders, Trash and Invoice. Two of them matter here, and their setting names are easy to mix up. Delete product lives on the Products section, and Product Delete lives on the Trash section. They do different things, so check which section you are on before ticking anything.
- In your WordPress admin, go to WC Vendors → Settings.
- Click the Capabilities tab then stay on the General section, the tab you land on by default
- Scroll down to the Products heading. This is a group of settings within General, not the separate Products tab next to it.
- Check the box next to Trash Bin.
- Click Save changes.
- Open the Trash section and confirm Product Delete is not ticked. Its description reads “Delete vendor products permanently. Bypass the trash when a vendor deletes a product and delete permanently.” When it is ticked, vendor deletes skip the trash completely and the trash bin stays empty no matter what you set above.
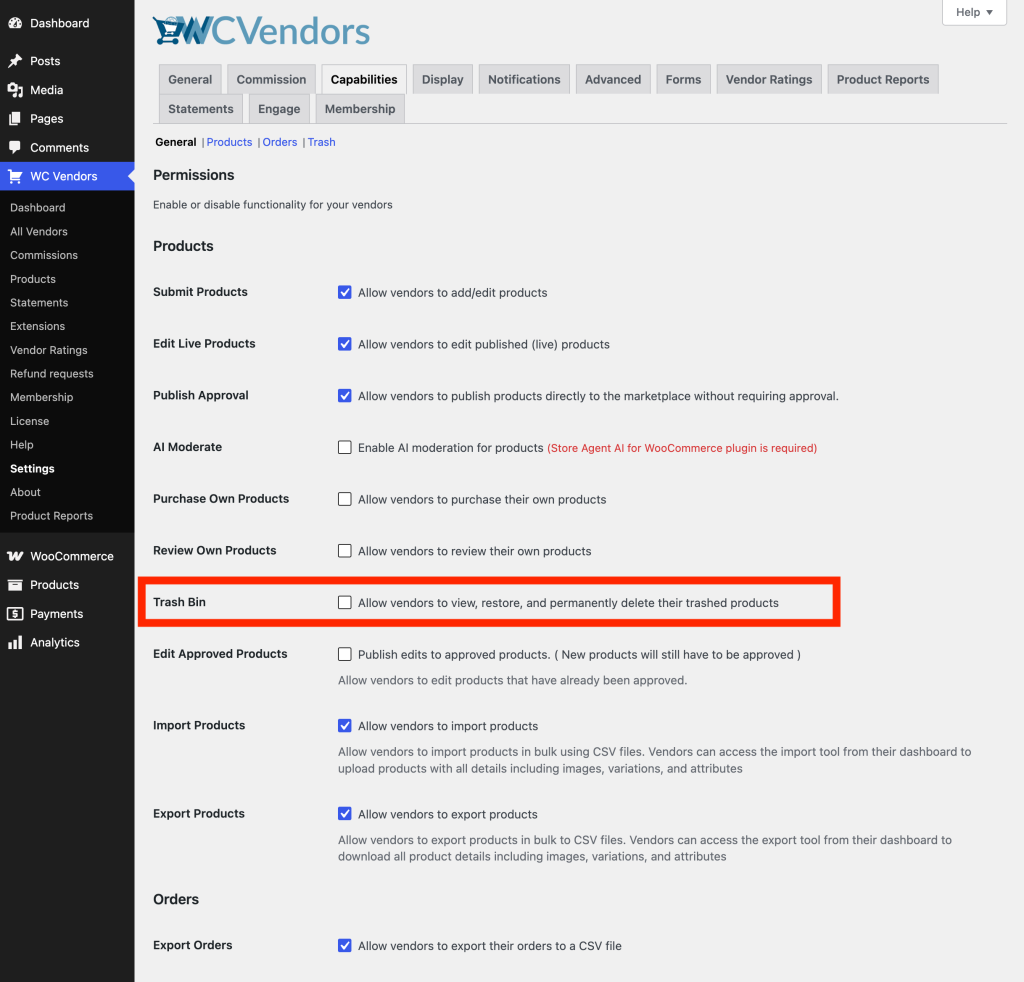
Vendors on your marketplace will now see a Trash count in their Products dashboard as soon as the setting is saved.
What vendors see on the dashboard
Once the trash bin is enabled, vendors will notice a new status filter at the top of their Products dashboard. Alongside All, Published, Draft, and any other status filters, a Trash filter now appears with a count of how many products are currently in the trash. The All count does not include trashed products. It only reflects active products.
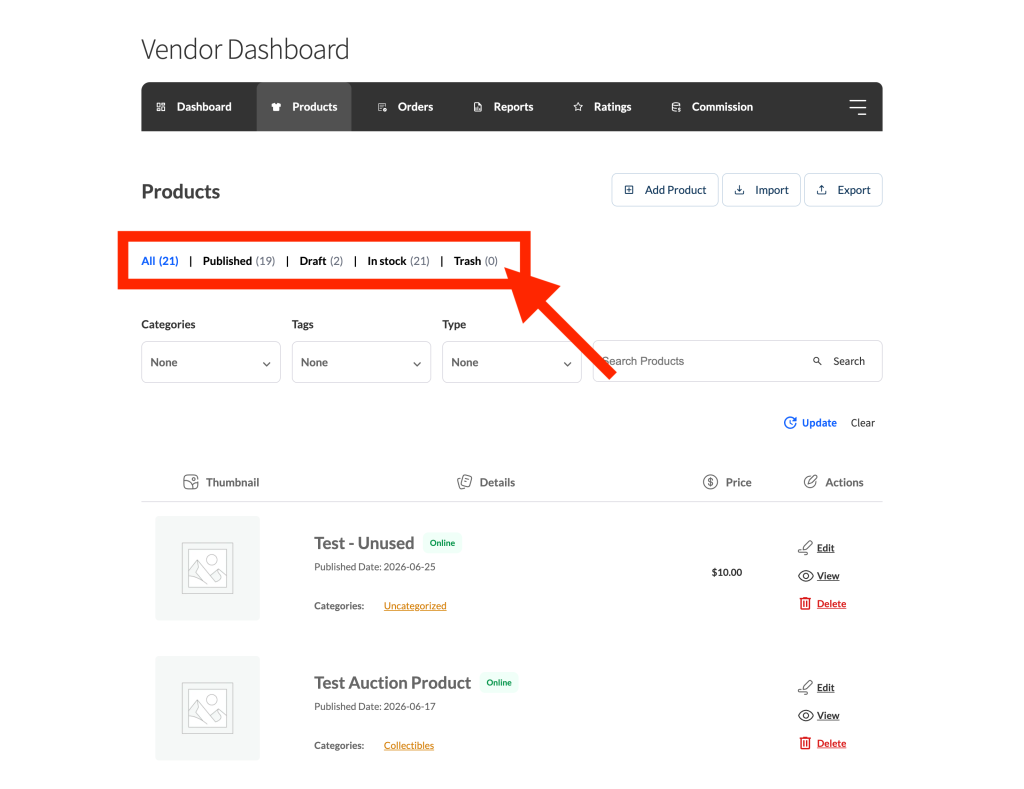
Clicking Trash switches the view to show only trashed products. Each product row shows two actions: Restore and Delete Permanently. The standard Edit, View, and Duplicate actions are not available while a product is in the trash.
Restore a product from trash
Restoring a product returns it to the exact status it had before it was deleted. If it was published, it goes back to published; if it was a draft, it goes back to draft.
- In the vendor dashboard, go to Products and click the Trash tab.
- Find the product to restore.
- Click Restore in the product’s row.
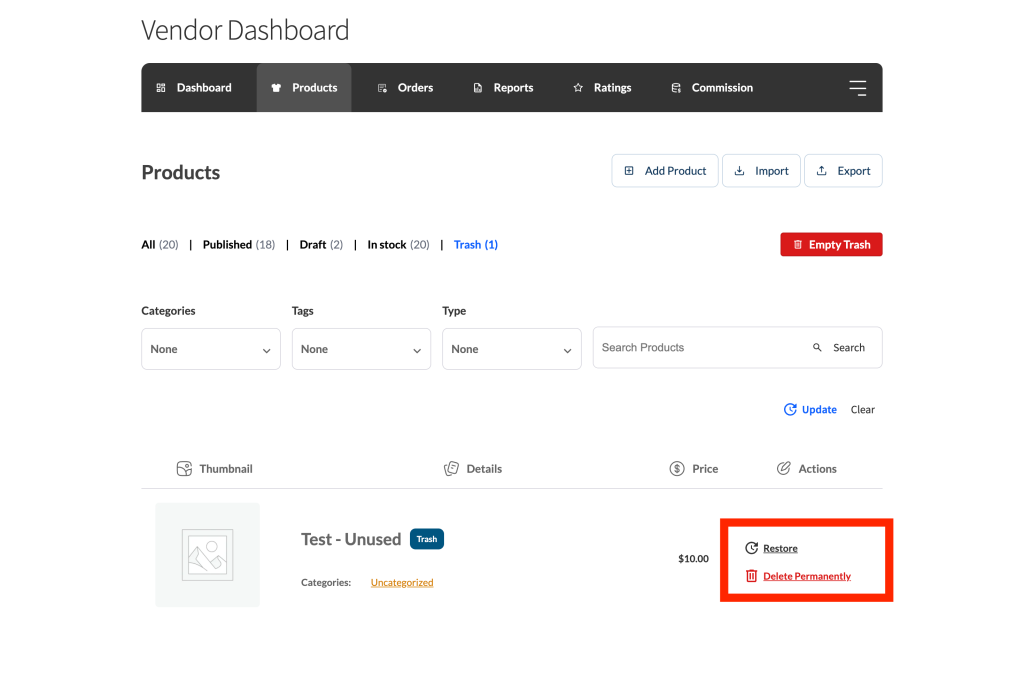
The product moves back to the Products list and a confirmation message appears: “Product restored to {status}.” The product is immediately visible again, with no additional steps needed.
Permanently delete a trashed product
Permanent deletion removes the product completely. It cannot be recovered afterwards. Vendors are asked to confirm before the deletion goes through.
- Go to Products and click the Trash filter.
- Find the product to remove.
- Click Delete Permanently.
- Confirm the prompt to proceed. It reads: “Permanently delete this product? This cannot be undone.”
A confirmation message reads “Product permanently deleted.” and the product is removed from the trash list.
Empty the trash
The Empty Trash button permanently deletes all products in the trash at once. This is useful when a vendor has accumulated many trashed products and wants to clear them out in one go.
- Go to Products and click the Trash filter.
- Click Empty Trash at the top of the product list.
- Confirm the prompt to proceed. It reads: “Empty trash? This permanently deletes all trashed products and cannot be undone.”
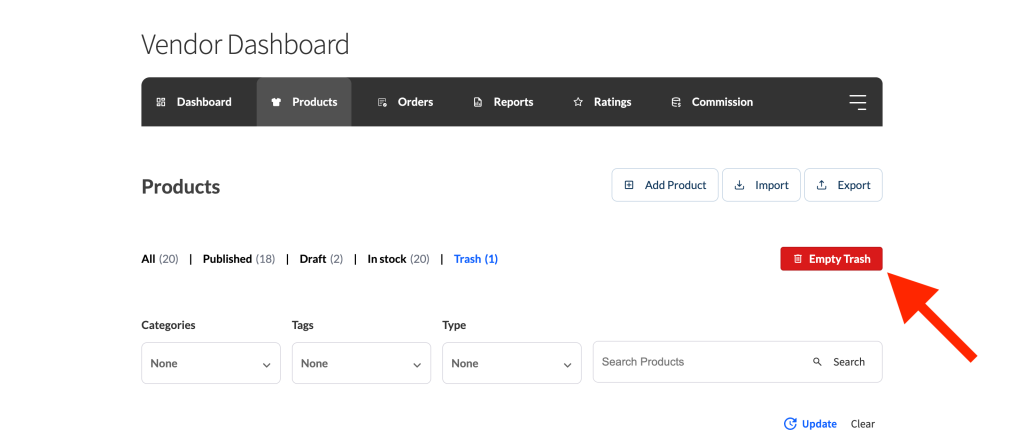
The trash is cleared in batches of up to 200 products per click. If a vendor has more than 200 trashed products, the button needs to be clicked again to remove the next batch. A message confirms how many products were permanently deleted after each run.
How the Delete product capability affects the trash bin
If you’re using WC Vendors Pro, you can take the delete action away from vendors entirely. Tick the Delete product capability at WC Vendors → Settings → Capabilities → Products. The label reads as a permission, but the checkbox does the opposite of what you might expect: its own description is “Disable the delete option on the product form”, so ticking it removes the delete button. Once it is ticked, vendors can no longer delete products or move them to the Trash. However, any products that were already deleted before this setting was ticked stay visible in the Trash tab and can be restored by the vendor. Vendors will not be able to permanently delete products going forward, as they can no longer send products to the Trash in the first place.
Troubleshooting
The Trash tab doesn’t appear on the vendor dashboard
The trash bin isn’t enabled yet. Go to WC Vendors → Settings → Capabilities, stay on the General section, and scroll down to the Products heading. Check the Trash Bin box and save. Once saved, the Trash filter appears on the vendor’s Products dashboard immediately, with no cache clearing needed.
If the Trash count shows zero, the vendor hasn’t deleted any products yet. Deleting a product from the Products list will send it to the trash and the count will update.
Deleted products never appear in the Trash tab
Go to WC Vendors → Settings → Capabilities, open the Trash section, and untick Product Delete. Then save.
That setting makes vendor deletions permanent, so the product is removed outright instead of moving to the trash. It overrides the trash bin: with it ticked, nothing ever reaches the Trash tab even when Trash Bin is enabled. Products already deleted while it was on cannot be recovered from the trash, because they were never trashed.
The Delete Permanently and Empty Trash options are missing
This happens when the Delete product capability is ticked in WC Vendors Pro. Vendors can still restore products, but permanent deletion is restricted by that setting. To allow product deletion, go to WC Vendors → Settings → Capabilities → Products and untick Delete product.
A restored product came back as a draft instead of published
WC Vendors restores a product to whatever status it had before it was trashed. If it came back as a draft, the product was already in draft status when it was deleted, or the original status data was not available. In that case, you or the vendor can manually change the status to Published from the product edit screen.
Frequently asked questions
Can admins still see and manage trashed vendor products?
Yes. Trashed products are standard WordPress posts with a trash status. You can view and manage them from WP Admin → Products using the Trash filter. The vendor trash bin setting does not affect admin access.
What happens to already-trashed products if I disable the trash bin later?
The products stay in WordPress trash. They are not deleted. Vendors just lose the Trash tab on their dashboard and can no longer manage them from the frontend. You (as admin) can still restore or delete them from the WordPress admin.
Does the trash bin work with product types other than simple products?
Yes. The trash bin works for all product types vendors can create on your marketplace: simple, variable, downloadable, virtual, and any others you’ve enabled.
Can vendors restore a product that another vendor deleted?
No. Vendors can only restore or delete products they own. Ownership is verified for every trash bin action.
Need help?
- Premium users: Open a support ticket
- Free users: Visit our community forum