
Running a multi-vendor marketplace means keeping your vendors informed about their earnings. WC Vendors Pro includes a Vendor Statements feature that generates a monthly financial summary for each vendor, covering gross revenue, commissions, tax, shipping, refunds, and net payout. This article walks you through the settings, branding the statement PDF, choosing who gets a statement, generating statements manually, and what your vendors see.
Requirements
- WC Vendors Pro v2.0.9 or later installed and activated. The rules for vendors left out of statements need v2.1.0 or later.
- WC Vendors (free) installed and activated
- At least one active vendor on your marketplace
Step 1: Configure the statements settings
- Go to WC Vendors → Settings.
- Click the Statements tab.
- Set each option in the Statements section. The table below explains each one.
- Click Save changes.
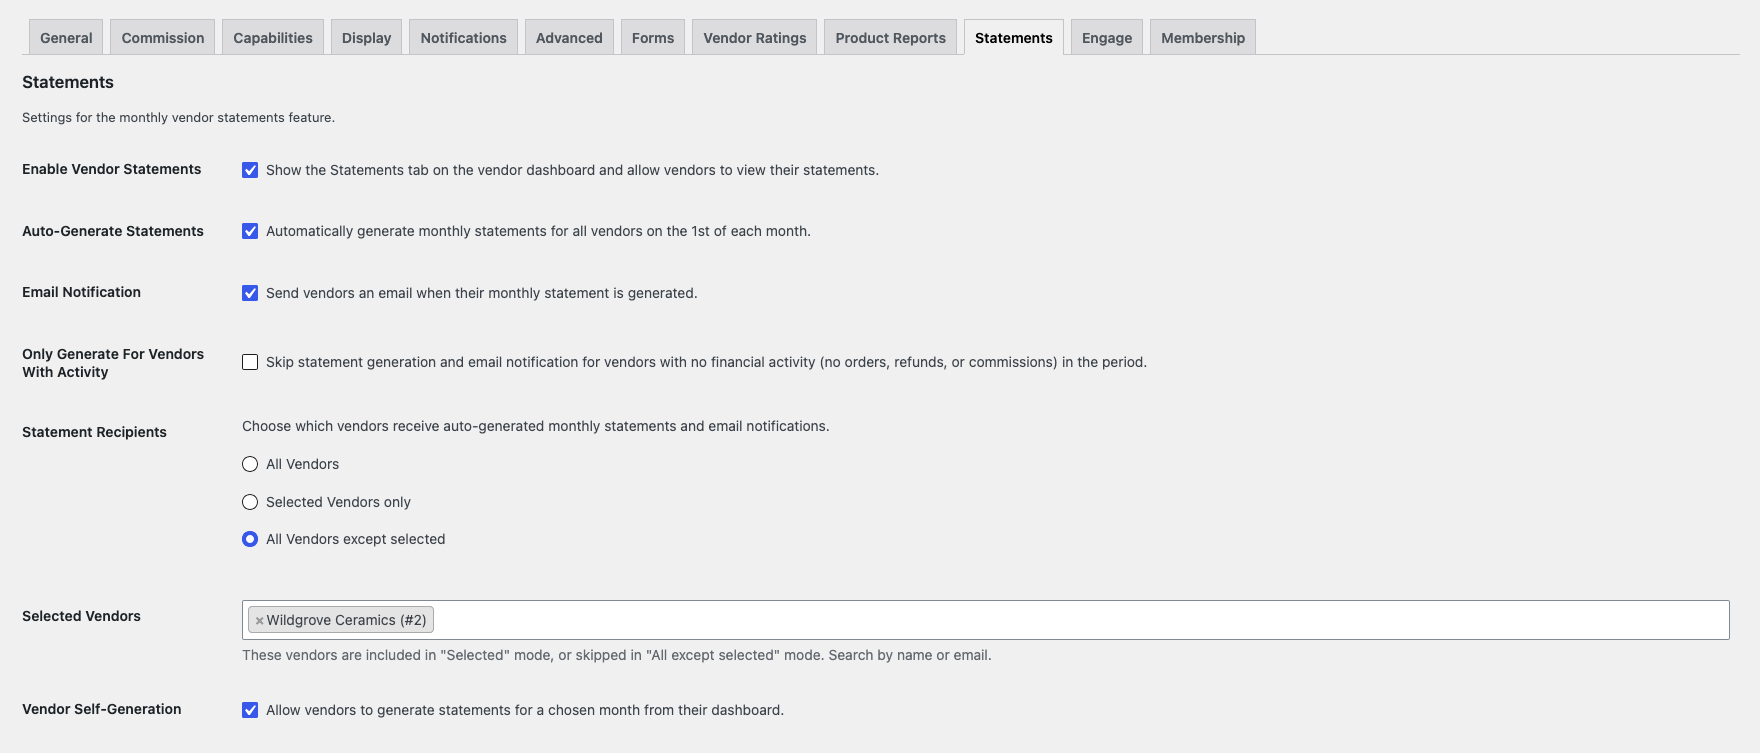
| Setting | What it does | Default |
|---|---|---|
| Enable Vendor Statements | Shows the Statements tab on the vendor dashboard and lets vendors view their statements. Turning it off hides the tab for every vendor. It does not stop statements being generated. | On |
| Auto-Generate Statements | Generates statements on the 1st of each month, covering the previous month. This is the master switch for the monthly run. | On |
| Email Notification | Emails each vendor when their statement is ready. The email includes a financial summary and asks the vendor to log in to their dashboard for the full statement. | On |
| Only Generate For Vendors With Activity | Skips the statement and the email for vendors with no orders, refunds, or commissions in the period. | Off |
| Statement Recipients | Chooses which vendors get monthly statements and email notifications: All Vendors, Selected Vendors only, or All Vendors except selected. | All Vendors |
| Selected Vendors | The vendors included in Selected Vendors only mode, or skipped in All Vendors except selected mode. Search by name or email. | Empty |
| Vendor Self-Generation | Lets vendors generate a statement for a month they choose from their dashboard. | On |
Be careful with Selected Vendors only. If you leave the Selected Vendors list empty, no vendor gets a statement. An empty list in All Vendors except selected mode works the same as All Vendors.
Step 2: Customize the statement PDF (optional)
The Statement PDF Customization section sits below the statement settings on the same page. Use it to brand the PDF and choose which rows it shows. None of these options change the stored statement amounts.
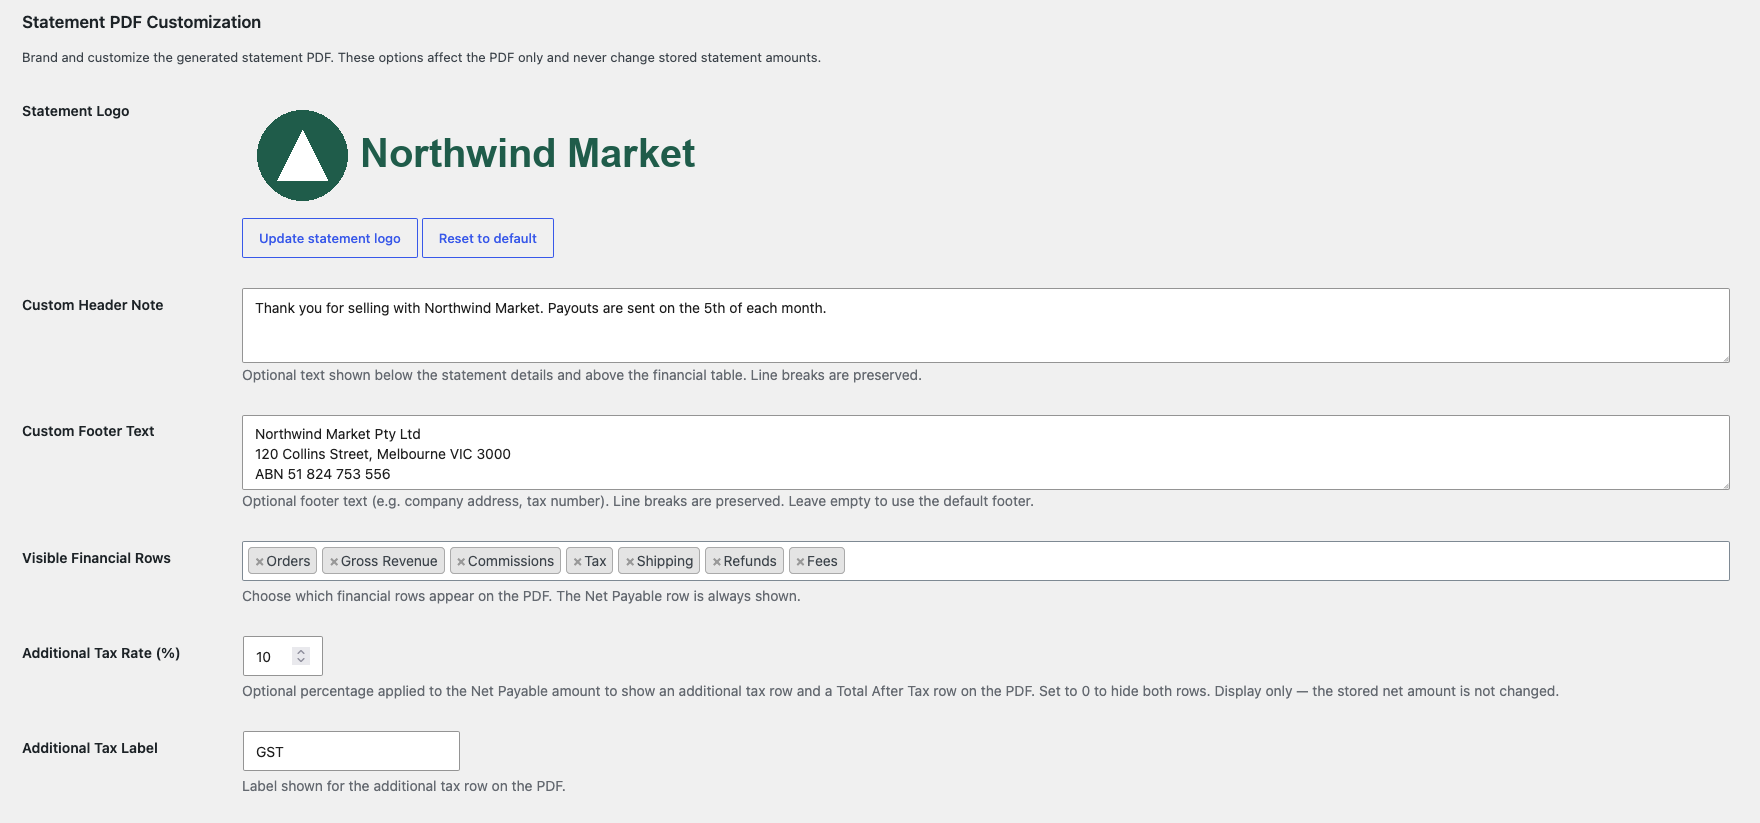
| Setting | What it does | Default |
|---|---|---|
| Statement Logo | Shows a logo at the top of the PDF, above the site name. A maximum width of 200px is recommended. | Empty (site name only) |
| Custom Header Note | Adds text below the statement details and above the financial table. Line breaks are kept. | Empty |
| Custom Footer Text | Replaces the default footer, for example with your company address or tax number. Line breaks are kept. | Empty (default footer) |
| Visible Financial Rows | Chooses which rows appear: Orders, Gross Revenue, Commissions, Tax, Shipping, Refunds, and Fees. The Net Payable row always shows. | All rows |
| Additional Tax Rate (%) | Adds an extra tax row and a Total After Tax row, calculated on the Net Payable amount. Set it to 0 to hide both rows. | 0 |
| Additional Tax Label | The name of the extra tax row. The rate shows after it, for example “Service Tax (10%)”. | Service Tax |
Visible Financial Rows and the additional tax also apply to the statement view on the vendor dashboard and to the statement email. The additional tax is for display only. It does not change the net amount you owe the vendor.
Step 3: Choose who gets a monthly statement
Three settings decide whether a vendor gets a statement in the monthly run, and they apply in this order:
- Auto-Generate Statements must be on. While it is off, the monthly run produces nothing for anyone, whatever a vendor is set to.
- Statement Recipients must include the vendor. Deactivated vendors are never included.
- The vendor’s own Statement value on the Vendors tab must not be Never.
So a vendor set to Always still gets nothing while the store setting is off, or while Statement Recipients leaves them out. A vendor set to Never is skipped even when everything else is on. Check all three before you treat a missing statement as a fault.
Set a vendor’s statement value
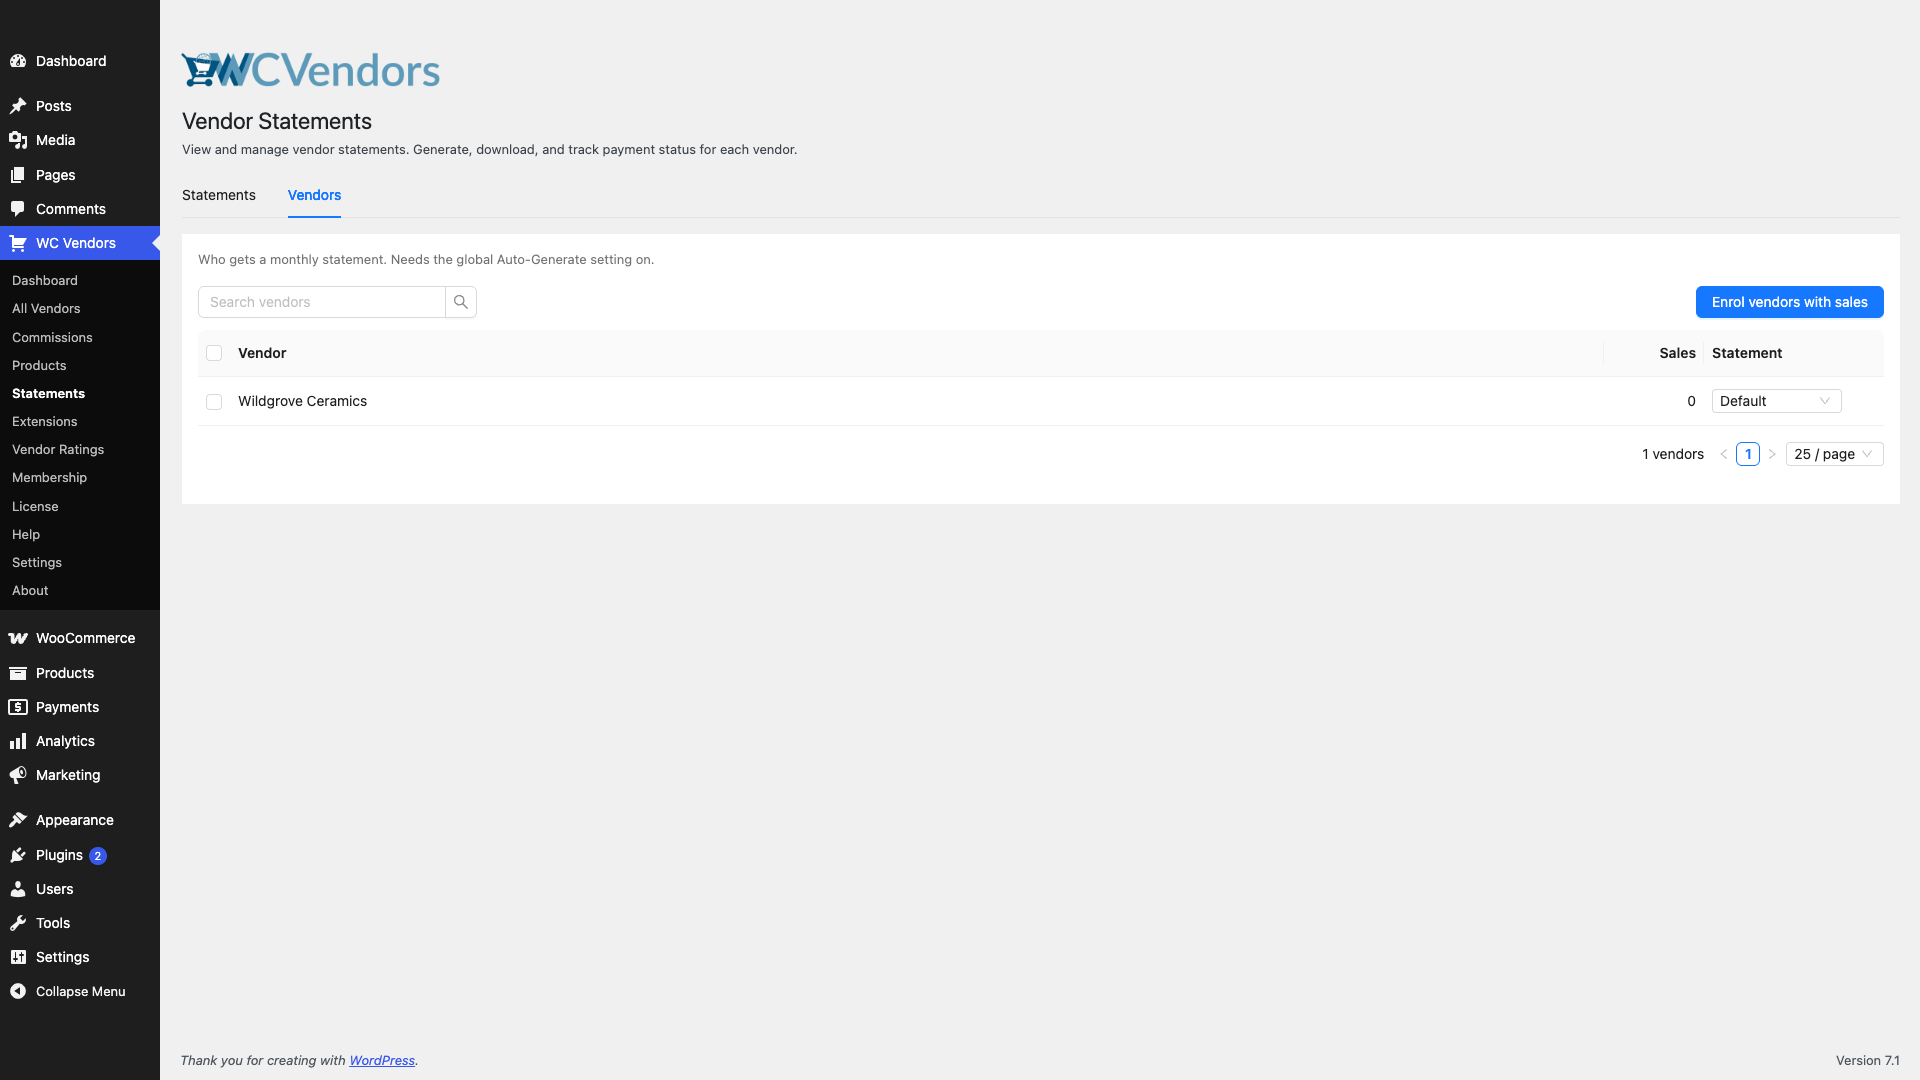
- Go to WC Vendors → Statements.
- Click the Vendors tab.
- Find the vendor. Use Search vendors if the list is long.
- In the Statement column, choose Default, Always, or Never.
The change saves straight away. Default follows the store setting. Always gives the same result in the monthly run. Only Never changes who gets a statement. The Vendors tab needs WC Vendors Pro v2.0.8 or later.
Change several vendors at once
- Check the box next to each vendor you want to change.
- Click Always, Default, or Never next to the selected count that appears.
To enrol every vendor who has made at least one sale, click Enrol vendors with sales and confirm. This sets those vendors to Always.
Step 4: Generate statements manually
Even with auto-generation turned on, you can generate statements for any past month at any time. Use it to catch up on months you missed.
- Go to WC Vendors → Statements.
- In the vendor dropdown, leave All Vendors or pick one vendor.
- Select the Year and Month you want to generate for.
- Click Generate Statements to queue the jobs.
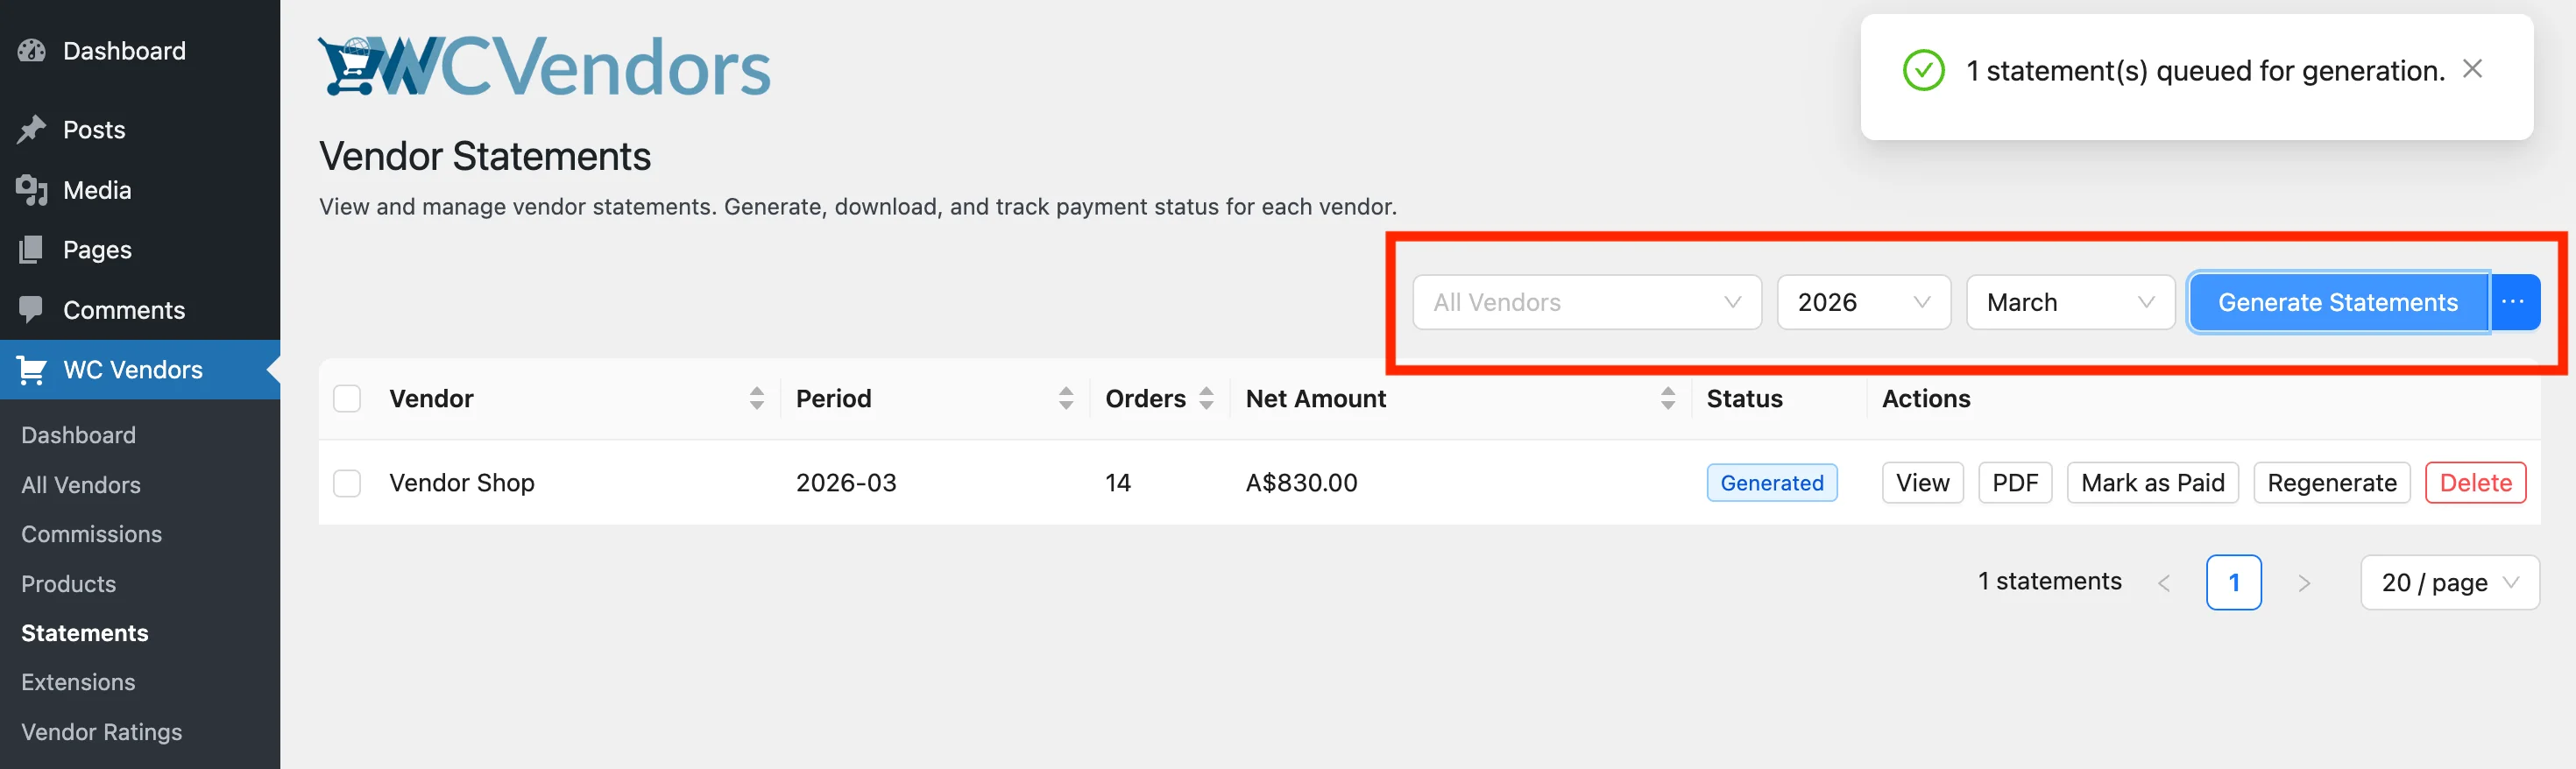
Vendors who already have a statement for that month are skipped. To replace them, click the ⋯ button next to Generate Statements and choose Regenerate (overwrite existing).
Generating for All Vendors follows your Statement Recipients and Only Generate For Vendors With Activity settings. Picking one vendor ignores Statement Recipients, so you can generate a statement for a vendor the setting leaves out. On v2.1.0 or later, that vendor doesn’t get the statement email.
Statement generation runs in the background using Action Scheduler. Refresh the page after a few moments to see the new entries appear in the list.
Step 5: Manage statements in the admin
The WC Vendors → Statements page lists all generated statements. You can filter by vendor, year, or month to find what you need. Deactivated vendors show with “(Inactive)” after their name in the vendor filter.
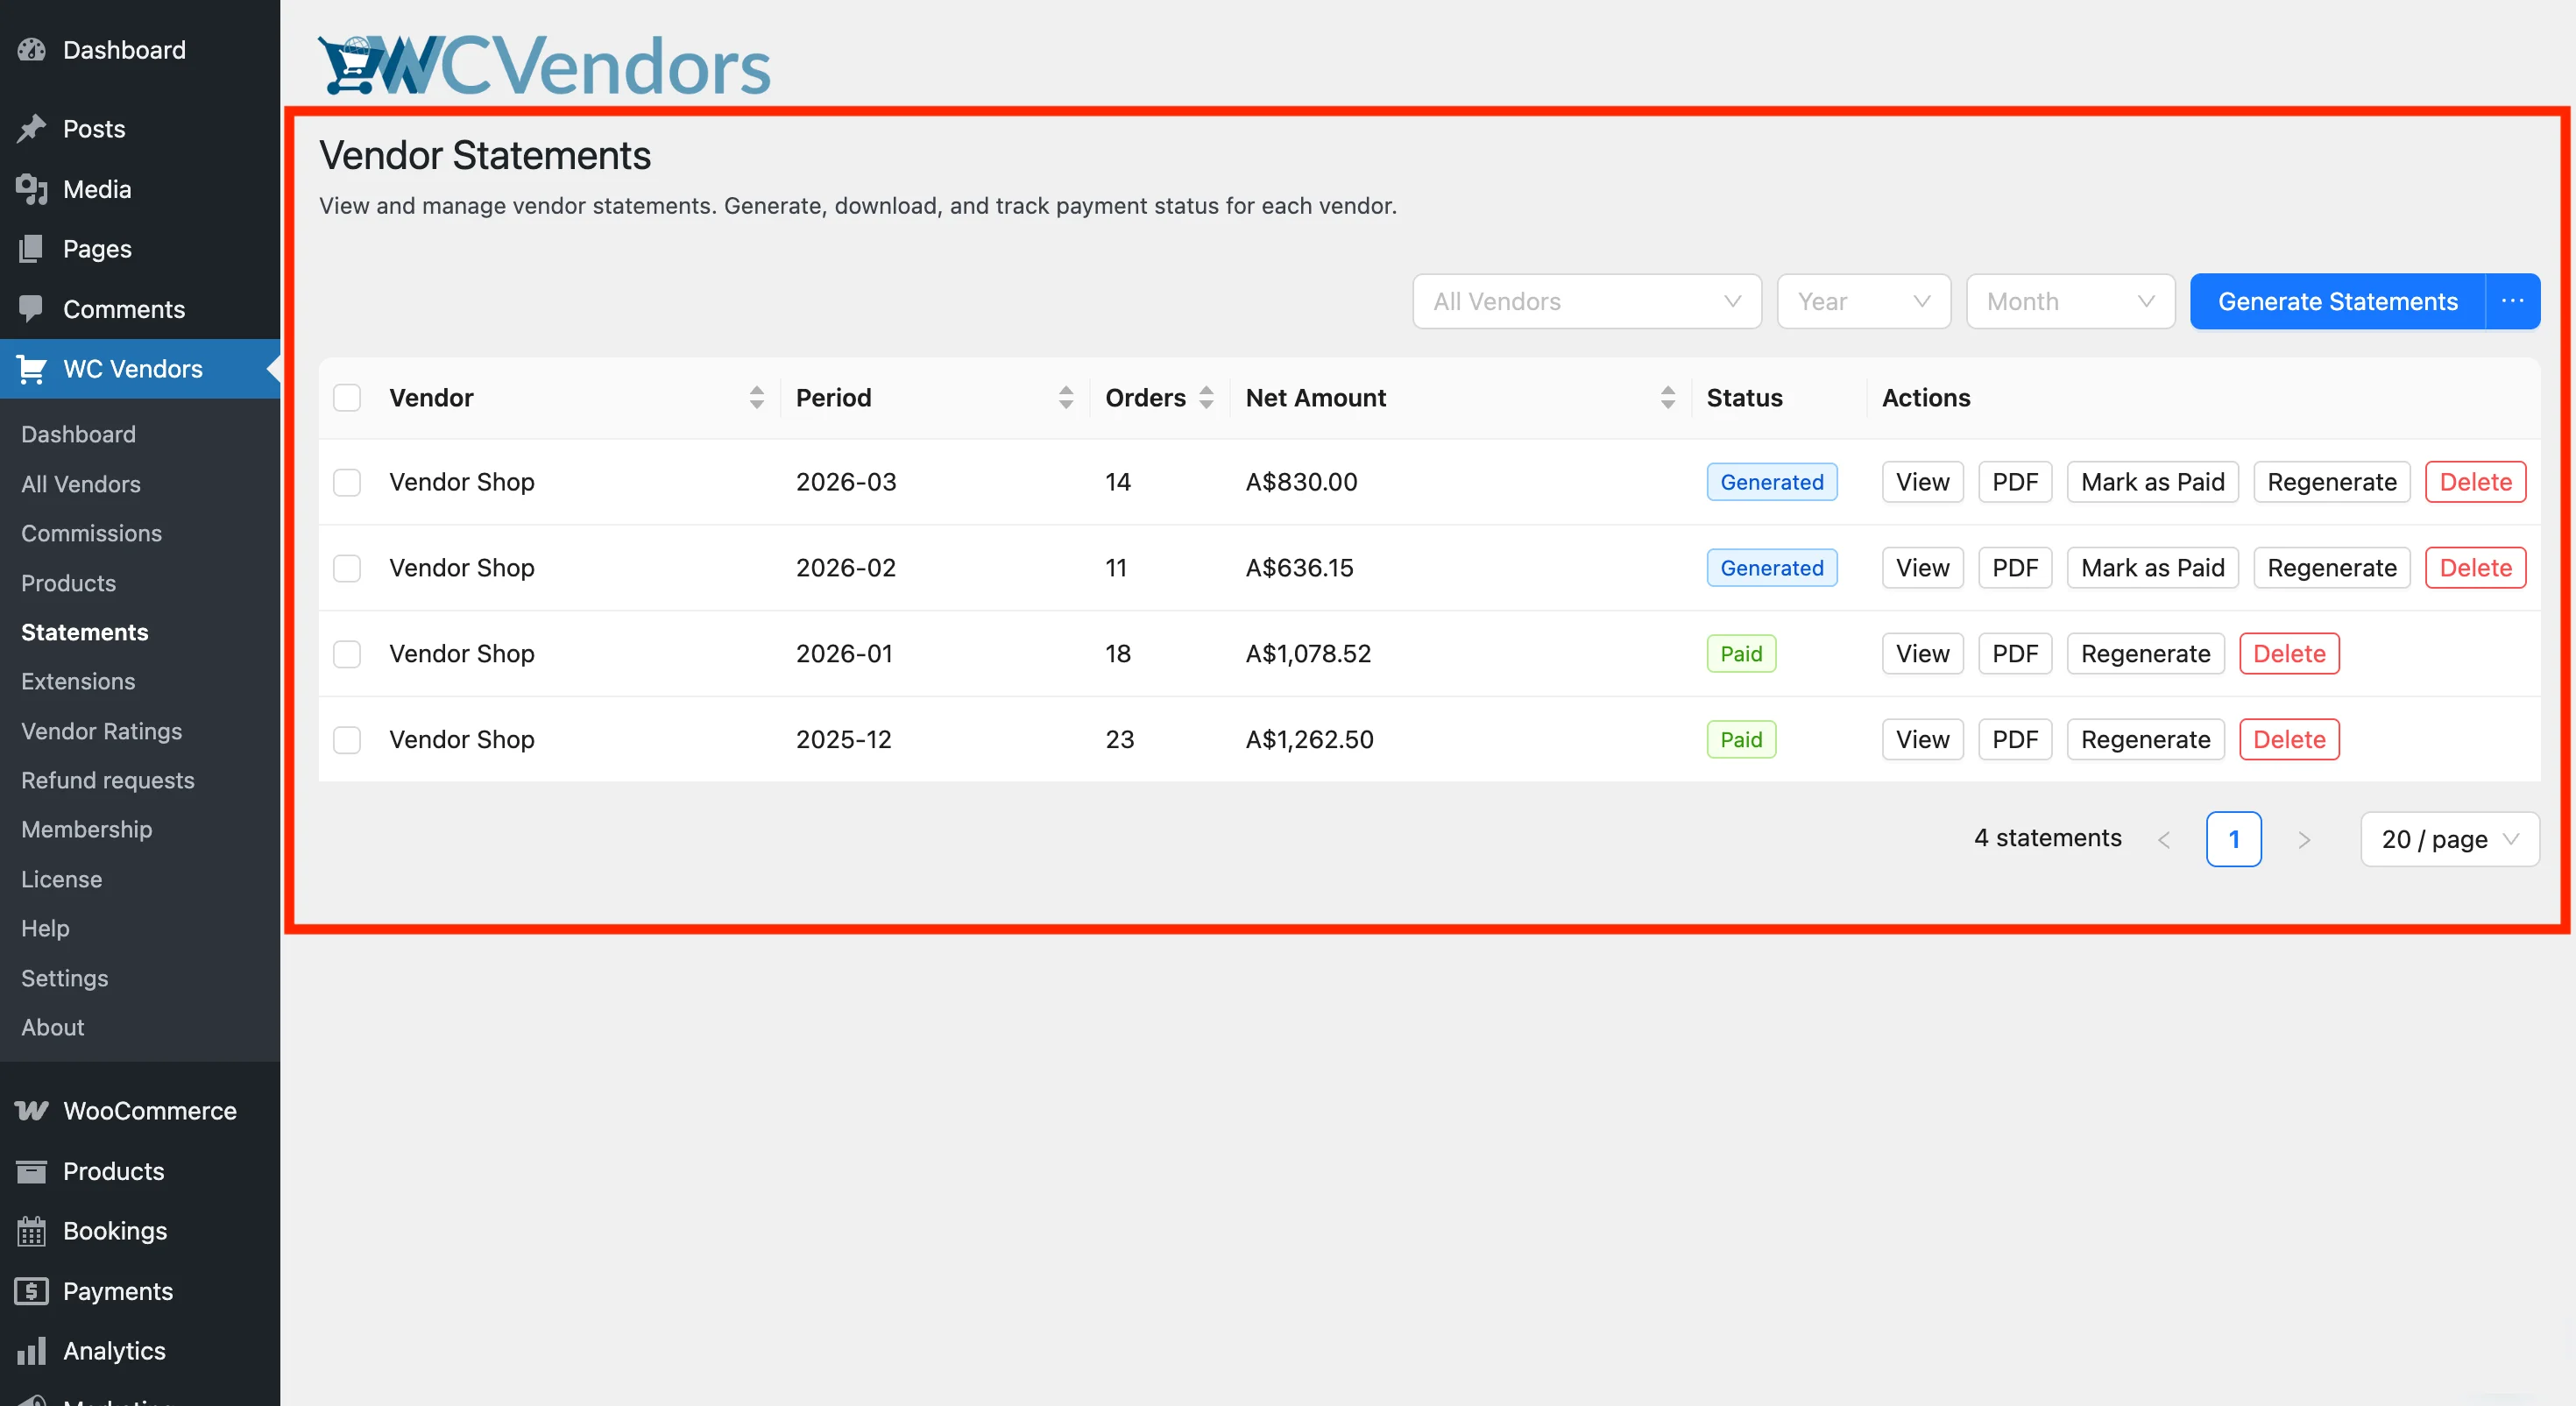
View a statement’s details
Click View on any row to open a side drawer with the full financial breakdown: gross revenue, commissions, tax, shipping, refunds, fees, and net payable.
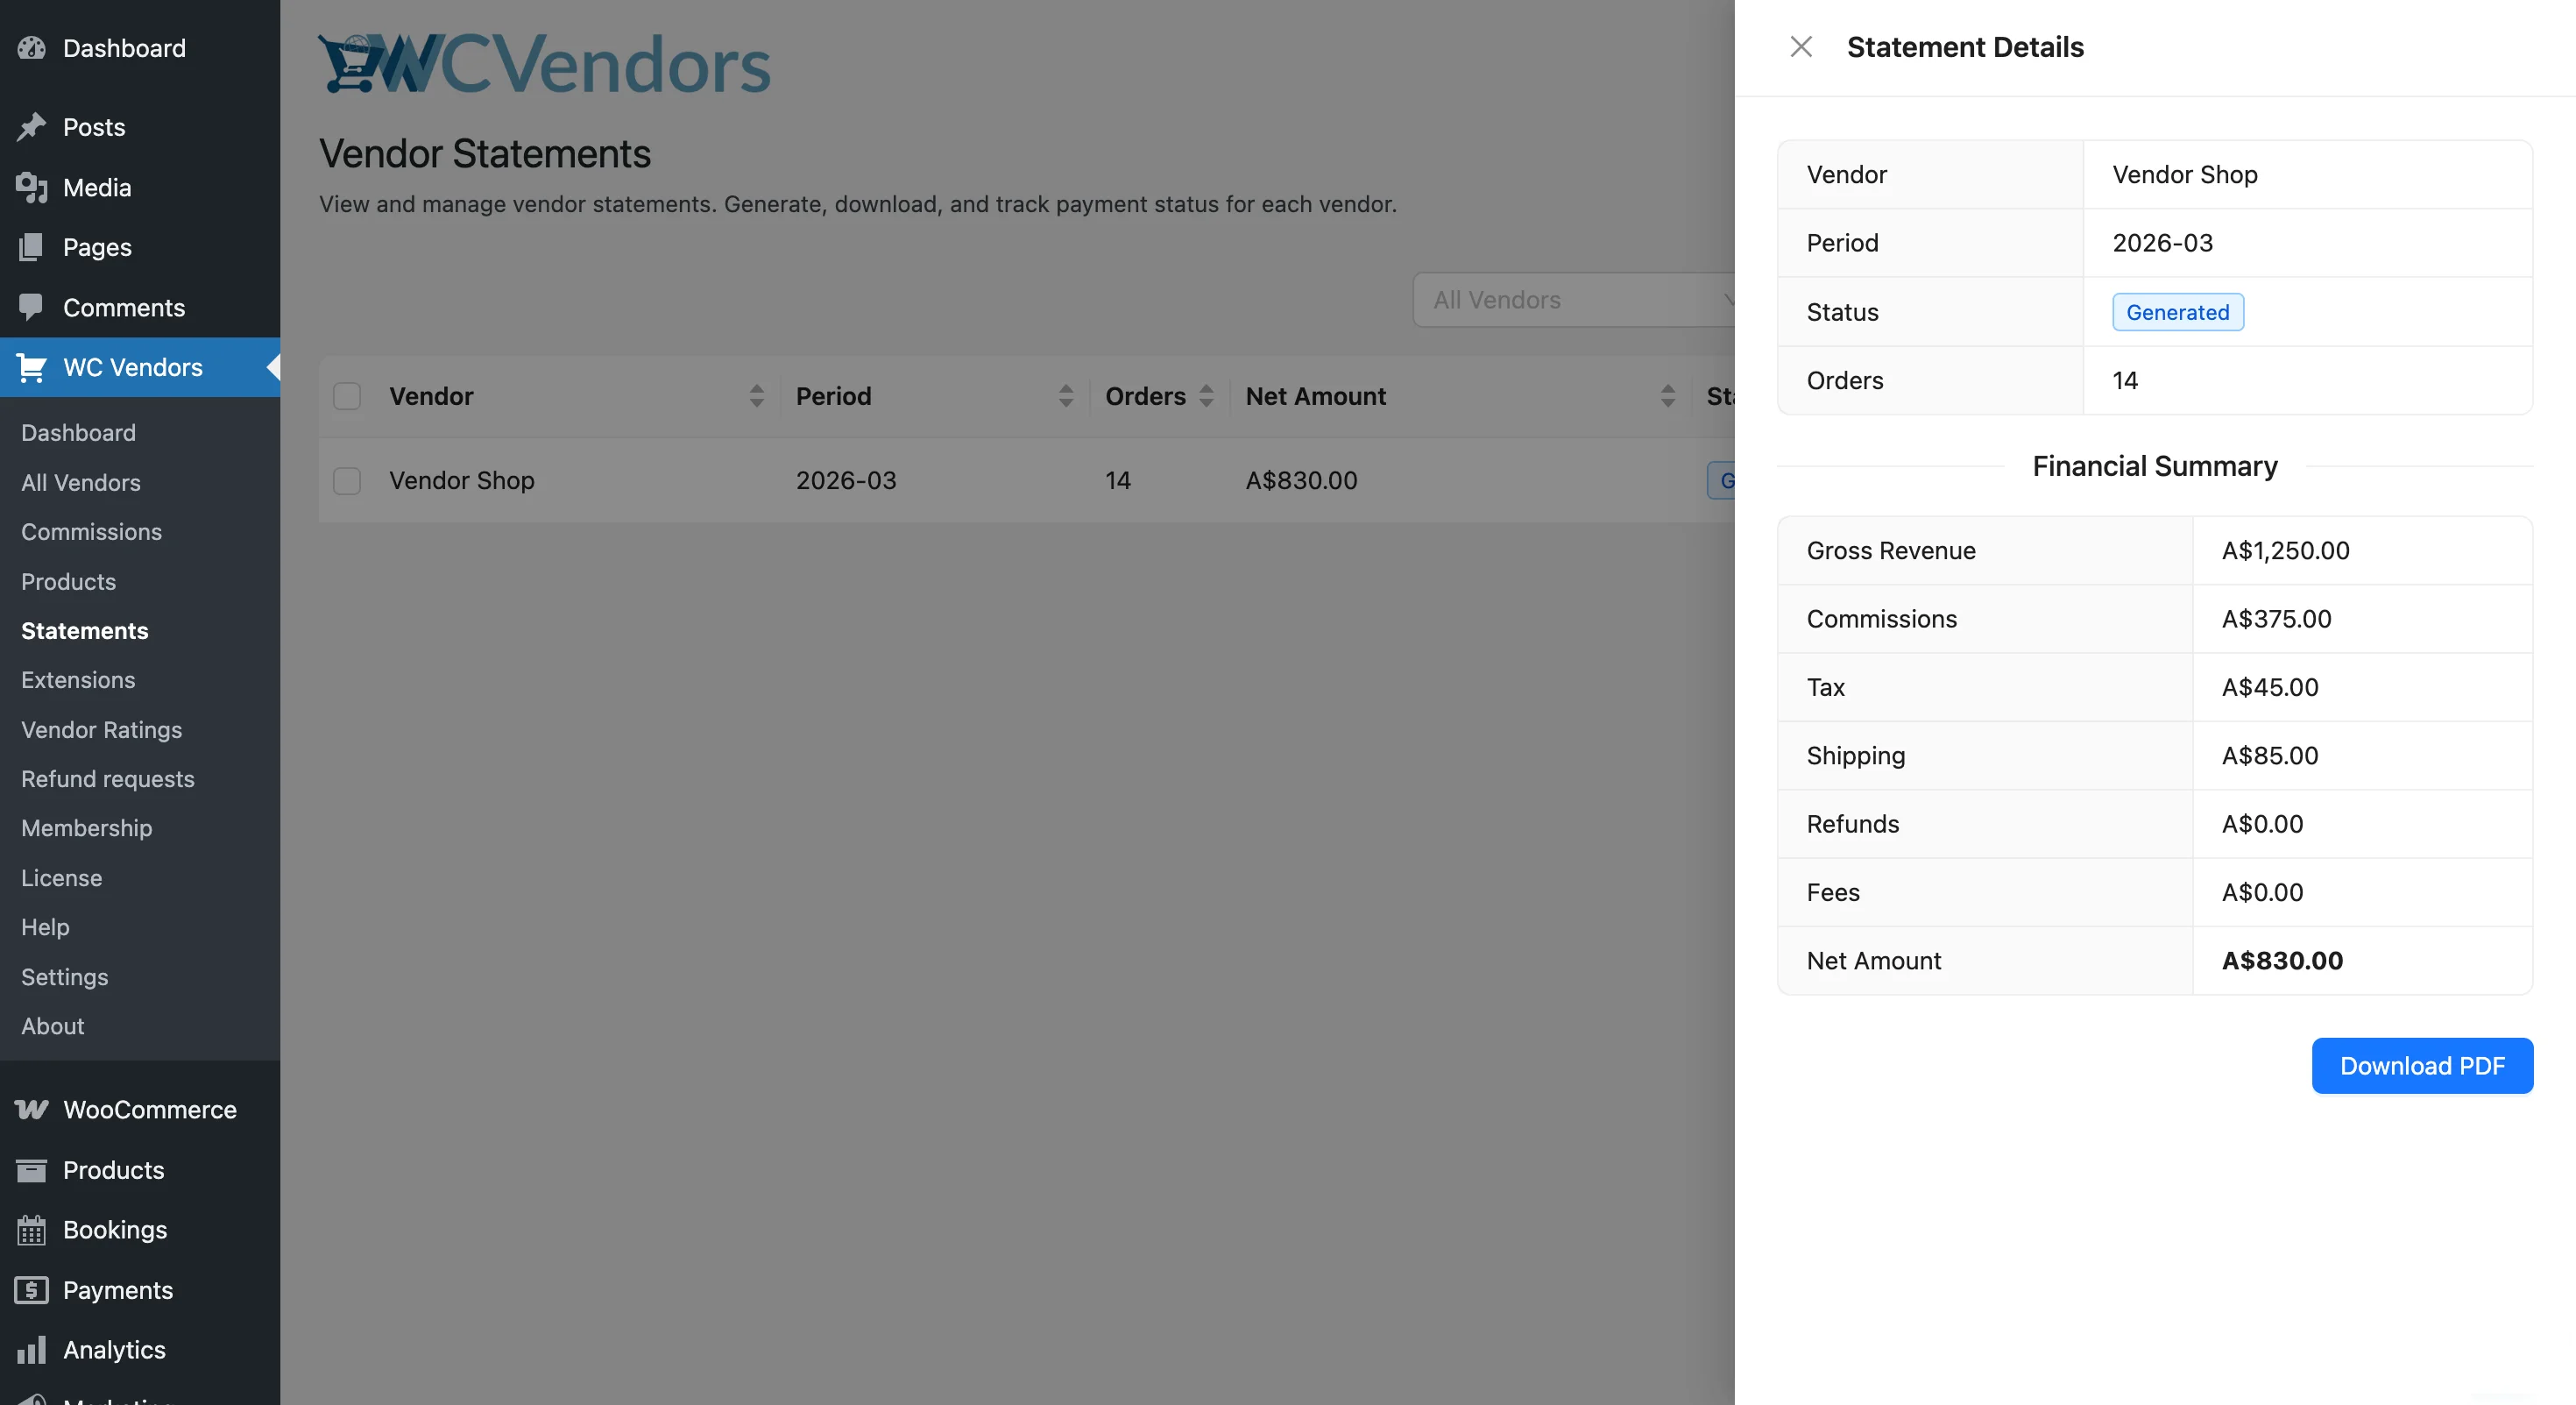
Mark a statement as paid
Once you’ve paid a vendor, click Mark as Paid on their statement row to update its status. To update several statements at once, check the boxes next to them and use the bulk Mark as Paid action.
Regenerate a statement
If orders were added or corrected after a statement was generated, click Regenerate on that row. This overwrites the existing data with a fresh calculation. You’ll be asked to confirm before it runs.
Download a PDF
Click PDF on any row to download a printable PDF copy. The PDF includes the vendor’s name, the period, and the financial rows you chose in Step 2. Keep it for your records or share it with the vendor.
Delete a statement
Click Delete on a row to permanently remove a statement. This can’t be undone. You can regenerate the statement later from the same month’s data, but it comes back as Generated, not Paid.
What vendors see
The Statements tab in the vendor dashboard
Vendors can view their own statements from their vendor dashboard. The Statements tab lists each monthly statement with the period, number of orders, gross revenue, net amount, and status (Processing, Generated, or Paid).
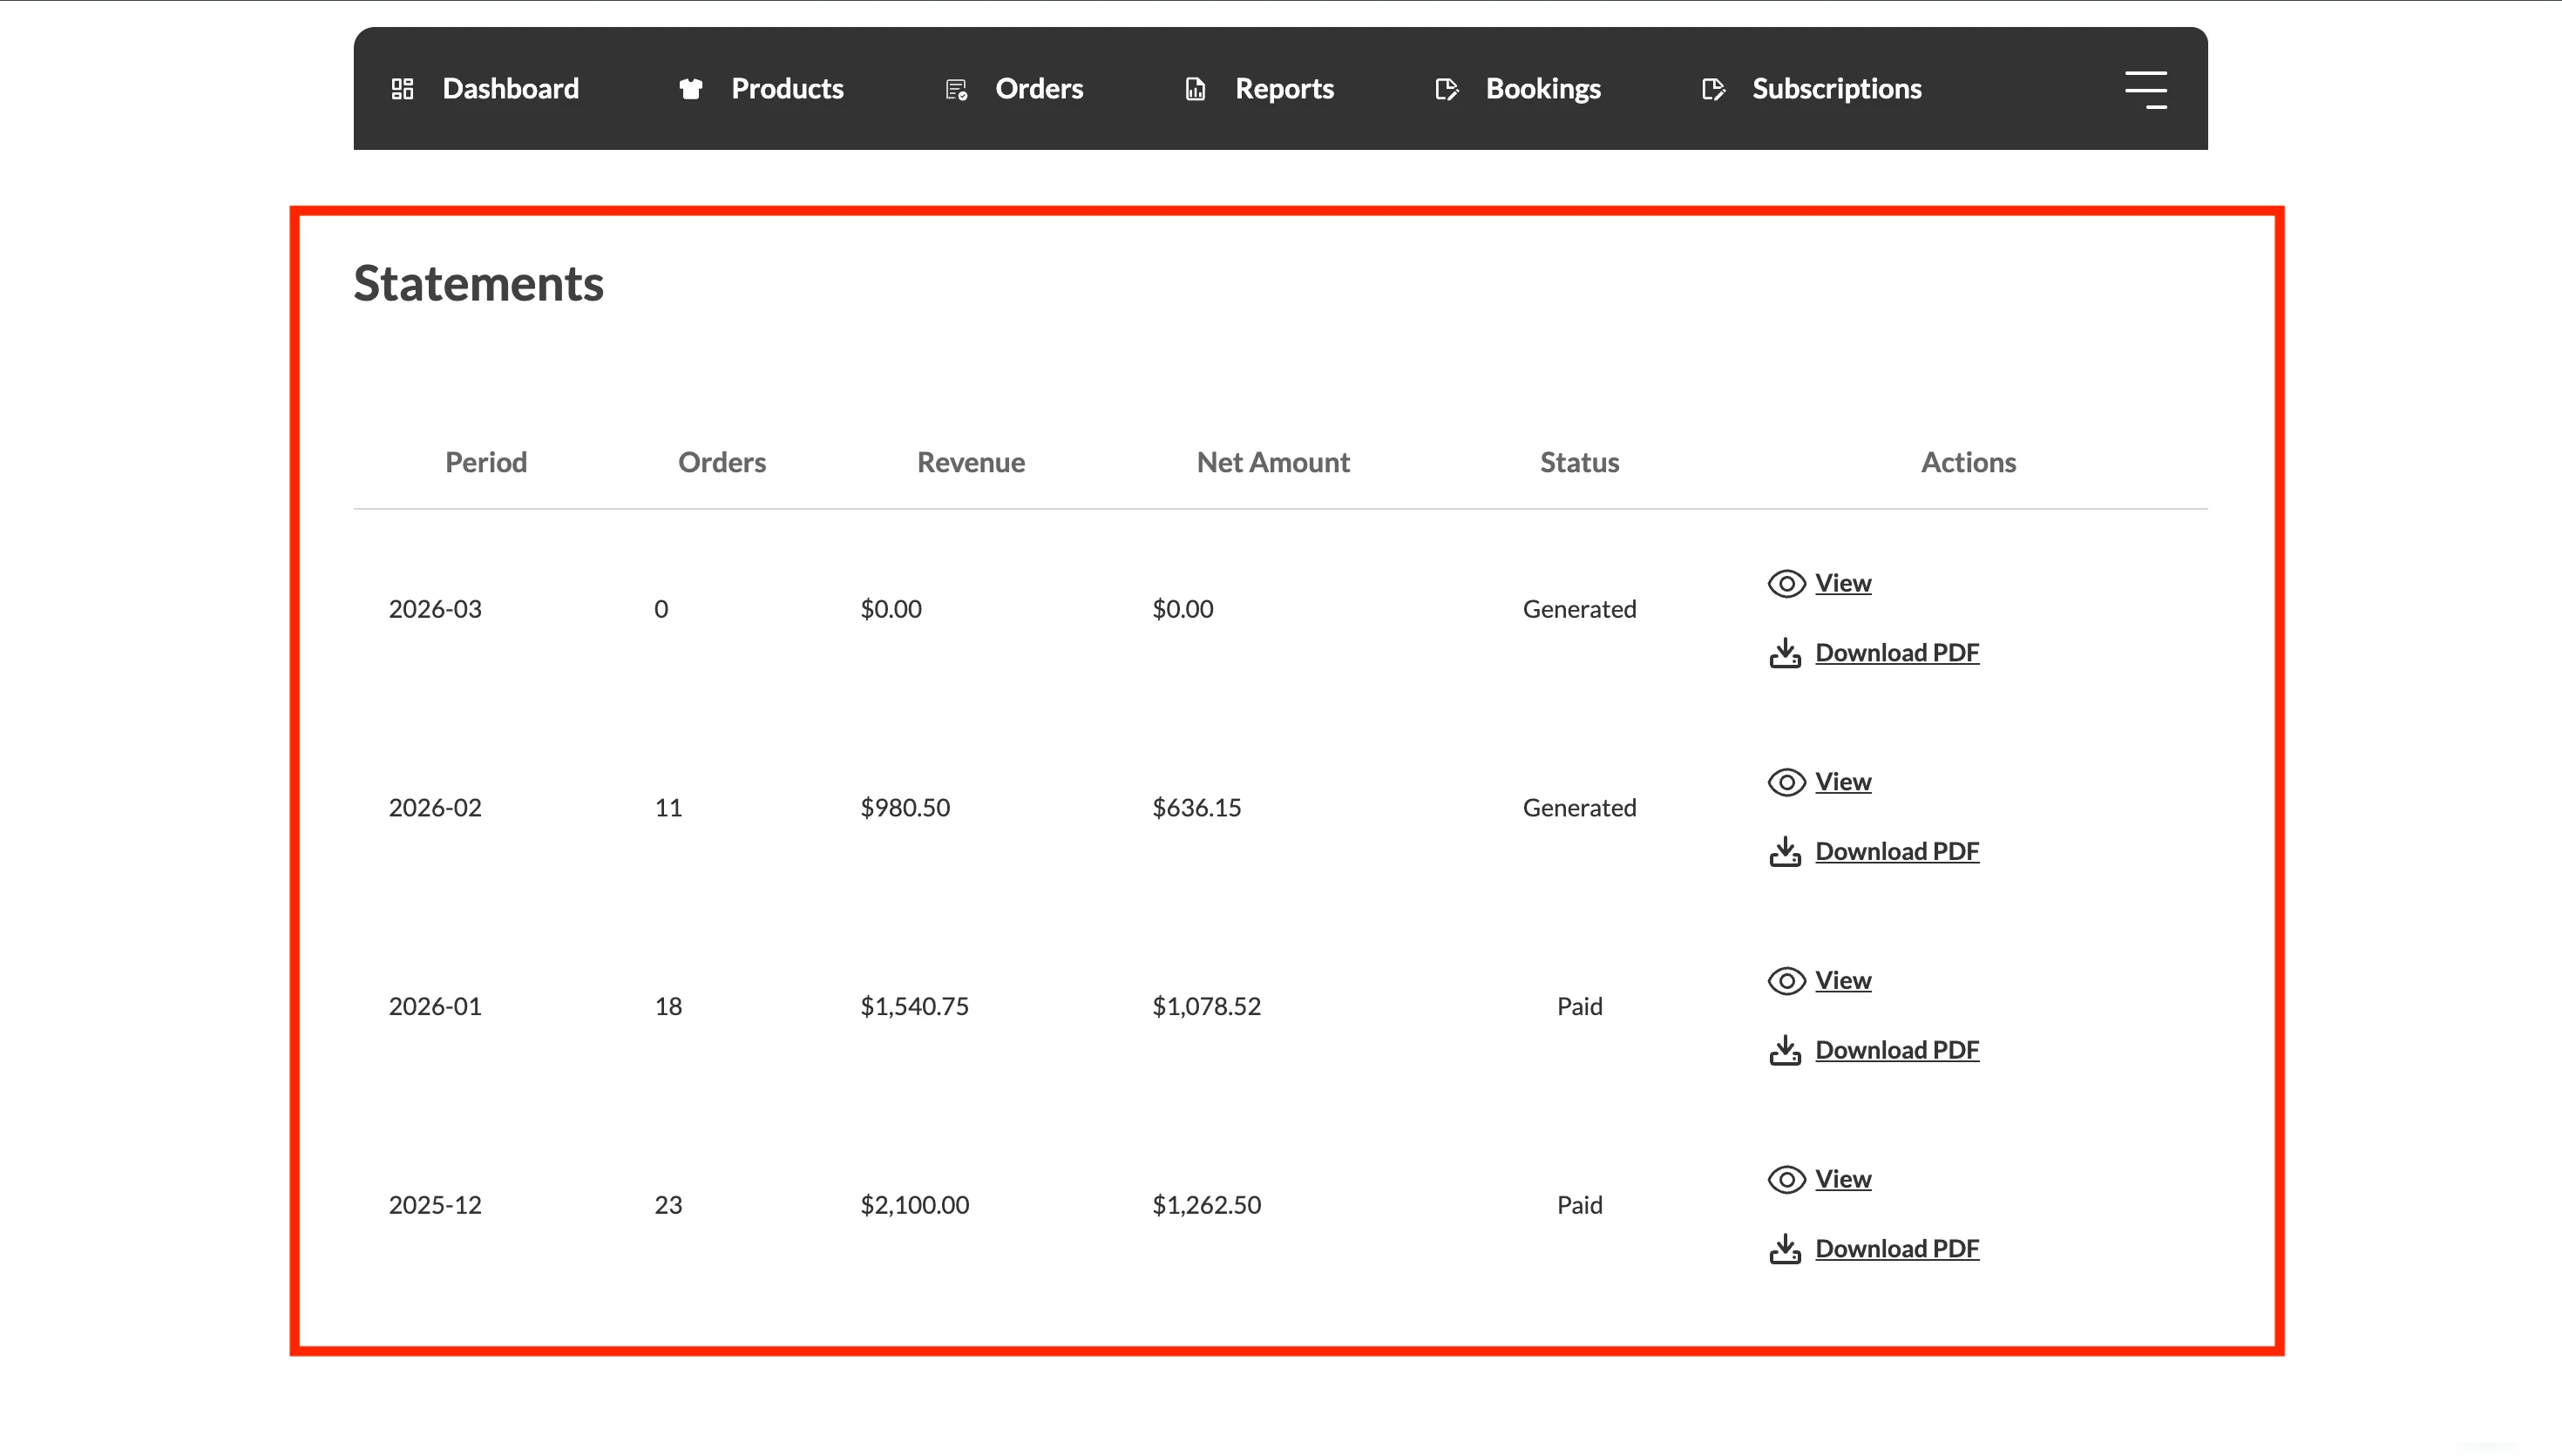
Clicking View opens the statement detail page, which shows the financial breakdown and the final net payable amount. Vendors can click Download PDF from this page to save a copy for their records.
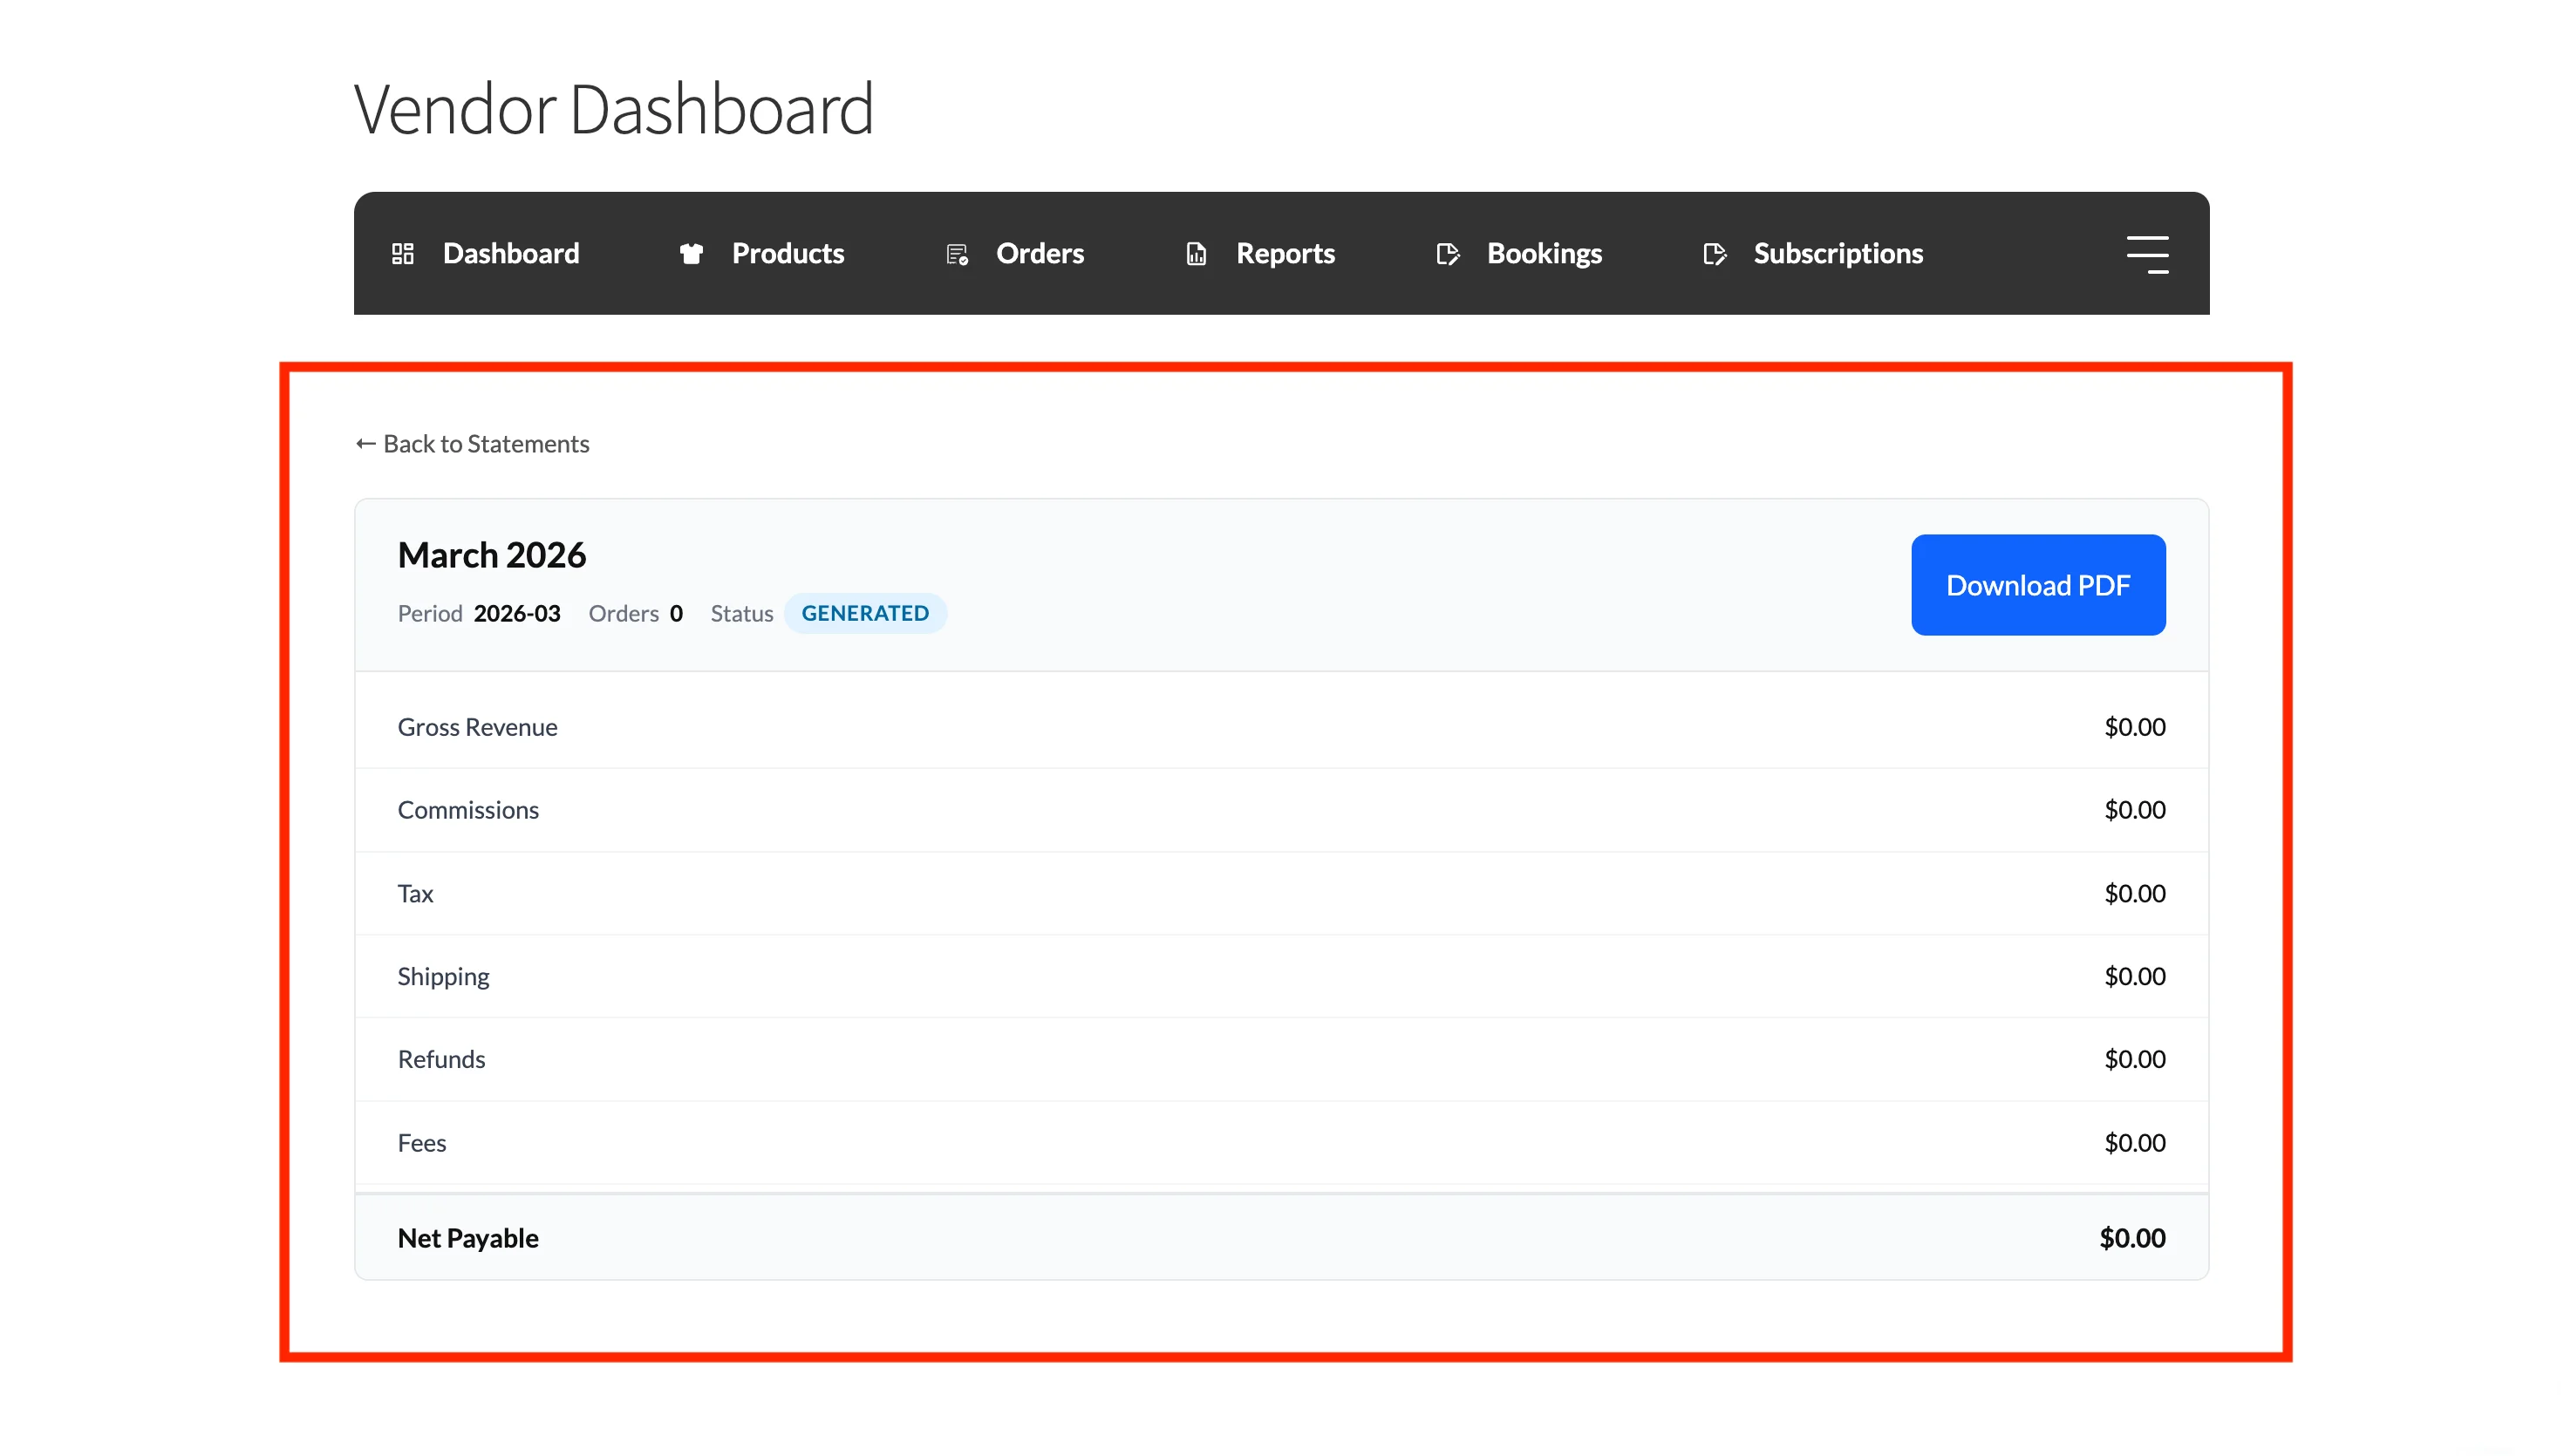
Generate a statement from the dashboard
When Vendor Self-Generation is on, vendors can create a statement for a month themselves:
- On the Statements tab, click Generate Statement.
- Choose the Month and Year.
- Click Generate.
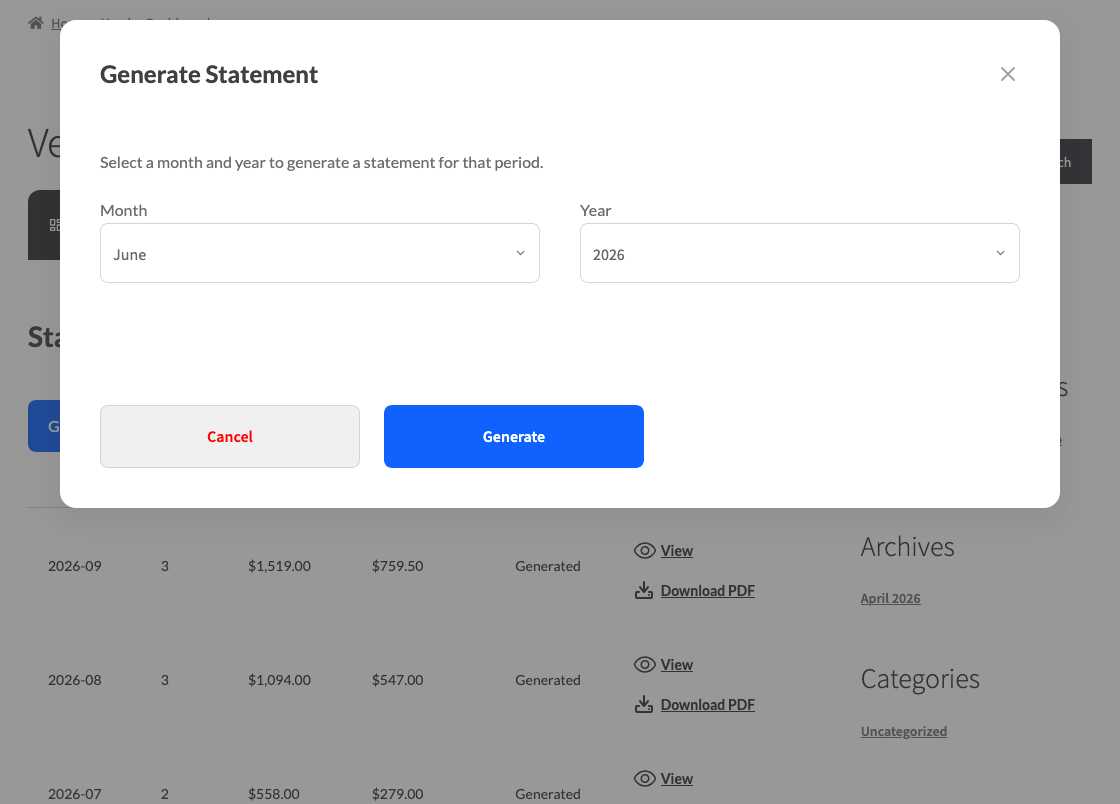
The statement appears in the list shortly after. Vendors can pick the current month or any past month, but not a future one. A statement the vendor generates is always created, even with Only Generate For Vendors With Activity turned on. Deactivated vendors don’t see the Generate Statement button.
Vendors left out of statements
From WC Vendors Pro v2.1.0, a vendor that Statement Recipients leaves out loses access to new statements. What they see depends on whether they already have statements:
| Vendor | What they see |
|---|---|
| No past statements | No Statements tab on their dashboard. |
| Has past statements | The Statements tab stays, with the notice “Your store no longer receives new statements. Past statements stay available below.” They can still view and download past statements, but the Generate Statement button is hidden. |
Left-out vendors also don’t receive the statement email. When Enable Vendor Statements is off, the tab is hidden for every vendor, whatever the recipient setting says.
The statement email
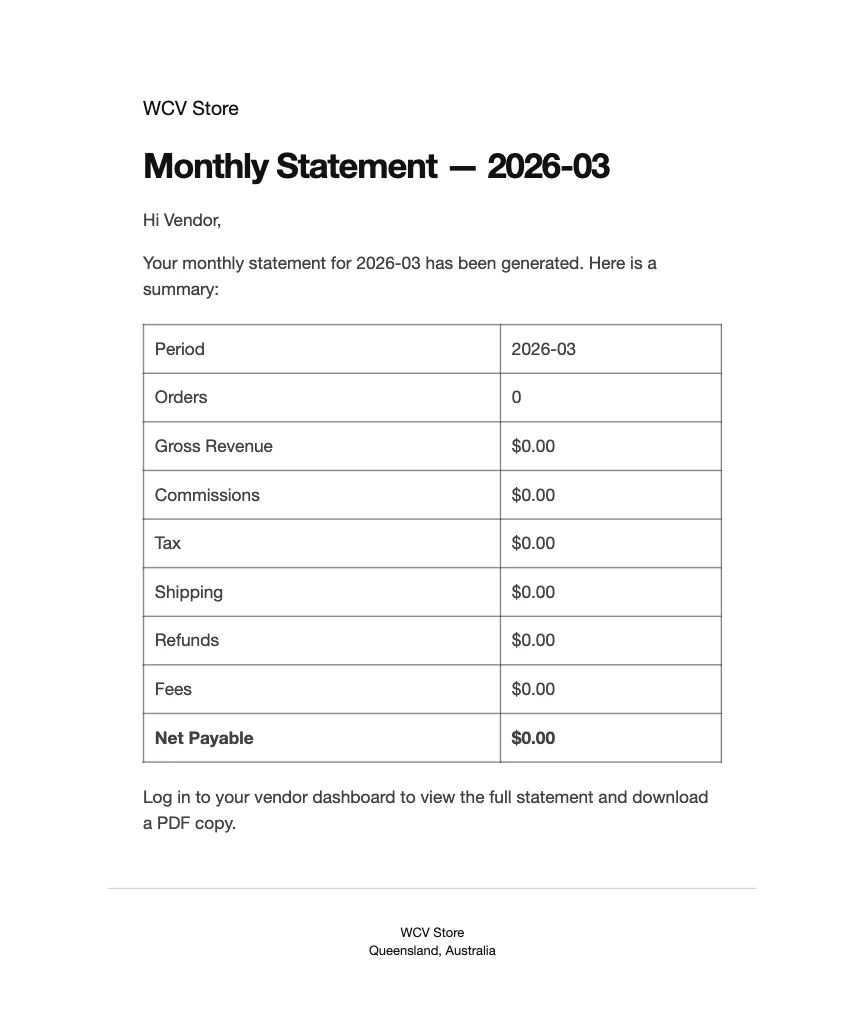
When a statement is generated and email notifications are turned on, the vendor receives an email with the subject “Your statement for 2026-04 is ready”. The email contains a financial summary table and prompts the vendor to log in to their dashboard to view the full statement and download a PDF.
Troubleshooting
Statements didn’t generate on the 1st of the month.
Confirm Auto-Generate Statements is checked under WC Vendors → Settings → Statements. Then go to WooCommerce → Status → Scheduled Actions, search for wcv_generate_monthly_statements, and check it’s queued for the next run. If the action is missing, reload any admin page and search again. The plugin adds it back on each page load while Auto-Generate is on. If the action is there but past due, scheduled tasks on your site aren’t running. Ask your host to check WP-Cron.
Some vendors got a statement but one didn’t.
Open the Vendors tab under WC Vendors → Statements and check the vendor isn’t set to Never. Then check Statement Recipients includes them, and that the vendor isn’t deactivated. If Only Generate For Vendors With Activity is on, a vendor with no orders, refunds, or commissions that month is skipped.
No vendor gets a statement in “Selected Vendors only” mode.
Add vendors to the Selected Vendors list and save. With the list empty, this mode generates nothing.
A vendor didn’t receive the statement email.
Confirm Email Notification is checked under WC Vendors → Settings → Statements, and that Statement Recipients includes the vendor. Also check that Vendor Statement Ready is enabled under WooCommerce → Settings → Emails. Then check that your store’s mail-sending is working (SMTP plugin or host mail), and verify the vendor’s account email under Users → All Users.
A vendor can’t see the Statements tab.
Turn on Enable Vendor Statements under WC Vendors → Settings → Statements. On v2.1.0 or later, also check Statement Recipients: a left-out vendor with no past statements doesn’t get the tab.
A vendor can’t see the Generate Statement button.
Turn on Vendor Self-Generation under WC Vendors → Settings → Statements. The button is also hidden for deactivated vendors and, on v2.1.0 or later, for vendors that Statement Recipients leaves out.
Statements exist for months when Auto-Generate was off.
Those statements were generated manually, by you or by the vendor through Generate Statement, or the setting was on at the time.
Statement data is missing recent orders.
Click Regenerate on that row to recalculate with the latest data, then confirm. Orders added or refunded after a statement was generated aren’t reflected automatically.
Frequently asked questions
When are statements generated automatically?
When auto-generation is on, statements are created on the 1st of each month, covering the previous month’s orders. So on 1 May, statements are generated covering April. Only vendors included by Step 3 get one.
Can I generate a statement for just one vendor?
Yes. Pick the vendor in the vendor dropdown next to Generate Statements, instead of leaving it on All Vendors, then click Generate Statements.
What data does a statement include?
Each statement covers the vendor’s gross revenue, earned commissions, tax collected, shipping charged, any refunds processed, and the final net payable amount. Order count for the period is also shown. You can hide rows in Step 2.
Does the additional tax change what I pay vendors?
No. It only adds display rows to the PDF, the dashboard view, and the email. The stored net amount stays the same.
What does “Generated” status mean?
“Generated” means the statement has been created but the vendor hasn’t been marked as paid yet. Once you’ve sent the payment, use Mark as Paid to update the status.
Need help?
If you have a question or run into any issues, we’re here to help.
- Premium users: Open a support ticket
- Free users: Visit our community forum